Difference between revisions of "Defense structures"
| Line 2: | Line 2: | ||
{{TOCright}} | {{TOCright}} | ||
| − | + | Basically, players have to fight the same enemy AI programming for each type of hostiles but the approach to it may differ according to gameplay preferences, either face to face for a more combative experience or behind killboxes for a less threatening measure or both combined. | |
| − | |||
| − | + | Raids are frequent and numerous as they don't journey towards your base from their "camp" but just spawn on your map. Enemies don't have to worry about their base unlike players. Because of this disadvantage, additional measures need to be taken into account. | |
| + | |||
| + | ---- | ||
=== Perimeter Wall === | === Perimeter Wall === | ||
Revision as of 13:13, 1 September 2017
Basically, players have to fight the same enemy AI programming for each type of hostiles but the approach to it may differ according to gameplay preferences, either face to face for a more combative experience or behind killboxes for a less threatening measure or both combined.
Raids are frequent and numerous as they don't journey towards your base from their "camp" but just spawn on your map. Enemies don't have to worry about their base unlike players. Because of this disadvantage, additional measures need to be taken into account.
Perimeter Wall
An straightforward and effective but material-expensive way for defending bases, this simply requires erecting a wall surrounding your base. You can use the surrounding hills/ mountains to your advantage by incorporating them into the wall. The wall can delay attackers, or gaps can be introduced to funnel raiders, giving your colonists the upper hand in dealing with raids.
Enemies equipped with most weapons will attempt to break down the wall using melee attacks, even though firing point-blank at it with practically any ranged weapon may destroy it faster. This greatly slows down progress, or even stop it entirely if you have enough repairmen.
They also spread out greatly while doing so, giving your colonists a chance to destroy them one by one.
When they do break through, they will have essentially created a chokepoint for themselves, giving your colonists a chance to concentrate overwhelming fire on them while they get through. They can use the walls as cover, though, so be careful.
On the other hand, enemies with frag grenades will continuously throw them at the walls; they deal heavy damage against structures, meaning that even with the best of constructors and highly durable plasteel walls, they will not hold against constant explosive attacks for long.
Manhunter packs stay outside the walls and won't attempt to break down doors unless a colonist passes through them, so a wall can keep you completely safe in such events.
Always plan ahead when building walls. Take into account base expansion and future plans so you won't have to go though the hassle of deconstructing and rebuilding the walls frequently (unless you want to train your builders).
Multilayer walls
Having 2 layers of wall is more expensive but slows down the raiders even more.
You should not put the 2 layers of wall right next to each other; the outside layer will be inaccessible to your repairmen during a raid. Instead, consider putting a gap between the 2 walls. This allows repairmen to repair both layers of wall from the inside.
You can have even more walls surrounding vital structures, either for defense or insulation, but remember having too many walls can take up precious space which you can use for better purposes.
Having another layer of wall deeper inside base also helps defend against drop podding raiders landing at the edges of the map, if you have expanded to the buildable edges of the map already.
Cover management
Effective cover is an essential part in any defense, being able to negate a large part of any potential damage that can be dealt to your colonists. Enemies can also use cover to their advantage, so you should be careful of that as well.
Low cover do not seem to stack when placed in a double layer.
Sandbag emplacements
If you're short on materials, such as during the start, you won't need to surround the whole settlement with sandbags yet. Just have short walls of sandbags facing the enemy to block any incoming bullets.
You may want to put them near your base to make it harder for enemies to take advantage of them.
If you have perimeter walls you should also have sandbag emplacements in some places behind the walls. Once the raiders break through and storm in, you can have cover to shoot them from.
Perimeter sandbags
An essential defense in a base if you don't want to build killboxes (see below) or the like, this simply involves surrounding your base with sandbags. This provides great cover from gunfire, stopping 65% of the bullets that will otherwise hit your colonists. However this does not protect against explosive weapons.
Pros
- More flexible in terms of positioning
- More complete coverage
Cons
- No protection against explosives
- More expensive than partial coverage, especially in larger bases
Killboxes & Bunkers

If you prefer prolonged firefights instead of taking your enemies out with cheap tricks, then this is for you. This is an early game strategy because all you need for it is walls. First, build a room in an area where you expect enemies to approach from. This room doesn't have to be box-like -- all you need is a place for your colonists to stand inside while they shoot out. Simply build a structure in any shape and then deconstruct a few walls to make some holes -- these will be firing holes for your shooters, where they can use the walls as cover.
Additionally, build a roof for your bunker so that every cell is protected from bad weather like rain and lightning strikes. So, when a raider attack comes and your shooters head to the bunker, they now enjoy not only the full cover bonus from having thick walls between them and the enemy.
To truly finish the bunker, add flooring so your colonists don't have to worry so much about fires while inside.
Pros
- Cheap -- all it takes is whatever materials you use for the walls
- Simple, easy and fun to build -- just make a room and knock out holes for your shooters
- Makes it very hard for your enemies to hit your colonists since they are behind full cover
- You can easily extend this into a full bunker system just by adding more walls and knocking out more holes
Cons
- Should enemies overrun your bunker(s), they can turn the defenses on you to devastating effect
- May require Stonecutting research to get walls that are good enough to withstand sustained fire -- wood and steel just don't cut it
Alternating sandbags
Alternating walls with sandbags can provide even better cover, is slightly cheaper (assuming use of Steel or cheaper materials) and has a chance of blocking explosives. However, depending on the material, the walls may be flammable and also have less health than the sandbags.
The "Fire Wall"
An effective cover design is to alternate 2 walls and 1 sand bag, by doing this you have 3 colonists shooting out of the same hole, 2 behind full cover and one behind low cover. This method can be expanded as long as there is room.

Pros
- Gives excellent cover
- Allows defenders to attack a wide range of targets while remaining behind cover
- Prevents colonists from ganging up on enemies
- Stops some explosives
Cons
- Narrows the attack area, so the attackers must come straight at the defenders
Cover removal
While sandbags already give you an advantage over raiders in terms of cover (65% vs 50%), removing all sources of cover near your base is still very useful when dealing with ranged enemies as they will then have nowhere to hide.
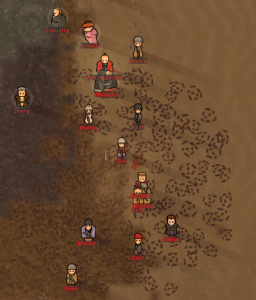
Haul all stone chunks towards a dump behind your defensive lines so enemies can't use them. Enemy snipers can shoot from up to 45 tiles away, though most raiders can't shoot that far, so removing chunks around 30 tiles away from your defenses can deprive most enemies of suitable cover.
Watch out for your crop fields as colonists tend to move and lay out chunks in straight lines, suitable for raiders to take cover behind.
Cover baiting
Once there's no suitable cover nearby, ranged attackers will scramble to find any suitable cover. You can exploit this by placing any form of low cover to attract them to a place where they can be dealt with more easily. Stools work good though you should expect them to wear out quite fast under constant fire.
If the cover is hard to remove (such as plants constantly regrowing in plant-rich biomes) you can manipulate stone chunks in ways that give them a disadvantage. For example, putting gaps between each chunk exposes the enemy behind to fire directed diagonally.
You can put traps behind the bait cover, which makes it slightly easier to trigger, though still less effective than chokepoints.
Damage minimization
The below shows ways to minimize the damage done to your base.
Firebreaks
4-tile wide strips of any kind of artificial floor is capable of stopping the spread of fires. This can negate many fires from reaching your base and burning it down.
You can build one surrounding your base, and divide the map into sections in order to control fires.
Keep in mind that building such amounts of floors usually requires huge amounts of building materials.
Walling structures

If you don't plan on building an entire perimeter wall, you can simply build a wall around your important structures, such as generators, power conduits or crops. Raiders will prioritize other targets over these, averting destruction.
For geothermal generators, remember to have some exposed roof areas so the heat from the generator can vent out instead of being trapped inside.
Armament racks
Ideally colonists should be equipped with weapons 24/7 so in case of threats you can instantly draft them to fight or defend themselves.
However, armor may slow down colonists and may cause them to have reduced work speed.
You can put shelves in convenient areas which hold armor. When anticipating a fight you can have colonists go to the shelves to grab an armor vest to protect themselves from gunfire. Afterwards you can have them remove the vest and return them to the shelf.
Chokepoints
Chokepoints allow your colonists to concentrate firepower, killing incoming attackers effectively, as well as utilize traps to their maximum potential.
At its simplest, it involves the use of a single opening in a wall, coupled with a location for colonists or turrets to fire and beat them, sometimes with traps to catch some of the unaware attackers.
If the chokepoint is straight, remove all potential source of cover nearby, such as trees or rubble, so raiders can't shoot into the chokepoint. They can still use the walls of the choke as cover though.
A strategy is to litter the choke with sandbags or rubble, greatly slowing down the raiders and giving you time to deal with them. They also prevent raiders from standing on them, forcing them into your defenses.
You can concentrate fire on a crafting spot or animal sleeping spot placed right in the entrance with miniguns to rip incoming raiders apart.
Slowing tunnel

One early-mid game tactic to slow down your enemies is by (possibly using mountains to help) creating a narrow strip between your colony and potential areas where raiders could attack from, then alternating sandbags or debris with unoccupied space, close to the exit of the strip (the end closer to your colony obviously).
To stop them from using the chunks or sandbags to their advantage, build a turn to break their line of sight.
Don't put sandbags or chunks right next to each other, otherwise they will simply vault over multiple bags at once, reducing their slowing efficiency. An excessively long tunnel also prompts them to break in instead of entering through it.
Pros
- Fairly cheap
- Easy to build
Cons
- Does not deal damage on its own
- Short slowing time
Turrets
With the low firepower and high power usage of the improvised turret in vanilla, it is not a good idea to extensively rely on them, especially in mid-late game. However they do provide decent additional fire to lay on the enemy combining with gunners, and also serve as a distraction from your more valuable colonists.
Turret-reliant perimeter defenses are generally only viable for the first several raids, after which the areas will quickly get overwhelmed each raid due to not being able to focus fire on the numerous raiders.
While protecting the outside starting area, you may want to rapidly pause the game during raids and give orders to repair damaged turrets.
Remember that raiders will run from exploding turrets, and to get your colonists to run from them as well.
Turret emplacements
Turrets should each get their own sandbags to reduce incoming fire both to the turret and colonists behind the turret repairing/shooting. This has the added advantage of making it harder for raiders to run from an exploding turret.
They should be spaced out to prevent a turret explosion from damaging other turrets, potentially causing a chain reaction. Alternatively, use high-durability walls to block explosions from damaging other turrets and your colonists.
Turret chokepoint
Putting a turreted defense in a chokepoint with a narrow entrance and wide turreted area is best because it forces the raiders to take a single-file approach to where all the turrets will be able to fire on them.
There should be more than one line of turrets so that the innermost line or lines can be used to position colonists where they are not immediately under threat from grenades (grenadiers will target the closest turrets first) or if colonists are positioned closer so they can repair, to retreat colonists further back when turrets are about to be or have been destroyed. Every line of turrets should have a line of sandbags directly in front and every supporting wall/rock should also have sandbags to lessen the likelihood of collapse due to collateral damage.
Turrets should not be placed directly (within three tiles) next to other turrets for the same reason, as they have a chance to explode when critically damaged. Placing walls between the turrets can lessen the impact of explosions, allowing you to put them tighter, but remember walls can block line-of-sight and bullets.
Power management
Turrets should be turned off whenever not in use. However, it's hard to anticipate when they will be needed, given the random nature of events in RimWorld, and turning them on by them is usually too late.
To fix this, connect your turrets to a separate power network, reconnecting them if needed. To toggle them all at once, install a power switch in a convenient location. The power switch can be then used to easily toggle a lot of turrets at once, saving power.
Weaknesses
Turrets are vulnerable to explosions and EMP damage.
- Explosives deal immense damage to turrets. All forms of regular explosives wielded by raiders are capable of 1-hitting a steel improvised turret and leaving a plasteel one at less than half health.
- EMP stuns the turrets. Enemy EMP grenadiers can stun a turret for 20 seconds with each grenade, meaning they can constantly lock down multiple turrets, especially those put close together.
Long-ranged gunners can shoot from outside their range without retaliation from the turret.
Traps
You can lay different kinds of traps to provide a nasty surprise for any incoming raiders.
Trap memory
Raiders will remember where you put traps, and they have to walk over the trap to trigger it, so once a trap is triggered it is unlikely that it will be triggered again (without the help of funneling). Trap memory is per faction, and doesn't apply to other factions -- if, say, the Vipers of Power come in and sets off your traps, then they would remember that. But, if the Rippers of Fire later attack, they won't have that knowledge and will still set off the same traps. It also only applies to humanlike raiders.
Trap memory activates if a raider survives to escape the map. It lasts for 1 quadrum, and is recorded per tile trapped- that is, they remember where you put traps and will avoid those places if possible, even if they are no longer trapped.
IED traps
Early on, you may want to focus on armed colonist defense with turrets, but as the raiders grow in number, it becomes more efficient to use a bit of metal to kill several at once than to invest a lot of metal in a turret that costs nothing to fire, but will explode rapidly due to large raider groups.
IED traps are extremely effective when used correctly, however in open areas they are mostly useless as the raiders are highly unlikely to step in any of the traps, and even if they do they're not tightly packed enough for the trap to cause serious damage. Thus, it is better if you combine traps with funneling to force the raiders together.
1 IED trap can trigger other IED traps in its explosion radius. This may or may not be desirable depending on the situation; you can easily set of a chain reaction to destroy a whole incoming raider horde, but also use up much more resources.
IED traps have a delay before exploding, allowing some raiders to escape. Raiders will attempt to run from an exploding trap, though the fuse is short enough to catch some of them.
Deadfall traps
A reusable trap that deals heavy damage on a single target. It can severely injure, maim or kill incoming raiders with ease, especially if you use a better material like steel or plasteel.
Where the trap hits is dependent on luck; if you're lucky the trap will slice off an unlucky raider's head in 1 clean blow, while if you aren't the raider will have its ears, eyes, nose and limbs chopped off, before finally taking the fatal blow. Even when made with plasteel, it usually takes 2 or more traps to kill a raider. Shields block damage from the trap, so shielded raiders will need more traps to kill or down.
The trap takes time to rearm, and if you have a lot of these traps, it will take ages to rearm without enough colonists. You will have to prioritize rearming traps so they will be ready for the next raid, especially if they come very often.
They can be placed in a checkerboard pattern in chokepoints to allow friendlies to harmlessly bypass them while still causing them to be triggered by passing raiders.
Placement
The trap is useless in open space, being only able to hit 1 target and requires being walked over to trigger.
Combine with funneling, and it becomes a scary trap to face up against. Despite knowing where the traps are, they are still inclined to walk over them to get to you, meaning that the trap is effective even when its position is known.
Materials
Steel is the best material if you are looking for damage. Plasteel deals higher damage, but that is usually overkill, and plasteel is significantly more expensive and harder to come by.
Wood, on the other hand, is extremely cheap, however it does not hurt much, especially against shielded enemies which can trigger 2-3 of these before their shields are broken.
Roof trap
This clever trap is simple to set up and hard-hitting when triggered. It can be considered a giant single-use deadfall trap.
All you need to do is to erect 1 pillar made of a low-HP material, optimally wood, then build a roof over it. When raiders walk near the pillar, demolish it from a distance with a few long-range guns (or grenades if you're reckless). You can remove the home area near the pillar to prevent colonists from repairing it, then damage it until it can be destroyed in 1 hit.
After the pillar is destroyed, the roof will fall, crushing the raiders on the head, neck or torso and dealing up to 20 damage (though armor will negate part of it).
You can even put down some form of low cover such as stools to bait the enemy into going under the roof trap for 'cover'.
Triggering an IED trap near it is also very effective, with the advantage of being automatically triggered and dealing even more damage with its explosion.
This is technically more of a clever use of game mechanics than an actual trap, so raiders won't detect it, nor will they treat it as a trap.
Pros
- Large radius; easily injures a sizable group of raiders at once
- Penetrates shields
- Low cost; only 5 wood each for a single use
- No risk of friendly activation
- Undetectable by raiders, and position will not be remembered
Cons
- Hard to trigger; you may need to lead your targets
- Low damage
- Rarely kills or incapacitates
- Cannot be used with killboxes easily
It is optimal for softening a group of raiders so it's easier to defeat them.

Roof trap before triggering.
Roof trap after triggering, having injured some raiders (some through shields) and left a large pile of rubble.

More refined roof trap design with stools to lure the enemy into using them as cover, along with an IED trap to automatically trigger the trap. Significantly more expensive.


Mountain trap
An extreme version of the roof trap using overhead mountains instead of constructed roofs.
To use it, you mine out a whole mountain except a pillar in the center. Then you damage that pillar until it has just a sliver of health left (40 or less for easy activation with a single sniper rifle shot). Mining out all the rocks at once will result in your colonists getting crushed by the trap.
It is triggered the same way as the regular roof trap, and has the same effect radius except victims are instantly killed and buried. The collapsed rocks spawned after this trap is triggered can be useful or harmful depending on the situation.
Rearming it is a lengthy process as you will have to mine out lots of rocks. This does provide a decent way to train miners though.
Pros
- Instantly kills any enemy
- Leaves no corpses
Cons
- Takes much longer and is more dangerous to re-arm
- You have to mine out everything then support the mountain roof with low-HP wall; compare with regular roof trap which simply requires building the wall and the roofs
- Colonists risk death if you aren't careful
- No loot or capturable downed raiders
- Overhead mountains may not be easily available
In mountainous areas where overhead mountains are abundant, this trap can absolutely destroy any incoming raids, especially when combined with funneling.
Trap chokepoints
Deadfall traps are available to you from the start of the game even if you start off as a tribe. Though they can be costly to make in large numbers, if you have lots of wood or steel on your map you can start producing them early.
The main point of this defense is that you build a perimeter wall. Leave an empty tile or two on the wall as exits as needed and then you build a second wall segment 7-11 tiles long just in front of the empty tiles. These segments will have a door at the same spot as the hole behind them. Then, you fill up the space in-between with traps like so:
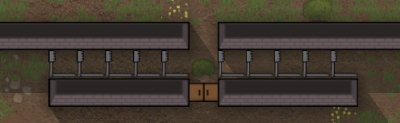
Trapped entrance with colonists and attackers entering from below. For larger chokes it's not recommended to use wooden doors.

Due to how the AI works, your colonists will prefer to move through the door, thereby always avoiding your own traps, whereas any enemies will prefer to go around the wall segment straight towards the open entrance, leading them into your line of traps. 5-6 traps, even if made from wood, are usually enough to kill or severely wound an enemy. If you can afford to make them out of steel or better, you can expect an assaulting enemy force to take heavy losses by the time they make it through your traps.
Pros
- Can often single-handedly rout early raiders without your colonists ever being in danger
- Traps can be rearmed any number of times, making this method economical in the long run
- Can be expanded to include even more traps if needed
Cons
- High resource cost can make it unfeasible on resource poor maps
- If the entrances are very far from where the enemies approach from, they might choose to attack your wall instead
- Not good at dealing with large crowds or shielded enemies
- Cannot delay enemies very long
"Attention Suppressor"

Once you have lots of bulk materials, but don't have enough industry to build proper defenses, you can build an attention suppressor out front of your basic defensive line. This is usually out of wood, although the flammability of wood is a problem.
Start like you're making a 29-wide room, but instead of doors, just leave one-tile openings at opposite ends. That way it doesn't get a roof. If needed, use a no roof area. Down the middle of the attention suppressor leave an open path, which will actually be traveled by your colonists. Pack the sides with alternating walls, leaving numerous blind alleys branching off the open path. The attention suppressor should look like two giant combs facing each other across the path, or perhaps like a cutaway of an especially-blocky sound suppressor.
A raider entering through an attention suppressor is presented with numerous blind alleys, each one of which could hold something important (in their perspective). Raiders will typically only resist the lure of a dozen or so blind alleys, after which they'll turn off into a blind alley to look for something to attack. In many cases they'll attack the walls, but the general effect is that a raiding force will spend a long time milling around in the attention suppressor, deeply distracted, and slowly trickle out of it toward your base alone, or (for a large raid) in twos and threes. This slow trickle of raiders is easily handled by a few colonists with basic weapons, or later a few turrets and a repairer.
Colonists and visitors with specific business on one side or the other of the attention suppressor will go quickly down the middle without being distracted. However, colonists pursuing joy activities like going for a walk will usually be diverted to do so in the blind alleys of the attention suppressor. As a result, it's not safe to fill with deathtraps.
Pros
- Effectively distracts and delays raiders
Cons
- Does not deal damage
- Takes up large amounts of space
- Expensive and time-consuming to build a lot of walls
- Makes it harder to eliminate all raiders at once
Overall, this can be a decent solution to delaying raids in early-mid game if you have the effort and materials, but as you enter mid-late game it's better that you replace the suppressor with something else (such as a killbox) which can actually bring the hurt.
Killboxes
| This article is a stub. You can help RimWorld Wiki by expanding it. Reason: Please add a reason . |
Killboxes are in general heavily trapped, armed areas where enemies are funneled to so they can be destroyed easily.
They almost consist of a funnel which directs raiders into it, like a wall with a single opening.
Raiders will then trickle in, allowing colonists or turrets to concentrate fire on them, or traps to destroy them while they try to move in to attack.
This is an extremely effective way to defeat most raids, as the enemies will often be overwhelmed by the sheer firepower raining on them. It also allows effective use of traps, as funneling enemies greatly increases the chance one's going to trigger them. A well-built killbox can easily neutralize the threat of raids, to the point where some players refuse to use them since it takes the fun out of the game.
Note that sappers will attempt to mine into the base away from the killboxes, so make sure you have an effective coping strategy.
Building
You should double wall your killboxes as the sheer firepower raining on your enemies will inevitably destroy some of your own walls by accident, allowing raiders to flood into the killbox from another direction, bypassing traps and overwhelming your defenders.
Include sources of cover from around the killbox where your colonists can fire on incoming enemies. For increased firepower you may build turrets as well.
Entryways
Any entryways of the killbox should not be straight, otherwise raiders will simply fire using the entryway as cover. Instead, you should have a turn to break line of sight, prompting the raiders to enter an area where you can get them easily. For better effect, put a grave or other similar object that raiders can't stand on.
The below shows the results of different killbox entryways.
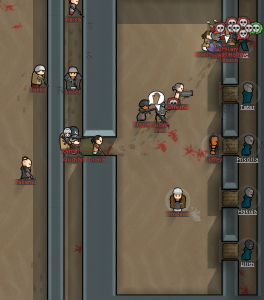
Right design of a killbox entryway. Raiders are prompted to move into the killbox, sometimes so close that they prefer to melee attack instead of shoot.
Wrong design of a killbox entryway. Raiders are bunching up in the entryway, using its walls as cover.


Don't make your entryway excessively long, otherwise raiders will think it's not worth it going such a distance and will decide to go for something else instead. Manhunters however will still chase colonists down a long corridor or over extreme distances, so you can have some dedicated anti-manhunter killboxes with extra-long corridors for this purpose.
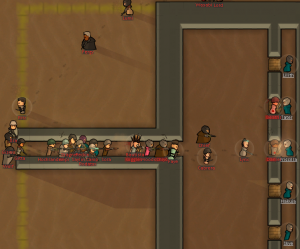
For better effectiveness fill the entryway with deadfall traps, some IED traps (not too close to each other, otherwise they will set off a chain reaction) to soften the raiders before you fire on them, and alternated chunks or sandbags to greatly slow them down. Make sure that the walls are durable enough to withstand explosions if you will be using them.
If your entryway is long then you will need to build doors to allow your colonists to enter without setting off your own traps or having to go through all the obstacles.
Entryway with alternating sandbags to slow raiders and doors to provide access. Slows raiders but not colonists.
Same entryway but with deadfall traps. Deals heavy damage to incoming raids but costs a lot to build.


Equipment
Colonists defending in a killbox will be shooting at a large number of targets no more than a few tiles away (usually). Thus, defenders should use close ranged high damage weaponry for firing at raiders.
- Charge rifles, heavy SMGs, pump shotguns or LMGs work good in killboxes, being able to dish out hurt at close-mid ranges.
- Chain shotguns inflict extreme pain at killbox range, even surpassing the charge rifle in DPS as long as the targets are closely grouped.
- Miniguns are excellent at attacking the bunched-up raiders inside a killbox. While it won't hit its intended target, it will hit everything right next to it, inflicting heavy damage.
- For maximum effectiveness focus it on a crafting spot at the exit of your killbox where your colonists will face the invaders. Remember to have fortified walls as many bullets will hit them instead of the raiders.
- Bolt-action rifles or assault rifles are useful for larger killboxes for reaching further targets, though they are not recommended for smaller ones.
- Don't bother with sniper rifles as they can't deal enough hurt to be effective at close ranges.
- Grenades are good if you can time them right. Throw them at the entrance where each explosion to hit a tight group of raiders, especially if they're slowed down with obstacles. Don't throw too many otherwise you'll demolish the walls of the killbox.
- Have melee colonists with longswords standing nearby as raiders who enter your killbox may decide to melee charge you instead.
Turrets
You can put turrets in place of colonists in a killbox. They deal moderate damage at close ranges, with the restricted space of the killbox offsetting the underwhelming long-range damage of the basegame improvised turret. A few can be deployed to provide additional firepower, ensuring victory.
You may also choose to fully arm your killbox with turrets, with enough to single-handedly take out raids (especially in tandem with traps). Doing this allows you to defeat raids automatically without the need to divert colonists from other jobs, but eats up lots of power and is vulnerable to solar flares, so you will need to have a backup plan.
- Progression
- Quickstart Guides • Basics • Intermediate Midgame Guide • Advanced Endgame Guide • Ending the game
- Scenarios
- Lost Tribe Guide • Rich Explorer Guide • Naked Brutality Guide • The Mechanitor Guide

- Survival
- Extreme Heat Guide • Extreme Cold Guide • Extreme Desert Guide • Ice Sheet Guide • Sea Ice Guide • Events Guide
- Combat
- Defense tactics • Offense tactics • Weapon Guide
- Construction
- Colony Building Guide • Defense structures
- Production
- Food production • Money making guide
- Other
- Skill Training • Permadeath save conversion guide •
Ideology Min-Maxing