Difference between revisions of "Defense tactics"
PigeonGuru (talk | contribs) |
|||
| (560 intermediate revisions by 36 users not shown) | |||
| Line 1: | Line 1: | ||
| − | {{ | + | {{Image wanted|reason=New images are needed for mechanoids added in Biotech}} |
{{TOCright}} | {{TOCright}} | ||
{{for|defensive constructions against threats|Defense structures}} | {{for|defensive constructions against threats|Defense structures}} | ||
| − | Getting attacked, whether by tribals, pirates | + | Getting attacked, whether by tribals, pirates, hordes of angry animals or by something more alien is a common event in the rimworlds. Defense against these attacks is one of the keys to having a successful colony. |
This page details different tactics for defense and visualizations of them, applicable to most stages of the game. | This page details different tactics for defense and visualizations of them, applicable to most stages of the game. | ||
| − | = | + | = Core battle tactics = |
| − | + | No matter what sort of defenses you use, these battle tactics may be useful. | |
| − | + | === Melee tactics === | |
| − | + | Melee soldiers are a useful asset in your colonies, if used correctly. They can disrupt ranged enemies, because being engaged in melee interrupts and prevents ranged attacks, and staggers the enemy thus slowing movement. Ranged enemies are also forced to fight back with makeshift melee attacks with their guns, which are woefully inadequate against a dedicated brawler. | |
| − | + | In addition, melee soldiers can fend off invading brawlers charging into your lines, or beat up drop podding enemies. | |
| − | + | [[Shield belt]]s and good armor are usually necessary for your colonists to close the gap between you and the enemy. Melee attackers without the protection of shields are highly vulnerable to gunfire, even if heavily armored. Before battle, hide your melee attackers until all enemy melee attackers are engaged in battle, or put them in line in front of your gunners for quick deployment and damage absorption. | |
| − | + | Friendly fire is a serious issue in hand-to-hand combat, as you can easily hit your own fighters. While it is still a bearable problem if their shields are up, once the shields are down you will need to manually retarget to prevent friendly fire. | |
| − | + | ==== Melee sortie ==== | |
| − | ==== | + | This tactic involves using a small element of melee colonists to charge enemy ranged attackers and take the heat off your own gunners. |
| − | + | ||
| + | Can be used to take down annoying long-ranged snipers or small gunner groups. Note that charging at entrenched ranged attackers can also divert their attention from your own entrenched forces to your charging brawlers. | ||
| + | |||
| + | ==== Melee rush ==== | ||
| + | |||
| + | Melee rushing is the tactic of sending your melee attackers to engage hostiles all at once, rather than focusing on shooting them down or sending small parties to take down troublesome enemies. | ||
| + | |||
| + | Melee rushes can work alone, especially with quality equipment; well-equipped melee rushes can hold off an attack and cause raiders to flee despite being slightly outnumbered. They also attract a great deal of friendly fire from the enemy, as they try to shoot down your brawlers, hitting their allies in the process. | ||
| + | |||
| + | If you aren't afraid of friendly fire, it can be combined with a firing squad from a distance for devastating effects. The brawlers cause chaos within the raiding party while the firing squad lays fire to destroy them while the raiders are trying to cope with your brawlers. | ||
| + | |||
| + | Note that enemy melee rushes are not to be countered by your own melee rush; there is a [[#Melee blocking|much more effective tactic]] detailed below. | ||
| + | |||
| + | ==== Peeling ==== | ||
| − | + | If a vulnerable gunner is under attack by melee attackers, you can 'peel' them away using your brawlers. Have them engage the melee attackers, who will then focus on your brawlers, allowing your gunner to get to relative safety. | |
| + | |||
| + | Trained animals automatically peel for their assigned masters, if 'Release animals' is Off. The animals will attack any hostiles coming close rather than straying off to attack distant targets. <br> | ||
| + | Setting 'Release animals' to On right when another colonist in distress near the trainer causes the animals to swarm the attacker, peeling them off. | ||
| − | + | Peeling is a relatively high-risk activity, as you are trying to put a pawn at risk in return for allowing a pawn at greater risk to escape. Peeling pawns should be expendable or decently armored. | |
| − | + | ==== Self-defense ==== | |
| − | + | Even though they aren't as good as dedicated melee weapons, guns still hurt in melee combat, even surpassing some low-quality melee weapons. This allows shooters to have a fighting chance against melee enemies. | |
| − | |||
| − | |||
| − | + | Shooters can fight off small animals quite easily with melee, so have them fight back instead of letting the animal chew them to death. | |
| − | |||
| − | + | Melee attacks with guns are a viable alternative if your colonists are adept at melee combat and the guns don't fare well at touch range. Since they don't usually emerge victorious from a 1v1 melee fight unless there is a massive skill gap, have someone else join in the fray, be it a brawler or gunner. | |
| − | === | + | === Body blocking === |
| − | + | [[File:Bodyblock_choke.png|250px|thumb|right|You shall not pass.]] | |
| − | + | Enemies can be physically blocked by colonists or animals, denying them access to locations. This can be done to a significant tactical advantage. | |
| − | + | Heavily armored soldiers are needed to body block active combatants, as they will take a lot of hits while blocking, and even so they will eventually collapse due to sustained damage. They should also be able to deal good damage at point-blank. | |
| − | |||
| − | |||
| − | + | Blocking can be used to slow down prison breaks, seal off escape routes for enemies, or more aggressively to devastate melee only raids, detailed below. | |
| − | |||
| − | + | You can avoid heavily injured pawns just by invisibilize your pawns continuously, they will still be blocking enemy drafted pawns in hallways but cant get retargeted. But you have to pay attention, a freshly invisible pawn does not lose the agro of enemies. As an example, if your pawn gets in the door and get targeted by an enemy equipped with a doomsday, the doomsday will be shot at the invisible pawn, there are some ways of breaking the targeting process such as loss of vision, and any kinds of jumps or teleportation. | |
| − | |||
| − | + | ==== Melee blocking ==== | |
| − | + | When faced with a full melee attack, instead of engaging enemies on the frontline, '''retreat behind your walls, and open doors to use as chokepoints'''. Leave up to '''three''' melee brawlers standing right behind (not in) the chokepoint to block enemies while cutting them down, stationing more nearby as replacements, and gunners behind to fire on the blocked intruders. This forces melee enemies to trickle in and fight with your soldiers one-by-one, making them significantly easier to dispatch of. Make sure all brawlers are heavily armored to block damage, and shielded to block friendly fire. | |
| − | |||
| − | + | This is a horribly effective way to defeat melee attacks. Compared to a regular frontline defense, this tactic significantly reduces the casualties your side will sustain. You also don't need to build anything special for this purpose- any opening or door in the wall will do. If you use [[killbox]]es then it's best that you build it in a way such that melee blocking attacks can be conducted effectively inside. | |
| − | The | + | =====Weapons===== |
| + | For maximum pain, use high-DPS guns for your backline for bringing the hurt, combined with quality melee for your frontline to deal sustained damage in between barrages. | ||
| + | *The [[chain shotgun]] or [[heavy SMG]] are the weapons of choice in this situation due to their unparalleled close-range DPS. | ||
| + | *Miniguns, while effective at shredding the tightly packed enemies behind the chokepoint, are generally not recommended due to the collateral damage to the walls. If you do choose to use them, aim at the middle of the crowd so you can hit as many enemies as possible, while also reducing the damage done to the walls. | ||
| + | * Grenades may also be used and can be incredibly effective at stacked melee groups trying to enter through a chokepoint, but should be ground-targeted rather than freely targeted by the pawn, to avoid grenading your own melee blockers. Grenades can land anywhere within 1 tile of the targeted tile, so place your ground target 1 tile further away to avoid accidentally grenading your own forces or blowing up the walls that are enabling you to melee block. Like [[minigun]]s, this will often shred the walls of your chokepoint, so building extra layers of walls at the chokepoint can be helpful. | ||
| + | * Pawns, both friendly and hostile, cannot stop and stand on top of sandbags, and are substantially slowed while moving over them. This can be used to force targets into a particular tile or slow the progress of an incoming force. | ||
| − | + | Stray bullets will not harm your tanks if the shooter is not standing too far behind; that means it is not a good idea to use long-range fire. | |
| − | + | Combined with measures to force enemies into close range, it may be effective against ranged enemies as well, but beware as enemies can still fire until you start beating them up. | |
| − | + | =====Animal Melee Blocking===== | |
| + | Animals can be used as a form of melee blocking by creating a zone for just the single tile immediately in front of the chokepoint or door and assigning a bunch of animals to it. The animals prevent hostile attackers from traversing through that space, and the animals will generally counter-attack en masse anything that attacks them. This often results in substantial injury or death to animals, of course, so ensure the animals used are expendable (ie. not bonded or otherwise critical to the colony), and don't use explosive animals like Boomalopes or Boomrats. This is most effective against non-human threats such as manhunter packs and insectoids. | ||
| − | === | + | <gallery widths="400px" heights="400px" class="center" mode="nolines"> |
| + | File:Melee_test_eleplants_normal.png|10 manhunter elephants vs 3 armored brawlers and 4 armored gunners; all colonists are downed while all elephants remain standing. | ||
| + | File:Melee_test_eleplants_block.png|Same situation but with melee blocking; only 1 colonist downed, and all elephants defeated. | ||
| + | </gallery> | ||
| − | + | === Spacing out === | |
| − | + | Each colonist should ideally stand '''at least 1 tile away from other colonists''', thus reducing the chance of enemy bullets hitting somebody else after missing the original target, which deals a lot of damage to static grouped up defenders. | |
| − | + | Explosives will also hit fewer people this way, though there are better countermeasures than simply spacing defenders apart. | |
| − | + | === Dealing with rockets === | |
| − | + | Rocket launchers are painful to deal with, due to the huge area damage and long range. In the mid-late game they are one of the biggest threats from the enemy. <br> | |
| + | The best way to deal with them is to distract them to fire elsewhere, in order to greatly reduce the amount of damage received. | ||
| − | + | Raiders with rocket launchers are often seen in the backline preparing their rockets, while their allies lay down fire at the front. They get distracted quite easily, wasting them on animals or lone colonists. This can be exploited simply by '''charging them with single units''', which will cause them to fire it towards them and away from the rest of your forces. They may fire at point-blank, injuring themselves and their comrades, or with some luck in positioning and fast melee units, you can even intercept them before they can lock on with their rocket launcher, forcing them into hand-to-hand combat and eventually yielding the launcher which can be captured for future use. | |
| − | + | This is a high-risk but necessary move to take, and some pawns may need to be sacrificed. | |
| − | + | For successful distraction, you have to make your charging units the only available targets for them to consider attacking. If they have a better target with less possible friendly fire, they may attack them instead. To combat this, have all your other units, including animals, stay completely out of range until the rocket launchers have been neutralized. | |
| − | + | ==== Psychic insanity lance ==== | |
| − | + | Using a [[psychic insanity lance]] on a raider will cause their allies to waste rockets on them. Often, this gets rid of all of the rockets in a raid, and also causes a lot of damage. Psychic lances can generally be used from relative safety, due to their extensive range (though they do require line-of-sight to the target), and have a relatively low cost. Targeting the most durable raider will help make sure as many rockets are wasted as possible. | |
| − | + | ==== Shielded unit deployment ==== | |
| − | + | Deploy brawlers equipped with [[shield belt]]s and heavy armor, letting the shields block the blast as well as some fire. There are two variations of this: | |
| + | #Move in a zigzag pattern in front of the enemy to draw their attention, and dodge the rockets when they are discharged. | ||
| + | #Directly charge into the fray with your shielded fighters, such that any rockets fired at them will likely hit other enemies as well. | ||
| − | + | Be prepared to sacrifice someone, as their shields are very likely to be broken whether by the blasts or concentrated gunfire. | |
| − | + | ==== Expendable animal charge ==== | |
| − | + | Have animals that are both expendable and fast charge the enemy, rocket soldiers included. It's especially good if the animals can survive a rocket blast, as it allows them to continue distracting any further rockets. | |
| − | + | For multiple rocket launchers, send animals in batches, such as by assigning animals to different handlers and setting them to attack at different times, to prevent them from being wiped out by a single blast. | |
| − | + | While they do not need to be obedience- or release-trained, as you can use animal area zones to force them into areas, doing so is less effective as animals have a delay before moving into their assigned zones and may be very far away. | |
| − | + | ==== Friendly fire with rockets ==== | |
| − | + | Besides being caught in a blast, enemies can also take friendly fire if the rockets impact them instead of your colonists. | |
| − | + | You can increase the chance of this happening by having the rocket travel over as many enemies as possible through aligning your distractors. Each rocket traveling over a pawn has up to 40% chance to impact, setting it off early. | |
| − | + | If you see that an enemy rocketeer has locked onto a brawler, you can also choose to charge the enemy with that brawler. It will either cause the enemy to deal immense friendly fire, or allow you to take out the rocketeer outright. | |
| − | + | ==== Killbox tactics ==== | |
| − | + | Rockets are much more dangerous in a killbox where colonists and turrets are closely bunched together. If you're unlucky, a rocket will set off turret explosions, causing additional damage. Rocketeers are a priority target that need to be rapidly eliminated as soon as they enter. | |
| − | + | However, killboxes do provide 2 crucial advantages: range restriction and concentrated fire. This allows you to direct concentrated fire onto the rocketeers to neutralize them rapidly. | |
| − | + | === Rescue === | |
| − | |||
| − | |||
| − | |||
| − | + | When a colonist is downed or severely injured, it's best to drag them out of the fight immediately. Don't leave them there otherwise they risk dying from stray bullets or blood loss. You don't really need to send them directly to hospital; just drop them off somewhere outside of active combat. | |
| − | + | Colonists lying outside cover are riskier to rescue. Choose the right time to pull them out, ensuring that there are no melee enemy nearby that could tie up the rescuer, and use your best-protected colonists. Don't allow anyone near at other times as they may draw fire. Consider drugging your rescue team with [[go-juice]] if the pawn you are rescuing is under heavy fire, as this will both increase the rescuer's speed and improve their pain resistance, making them less likely to be downed. Using a [[jump pack]] {{RoyaltyIcon}} to rapidly jump in and pull them out of combat, with the i-frames incurred during jumping, makes this significantly faster and safer for both rescuer and rescuee. [[Locust armor]] {{RoyaltyIcon}} can be substituted at the cost of armor, but ideally should be paired with a [[shield belt]] to make up it. At high qualities, for the short duration of exposure, a shield belt can be superior as it prevents all damage, including that which would slow the pawn or reduce medical skills. | |
| − | + | Non-combatants, such as those incapable of violence, are ideal to serve as rescue members by standing near a fight to pull out downed colonists. Non-combatant doctors should wear a [[shield belt]] and carry quality medicine at all times, so they can be drafted during combat and quickly tend to wounded colonist on the field. Non-combatants should be equipped similarly to above, though with no ranged weapons they have fewer restrictions on wearing a shield belt to prevent damage, and their value proposition improves. | |
| − | + | If a colonist cannot reach the hospital in time, typically ~2 hours from death or less, have the doctor patch colonists up a little such that they can reach the hospital without bleeding out, then carry them there. You will have a higher infection chance this way, but it's better than the colonist bleeding to death while on their way to the hospital. The remaining injuries can then be treated in the cleaner environment. Alternatively, an untuned [[biosculpter pod]]{{IdeologyIcon}} can be kept nearby and the injured pawn loaded into it. This can save pawns moments from death, that a doctor could not treat fast enough to save. The cost of the pods can be considerable however, and they must be de-tuned or deconstructed and reconstructed after each event. | |
| − | + | === Friendly fire management === | |
| − | + | Friendly fire is a serious issue when facing close-range attackers, especially manhunter packs. If they manage to run past your barrage of gunfire to engage your ranged soldiers, they may receive more injuries from friendly fire in the ensuing chaos than the attackers themselves. You need to be careful when directing your troops so you don't hit your own forces by accident. | |
| − | + | Pawns can fire over the shoulders of friendlies up to 2 tiles (i.e. 1-tile space in between) away, meaning that you can have a 3-wide row of soldiers without friendly fire, which is not recommended. | |
| − | + | # When the enemy breaks the ranks, only let the soldiers closest to melee attackers fire at them. | |
| + | #*Manually re-target the others to fire at another direction, repositioning them if needed. | ||
| + | # Disable 'Fire at will' when the enemies are closing in so they won't switch targets, potentially causing friendly fire. | ||
| + | # Have only 1 line of shooters so stray bullets, including bullets fired horizontally at melee attackers, will less likely hit someone. | ||
=== Firing at cover === | === Firing at cover === | ||
| − | While cover works best against attacks coming straight, it's usually better to fire straight at the target instead of from an angle. If you fire straight at it, only 1 unit of cover will be effective, but if you shoot at a diagonal angle, 2 units of cover will be effective, both being capable of blocking shots, in total contributing to | + | While cover works best against attacks coming straight, it's usually better to fire straight at the target instead of from an angle. If you fire straight at it, only 1 unit of cover will be effective, but if you shoot at a diagonal angle, 2 units of cover will be effective, both being capable of blocking shots, in total contributing to higher cover effectiveness. |
| + | |||
| + | However, if you can get to the point where you're almost firing horizontally at the raiders, then cover becomes nearly ineffective at protecting the raider, allowing many more shots to connect. This often requires you get out of your own cover, so it's not recommended unless you can find suitable cover nearby. | ||
| − | |||
For skilled medium-long range shooters it's best to shoot from a great angle to hit them from the sides. <br> | For skilled medium-long range shooters it's best to shoot from a great angle to hit them from the sides. <br> | ||
However for not-so-good or short ranged shooters it's better to directly fire at them instead as the extra distance will make it harder to land hits, or cause the raider to exit firing range. | However for not-so-good or short ranged shooters it's better to directly fire at them instead as the extra distance will make it harder to land hits, or cause the raider to exit firing range. | ||
| − | '''The below shows the difference firing angle makes on the hit chance of a pawn hiding behind cover. | + | '''The below shows the difference firing angle makes on the hit chance of a pawn hiding behind cover.''' Cover values are from Alpha 16, but the mechanics remains unchanged. |
<gallery widths="400px" heights="400px" class="center" mode="nolines"> | <gallery widths="400px" heights="400px" class="center" mode="nolines"> | ||
| Line 163: | Line 184: | ||
</gallery> | </gallery> | ||
| − | === | + | == Mobile warfare == |
| + | |||
| + | === Flanking and Surrounding === | ||
| + | |||
| + | To flank enemies, have some defenders approach enemies from the sides or the back instead of concentrating fire on the front. To surround them, attack from all sides. | ||
| + | |||
| + | Enemy ranged units often stay in the same spot when engaging your colonists, and they tend to have effective cover facing one direction only, making them vulnerable to flanking. Flanking enemy ranged units can distract them and cause them to lose their cover advantage with attacks coming from multiple sides. While this makes you lose the advantage of high-quality cover, it is balanced out by the enemy's loss of cover. | ||
| − | + | This works best against entrenched ranged enemies attacking you from one side. They should be occupied with attacking frontal targets so you can creep up to them to unload lead on them from another angle. It's even better if you pair with melee to tie them up, buying time for your soldiers to get into position and preventing them from moving into new positions. | |
| − | + | Rounding up any fleeing survivors also becomes easier if you have someone (especially melee fighters) blocking off escapes from behind. | |
| − | |||
| − | |||
| − | |||
| − | === | + | ==== Moving in ==== |
| − | |||
| − | + | While moving in you need to make sure you stay far enough away from enemies, and directly right-clicking on the destination will nearly always result in a path that crosses with the enemy. | |
| − | + | This can be overcome by '''shift-clicking to form a path for the pawn to follow''', making sure to keep sufficient distance. | |
| − | + | Shield belts, drawing enemy fire from a different direction, or simply using walls and terrain to block projectiles are all good ways to move in. | |
| − | + | ==== Wide arc flank ==== | |
| − | + | This tactic is about scattering your fighters in a wide arc facing your enemies. Rather than huddling together behind continuous lines of cover such as lines of rock chunks, each soldier should be taking cover on their own, and be able to shoot straight at the enemy without anyone else in between. | |
| − | + | This gives more flexibility in positioning as well as greatly reduced vulnerability against explosives or collateral damage. Engaging your flankers also results in enemy fire being scattered, so focus fire won't take down anyone easily. | |
| − | You can | + | You can deploy shielded colonists to draw fire effectively from your gunners, though they need to be arranged carefully so as to be able to tank without taking friendly fire. |
| − | + | Perfect against preparation raids or in-construction siege camps when you can't use your static cover and they won't directly attack your base upon arrival. However if the enemy has a significant cover advantage (such as sandbags) then this tactic may not work out in your favor. | |
| − | + | === Tanking === | |
| − | + | This tactic simply requires you put your shielded colonists before your static gunners to partially soak up gunfire. This is best when you have insufficient cover, or additional cover to block more bullets for your frontline tanks. | |
| − | + | As with any tactic involving meat shields, this poses a great risk to colonists' lives. If the colonists' shields are downed and they are not well-armored, you will have to get them to retreat behind cover until their shields come back online, otherwise your colonist will be exposed to ruthless gunfire. | |
| − | + | Beware of high damage-per-hit weapons which can instantly down shields. | |
| − | === | + | === Hit and run === |
| + | Against slow or static targets you can employ this to weaken them. You will need several fast-moving long-ranged colonists, possibly with [[charge lance]]s or [[bolt-action rifle]]s. Have them move within range to fire, quickly exiting range once the enemy returns fire. Repeat until conditions are no longer safe to conduct this attack, such as enemies entering full aggression and charging. | ||
| + | |||
| + | Effective against siege camps and preparing raiders for they tend to stay put at their location until they are aggravated into attacking. | ||
| − | + | === Kiting === | |
| + | This tactic is effective when all or the most dangerous enemies are slow [[moving]]. | ||
| − | + | Ideally, you have fast colonists - 120%+ [[Moving]] - running near moving enemies, drawing their attention. Constantly outrun the enemy while staying within their attention range. If not, the enemy will engage other targets instead. This way, kiters can distract a group of enemies by leading them around the map. Other colonists can fire at the kited enemies. And if the kiting colonist is fast enough, they can take a few potshots (once they are far enough). | |
| − | + | As long as your colonist safely outruns hostiles, you're fine. However, if the enemy catches up, your colonist will be slowed and on his own. Even with a regular speed colonist, kiting can be beneficial, as it gives valuable time for your ranged colonists to shoot. | |
| − | ==== | + | ====Equipment==== |
| − | + | A fast, long-range weapon is safest - e.g. the [[assault rifle]] or [[bolt-action rifle]]. A fast moderate-range weapon (e.g. [[machine pistol]]) may be used against melee enemies, but is riskier. Slow weapons such as sniper rifles are not recommended, as the need to stand still for extended periods puts soldiers in grave danger. | |
| − | + | Kiting colonists should be lightly armored while still maintaining a fast speed. | |
| − | ==== | + | <gallery widths="400px" heights="400px" class="left" mode="nolines"> |
| − | + | File:Kiting_1.png|'''Kiting #1 - when enemies are as fast as the majority of your colonists. Optimal scenario shown - all raiders are lured to 1 colonist. Ideally you have >1 colonist faster than the enemy. '''<br><br> Black circle is the ideal kiting route, when your kiter is fast enough. Red lines can be used if the kiter is too slow to run a full circle. Enemies might catch up, but you've gained valuable time for colonists to shoot | |
| + | File:Kiting_2.png|'''Kiting #2 - when all colonists can outrun and outrange the enemy. Retreat just before you get into enemy range. | ||
| + | </gallery> | ||
| − | + | == Additional tactics == | |
| − | |||
| − | |||
| − | ==== | + | === Baiting === |
| − | |||
| − | + | Faster, more well-protected colonists can be used to lead enemies into traps or ambushes. This is for situations when you have defenses concentrated in one direction, but the enemy comes from another. | |
| − | + | [[File:Bait tables 2.jpg|300px|thumb|right|Setting the bait furniture on fire only hastened this raider's demise.]] | |
| − | |||
| − | |||
| − | + | Cheap furniture also makes good bait. Raiders will smash any player-built furniture left out in the open, such as tables or wooden stools. This can be helpful to split them up or lure them into range of your defenders' weapons. | |
| − | === | + | === Luring in === |
| − | |||
| − | + | Enemies can be lured closer to your base by keeping your colonists out of sight, then swarming out to attack once they draw closer to your base. Afterwards they will switch to engage your defenders. | |
| − | |||
| − | + | This can be used to negate the range advantage of enemies. It also works well with melee blocking to lure enemies into trying to jam themselves into your chokepoints, rather than beating up your base. | |
| − | + | === Animals === | |
| − | + | The animals on the map, tamed or not, can be used to your advantage. | |
| − | ==== | + | ==== Tamed animal release ==== |
| − | + | {{Stub|section=1}} | |
| − | + | With your handlers, you can amass a huge army of animals to charge the enemy. Simply find a good combat-capable animal, tame it, and train it to learn Release. | |
| − | + | There are many animals that are good for this purpose. Main tactics are take quality vs take quantity. | |
| + | * Large animals like [[Thrumbo]]s, [[elephant]]s or [[rhinoceros|rhino]]s have good DPS and their large health scale means that damage is less likely to kill them before they can get patched up by your doctors. However they are harder to tame and very hard to keep a big amount. Replenish losses for a long time (especially Thrumbos). Due to smaller amounts, in case of big raid, they can block only few gunners and will sooner be downed by others. | ||
| + | * [[Warg]]s and [[bear]]s offer a good balance of DPS, breedability and feasible number to keep (can eat bodies of raiders). Better block large number of gunners. | ||
| + | * [[Husky|Huskies]] significantly less DPS than the others, but are easy to breed, feed, and provide hauling. Can block big raids. | ||
| + | * Dryads don't need food, training, breed and can self-heal. Colony only need to maintain trees. Clawers are the best choice for meat attack, while barkskins for tanking. Use separately: clawers are faster than barkskins, and barkskins will not perform their main duty. | ||
| − | + | Tamed animals also cause pirates to fire near their allies in a bid to get them off their allies, potentially causing friendly fire. | |
| − | |||
| − | + | ==== Strategic zoning ==== | |
| + | Raiders take their sweet time to exterminate any trace of your tamed animals on the map. This can be exploited to your advantage, as long as you're willing to have a few animals valiantly sacrifice themselves. | ||
| − | + | *'''Distraction''': If you let your animals run all over the place, raiders may be tied up trying to wipe out the animals. This can give your colonists time to prepare, such as entering defensive positions or running to your mortars to fire a few rounds, as well as scatter the raiders making them easier to deal with. Raiders wielding rocket launchers also tend to waste them on your animals, leaving your colonists and structures mostly unharmed. However if they see better targets they will come at them instead. | |
| + | *'''Direct offense''': Besides distraction, animals may also engage raiders, harming or killing them. | ||
| + | *'''Manipulation''': Animals can be moved around without the need of training Release, simply by changing the allowed zone of your animals. A short time later, the animals will move towards the zone and stay there. When animals are sleeping you can put animal sleeping spots beneath them and then remove them to wake them up. ''Changing'' the animal's zone also immediately forces it to move, at high speed, if they are not in the area of the new zone. This can also be used to update an existing zone's area by changing the animal to a different zone (which they aren't in the area of) and then back to the original zone again. Untrained animals will flee from threats, but will fight back to defend themselves if they are damaged by a hostile. | ||
| + | **'''Aggressive zoning''': Zone animals in a place where you are expecting an encounter with enemies. Enemies will notice the animals and will start attacking, making them fight back and injure or even down the attackers. This method works for any animal, even those that cannot be trained. Remember to undo the zoning otherwise the animals may starve. [[Boomrat]]s are especially useful by causing explosions, setting raiders on fire and delaying their assault. | ||
| − | + | **'''Animal chokepoint''': Zone the animals in a chokepoint, creating a dense cluster. | |
| + | ***This is vulnerable to AoE weaponry so increase the area of the zone to make it that animals don't get too tightly together, if the enemy has explosives. | ||
| − | If | + | ==== Aggravating animals ==== |
| + | If you have any easily enraged wild animals ([[emu]]s, [[thrumbo]]s, etc) standing near the enemy, you can shoot them to anger them and make them charge at the enemy. | ||
| − | + | You can also opt to enrage an animal then have a fast colonist (>130% Moving) lead it towards the enemy. Some enemies will stop and engage the animal, potentially causing it to switch targets. For quite the obvious reasons it's best to equip a shield belt on the kiting colonist if he isn't the one enraging the animal. | |
| − | + | For this, larger animals are best due to their high health and damage. A thrumbo can be considered a godsend in a raid; just send 1 straight into the raider hordes, and let 'er rip. <br> | |
| + | Smaller animals are faster and hard to hit, making them decent distraction and causing a hefty amount of friendly fire among the enemy as well. | ||
| − | + | Remember, if you can down the animal easily with colonists, so can the raiders. | |
| − | + | Similarly to this, a [[Manhunter]] pulse on a flock of wild (or tamed but not trained) animals can wreak havoc on raiders, just make sure that your own pawns are too far away to be targeted. It may make sense to have some fenced-in pastures at the edge of the map for this very purpose. | |
| − | + | === Meat shield === | |
| + | The animals surrounding a handler can be used as a convenient meat shield as they take bullets, arrows and other projectiles (but not explosions) for their master. Provided they don't stray too far, they won't receive friendly fire as the shooters simply fire over them. All you need is to train Obedience, instead of Release. | ||
| − | + | Slaves with shield belts are also a good sponge for bullets. New meat shields can be obtained from survived and enslaved raiders. | |
| − | === | + | === Base scattering === |
| − | + | This is a '''last-ditch tactic to defeat humanlike enemies''' if you are significantly outnumbered. | |
| − | + | Instead of engaging them right away, let enemies scatter around the base first. After they scatter widely apart, divide and conquer, using large groups of soldiers to overcome them with ease, while others are busy demolishing other parts of your base. | |
| − | + | Remember to patch up the base after the damage done. Coolers are especially tricky as they serve as weak points and are expensive. | |
| − | |||
| − | |||
| − | |||
| − | == | + | === Outside help === |
| − | + | If the [[AI Storytellers|storyteller]] is feeling somewhat merciful, outside help may come to save the day. | |
| − | + | Don't count on this however, as these rarely happen on their own, and most of the time you still need to fend off the raiders yourself. | |
| − | === | + | ==== Friendly reinforcements ==== |
| − | + | Occasionally while hostiles are on the map, a friendly military caravan will come to bolster your defenses. The threats may also coincide with friendly trade caravans, visitors or passersby, who will help to engage a common enemy. | |
| − | + | This requires you be already allied with some factions, so that they will send help of meaningful value; otherwise they may just send a few people who will quickly get downed and serve no purpose other than distraction. | |
| − | |||
| − | |||
| − | + | Besides actual assistance, traders may also come with around 550 - 1000 points, enough to hold their own against a smaller raid. This allows you to have decent fire support around half the time, simply by calling in 1 trade caravan once every day (assuming alliances with all 4 non-pirate factions). It costs goodwill (or silver pre-0.19) but allows you to trade, as well. | |
| − | |||
| − | |||
| − | |||
| − | + | You may also call for additional help from allied outlanders at a cost of -20 goodwill (tribals are unable to send help due to technological limitations). This can be repaired by diplomatic gifts, or rescuing and treating downed friendlies. | |
| − | + | ==== Common enemy ==== | |
| − | + | If mechanoids, manhunters or another enemy faction show up, raiders may stop to engage them. This causes losses to both groups of enemies, making it easier to pick off the stragglers. Being concurrently raided by two different enemies at once is more common during the ship reactor start-up phase, making it slightly easier to survive the onslaught. | |
| − | |||
| − | |||
| − | + | If there are unopened [[ancient shrine]]s you can open them, which may contain artifacts, mechanoids, confused spacers, all useful against raiders, or none of the above. | |
| − | |||
| − | + | Using the [[psychic animal pulser]] or the Manhunter Pulse psychic ability is essentially invoking this tactic, but you need to be very careful when using it. | |
| − | + | ==== Environmental hazards ==== | |
| − | + | Very rarely, when unable to put up a proper fight, you can count on Mother Nature to play for your side. Invaders will come to you without proper protection against the weather. You will be able to fend off the attack without confrontation. | |
| − | |||
| − | + | Choosing to play on an extremely hot or cold map, such as in a sea ice biome near the poles, seals the fate of all raiders foolhardy enough to come. | |
| − | |||
| − | ==== | + | <gallery widths="450px" heights="450px" class="center" mode="nolines"> |
| + | File:Siege flee from Toxic fallout and hypothermia.png|'''Siege flees from Toxic fallout and hypothermia.''' | ||
| + | File:Siege flee from Toxic fallout and hypothermia 2.png|'''Free prisoners in bulk.''' | ||
| + | </gallery> | ||
| − | + | = Humanoid assaults = | |
| + | == Raiders == | ||
| + | "Raiders" come in a wide variety of sub-types, and with a surprising variety of tactics. But they all need to be explained the error of their ways... | ||
| − | + | === Behavior === | |
| − | + | [[Raider]]s will attack randomly chosen constructed objects, colonists and colony [[animals]]. They will not attack natural rock walls (except for sappers), non-hostile wild animals or unpowered [[turrets]]. They will attack [[prisoner]]s if they are captured from their enemy factions. | |
| − | |||
| − | + | They usually set fire to crops in [[growing zone]]s, [[power]] generators, [[power conduit]]s, and other [[production]] buildings. They will melee attack furniture, doors and walls. They will also use thrown explosives on structures, and some use [[EMP grenades]] to stun your turrets. | |
| − | + | Raiders will prioritize firing on [[colonists]] or [[turrets]] that are actively engaging in the fight, but will otherwise attack random objects. | |
| − | |||
| − | |||
| − | |||
| − | |||
| − | |||
| − | |||
| − | + | If humanlike non-mechanoid raiders are unable to defeat your colony in time, they may give up. Normal raiders will give up between {{ticks|26000}} to {{ticks|38000}} after the raid begins, while sappers will give up between {{ticks|33000}} to {{ticks|38000}} after they begin the attack. | |
| − | + | === Preparation === | |
| − | + | Humanlike raiders will sometimes start by standing around in a group where they spawned and will continue this until they lose a certain amount of raiders or they hit a certain preparation time limit, at which point they begin the assault. When a colonist is close to the raiders they will attack the colonist. | |
| − | + | === Equipment === | |
| − | + | Raiders spawn with randomized equipment determined by their "pawn kind". While the budget for "purchasing" each individual of the different pawn kind is determined by the [[storyteller]] and the current [[raid points]] value, the equipment itself is decided by the weapon and clothing budgets and type restrictions of the pawn kind. More information on the pawn kinds can be seen in the Pawns sections on each [[faction]]s' page. | |
| − | + | ==== Apparel ==== | |
| − | + | [[Raiders|Pirates]] can range from only wearing a tattered pair of [[pants]] to [[flak vest]]s to full sets of [[marine armor]]. [[Raider#Mercenaries|Mercenary slashers]] will always come in [[shield belt]]s and only they do so. | |
| − | |||
| − | |||
| − | + | [[Tribals]] always come in [[tribalwear]], with some in [[war mask]]s or [[veil]]s. Some later game come with [[plate armor]] as well. | |
| − | + | In cold environments, both will come in wearing [[parka]]s or [[tuque]]s, protecting them from temperatures of around -40 to -50°C, sometimes up to -110°C if they wear wool parkas. They don't usually come in wearing [[duster]]s or [[cowboy hat]]s in hot areas, making them vulnerable to the heat. | |
| − | + | They tend to wear leather, [[cloth]] or [[synthread]] clothes, which don't provide good protection, and less commonly the more protective [[devilstrand]] or [[hyperweave]]. | |
| − | + | While mid-late game pirates usually come with normal quality flak and marine armor providing around 100% sharp armor, with quality apparel you can push yours to have more than 130%, even without masterworks or legendaries, giving you the upper hand. | |
| − | + | ==== Weapons ==== | |
| + | For most factions, skills are assigned at random, meaning that raiders are not always given weapon appropriate for their skills; skilled shooters can be randomly equipped with melee weapons and melee pawns equipped with guns. So if you have your colonists equip weapons according to their skills, you already have an advantage over many enemies. Unlike the other factions, the [[Empire]]{{RoyaltyIcon}} will ''ensure'' that its soldiers have skills appropriate for their issued weapons. | ||
| − | + | [[Tribals]] usually come equipped with primitive weapons of random quality, either melee weapons or ranged weapons limited to bows and [[pila]]. Melee weapons are not to be underestimated however, as blunt armor is often lacking and both [[longsword]]s and [[spear]]s are relatively common and have respectable {{AP}}. | |
| − | + | [[Pirates]] and [[outlanders]] can spawn with most weapons in the game, up to and including dangerous [[doomsday rocket launcher]]s. | |
| − | + | However, some classes of raider always come with the same weapon or same category of weapon. For example, [[Raider#Mercenary_sniper|mercenary snipers]] always use [[sniper rifle]]s, [[Raider#Mercenary_grenadiers|grenadiers]] always wield either [[frag grenades]] or [[molotov cocktails]], and tribal archers of all types always use [[neolithic]] ranged weaponry. | |
| − | + | ==== Drugs ==== | |
| − | |||
| − | + | Pirates or Outlanders may utilize some form of combat-enhancing drug, namely [[go-juice]], [[yayo]] and [[luciferium]]. They will usually start off addicted to them, and will carry some in their inventory which is dropped upon death. They may also use multiple drugs, disregarding the risk of overdose. | |
| − | |||
| − | |||
| − | + | These can reduce the amount of the pain received, making the raider last longer in battle before going down. Increased movement speed also allow raiders to get into position earlier, and brawlers to harass your defenders more easily. | |
| − | + | *[[Go-juice]] is an excellent combat drug that makes the raider much more efficient in battle. It eliminates 90% of pain, gives a 30% movement speed buff, and a 10% consciousness buff for more accuracy. The raider is almost guaranteed to fight until death, or the rarer case of incapacitation through a shattered spine, severe brain damage or removal of both legs. | |
| + | **It's almost always more worth it to use body part-destroying weapons such as the [[Sniper rifle]] to kill them, as Go-juice does not reduce the actual damage they take. | ||
| + | *[[Yayo]] grants a 15% buff to speed and eliminates half of pain received. Enemies under the effect of yayo are more durable against damage not concentrated on a vital body part | ||
| + | **It will take more hits to down them, and more likely the raider dies first due to lethal damage, but is still possible. | ||
| + | *[[Luciferium]] grants a wide range of buffs to the user, from increased organ function, to slight movement speed and consciousness buffs, to reduced pain. | ||
| + | **It's more troublesome to capture addicted raiders since you'll need to regularly feed them luciferium to sustain their lives, which is very expensive and hard to come by -- it's usually more worthwhile to just strip and finish them on the spot. | ||
| + | **Although it is possible to farm this drug by addicting raiders to it and release them, the next time they come they will bring some with them. | ||
| − | |||
| − | |||
| − | |||
| − | |||
| − | + | === Sieges === | |
| − | |||
| − | |||
| − | + | During a [[Raider#Siege|siege]], raiders go to a location outside your base, receive materials via drop pod and will proceed to build a simple mortar camp. The mortar camp will generally have 2 mortars and sandbags as cover. The sandbags need not cover the mortars, nor will they necessarily face your base. | |
| − | + | <gallery widths="450px" heights="450px" class="center" mode="nolines"> | |
| + | File:Siege_base_construct.png|Siege camp under construction. | ||
| + | File:Siege_base_finished.png|Finished siege camp. Note that sieges always come with 2 mortars. | ||
| + | </gallery> | ||
| − | + | When faced with a siege, there are a few strategies you can use. | |
| − | + | In most cases it's better to attack the siege camp as the raiders will continuously siege the colony even if you're in hiding, and most likely you will eventually need to face off against the raiders yourself. | |
| − | + | ==== Camp assault ==== | |
| − | + | If you assault their camp, one possibility is sniping the raiders, prompting them to assault your colony directly instead of continuing their siege once you down several of them. Defeating them early enough will result in most of their items remaining intact, which you can take for yourself. <br> | |
| + | Another alternative is to snipe the mortars, hoping an explosion will take out many raiders, but keep in mind that for those you will need to either send someone dangerously close to enemy fire, or draw all attention to one side to allow flankers to snipe and detonate them. | ||
| − | + | Unlike most defensive situations, this time they will have the advantage of good cover on their side. You will have to find suitable cover, such as rock chunks, which you can fire from. | |
| − | ' | + | Sniping [[mortar]]s under construction, when they have much lower health, is effective at wasting the enemy's resources. |
| − | |||
| − | |||
| − | ' | + | They are vulnerable to flanking if they haven't finished their sandbags or left a side uncovered. However, once all cover is completed, flanking is less of an effective solution. |
| − | |||
| − | |||
| − | |||
| − | ==== | + | ==== Early interception ==== |
| − | + | The best time to attack them is when they've just started building their camp. At this time their resources would have arrived. | |
| − | + | Attacking them at this time forces them to use rock chunks just like you do, instead of having the superior sandbags on their side. Their mortars won't be ready as well. | |
| − | + | '''Attack only when their resources have arrived''', otherwise they will flee and not send any resources, which you could've stolen had you attacked later. | |
| − | + | ==== Hit-and-run ==== | |
| − | + | An effective tactic to lure sieging raiders out is to conduct hit-and-run attacks against them. Taking down someone usually causes them to give up on sieges and directly attack, making them lose their cover advantage. | |
| − | + | ==== Countering with mortars ==== | |
| − | |||
| − | |||
| − | + | If you have your own mortars, you can use them to fire back at the raiders. The raiders will stay put to defend the camp, making them easy targets for mortar strikes. It's best to wait for the raiders to arrive at their siege encampment location so leading the target isn't required. | |
| − | |||
| − | |||
| − | + | [[High-explosive shell]]s deal heavy damage to tight groups of raiders if they hit, ignoring all cover but solid walls in the process. A tight volley can devastate mortar camps, forcing them to either attack or flee outright. Waiting for their supplies to be dropped gives you the possibility of causing their own mortar shells to explode on them causing significant additional damage. | |
| − | + | [[Incendiary shell]]s are an effective way of distracting sieges as the raiders will be preoccupied with extinguishing the resultant flames. 2 mortars are usually enough to keep them from doing any activity other than firefighting, unless it is raining or there are no flammables nearby. This deals little damage to them, however. | |
| − | + | [[EMP shell]]s can stun the mortars, preventing them from firing. It is perhaps better used as a support weapon while your defenders assault the camps, to reduce the damage done to your base. | |
| − | + | ==== Sneak attack ==== | |
| − | ' | + | If you don't have the strength to attack directly, you can wait for them to sleep at night, then use the opportunity to set your colonists into position for a sneak attack. |
| − | |||
| − | |||
| − | + | Once someone receives an injury, everybody will wake up, so be sure to have everything in place. | |
| − | |||
| − | |||
| − | + | # Get within range and throw a coordinated barrage of [[frag grenades]] at the enemy, blowing the defenseless raiders to bits. | |
| + | # Go very close (no more than 3 tiles) then unload your guns on the exposed raiders. Nearly every bullet will connect, dealing heavy amounts of damage upfront. | ||
| + | # 1 well-aimed [[doomsday rocket launcher]] can end the siege easily. While also effective at day, it is much safer to approach at night, and the raiders will also be more tightly packed. | ||
| + | # Send brawlers straight in, beating up dangerous enemies like rocketeers first. | ||
| + | # Steal their supplies and wait for them to send more. Free food and mortar shells! | ||
| + | # Scatter chemfuel canisters around the camp, pick up shells and survival meals. Retreat. Load one incendiary round into your mortar. Do one shoot, enjoy the popcorn. | ||
| + | # Burn the enemy with fire, a task made much easier while they are off-guard. This will eventually force them out to attack after suffering from heavy losses. | ||
| + | #* Lighting the mortars on fire allows them to be destroyed with ease. | ||
| + | #* Surround the camp with fire. Upon waking up, they will put forward their futile efforts in controlling the raging sea of fire around them, eventually giving up and attacking. | ||
| − | + | ==== Deep tunneling ==== | |
| − | ' | + | Mortars cannot hit anything that is under an overhead mountain. This makes deep mining a effective defensive strategy against heavy bombardment. If you don't build your base into a mountain, you may at least consider digging out at least one panic room for non-combatants to hide within from the shells while others head out for the assault. |
| − | |||
| − | ==== | + | ==== Firefoam shell jamming ==== |
| − | + | [[File:Firefoam shell jamming.png|500px|thumb|right|Enemy mortar filled with a firefoam shell, demonstrated by reddit user u/xenoxaos.]] | |
| − | + | An interesting way to nullify the threat of a mortar attack is to launch a transport pod filled with firefoam shells to a location closer to the mortars than the shells they brought with them. When the shells arrive, the enemy will load them shells into the mortar instead. This means that the damage to your base will be much reduced, as firefoam shells do little damage beyond damaging roofs. | |
| − | + | {{clear}} | |
| − | + | === Shielded melee charges === | |
| − | + | [[File:Melee_charge_edge.png|240px|thumb|right|Full melee charge at the edge of the map, with everyone shielded and equipped with melee weapons.]] | |
| − | |||
| − | |||
| − | |||
| − | + | Pirates or Outlanders can come with all-melee charges, with most enemies wearing [[shield belt]]s. This can prove a threat to ranged-reliant defenses as they charge towards the colonists directly with their shield belts blocking large amounts of damage. <br> | |
| − | + | While they are vulnerable when their shields are down, many can still reach your colonists and engage them in melee combat. | |
| − | |||
| − | ==== | + | ==== Melee blocking ==== |
| − | + | The '''[[#Melee blocking|Melee blocking]]''' tactic is especially useful here; for better effectiveness, open multiple chokepoints to spread out enemies and keep them busy trying to squeeze in, otherwise they will get bored and wander off to attack other things. | |
| − | + | Shields don't stand a chance against concentrated fire poured down a narrow entrance. Using [[Grenades|EMP Grenades]] or [[EMP launcher|EMP Launchers]] can entirely disable the enemy shields, making mowing them down much easier, but ensure you don't accidentally short out the shields of your own melee blockers. It's best to order the grenadier or launcher wielder to attack a specific ground point rather than letting them freely select their target, as they may try to grenade a target right next to your own melee blockers. Both grenades and launchers can deviate by up to 1 tile in any direction from the targeted square, so take that into account when selecting your aiming point. | |
| − | + | {{clear}} | |
| − | + | === Sniper party === | |
| − | + | Raiders can come using only sniper rifles, giving them a very long range but low overall damage. | |
| − | The | + | The danger comes in that if you engage them conventionally, you may need to exit your quality cover, removing your cover advantage. |
| − | + | Sniping them back is not recommended unless you have a surplus of skilled snipers and cover. | |
| − | + | ==== Luring in ==== | |
| − | + | Instead of engaging them on the frontline, you can keep everyone out of sight, then rush out only once they get close to your base, negating their range advantage. | |
| − | + | ==== Killbox ==== | |
| − | + | A well-designed killbox can entirely negate any advantage that sniper parties field. Critical to that is ensuring that line of sight is entirely blocked for incoming attackers until they are in range of your own forces, preventing them from being able to take cover once inside the killbox, and using sandbags to force them to walk (slowly) while already under concentrated fire without being able to return fire. | |
| − | + | === Heavy explosives assault === | |
| − | + | Enemies may come in mainly equipped with area damage weapons, such as rocket launchers, grenades and miniguns. This can cause serious damage to your base, your colonists, and the raiders themselves. | |
| − | |||
| − | |||
| − | |||
| − | + | The main danger, as always, is from the rockets. The ideal method is to [[#Distracting rockets|distract]] them from the main defending force, not only reducing damage taken by friendly forces, but also increasing friendly fire the enemy takes. The fact that so many of the raiders have rocket launchers means that friendly fire can be so serious that the raiders will decide to retreat to cut losses by friendly fire alone. | |
| − | |||
| − | |||
| − | + | Due to the wide use of explosives, cover is less useful; you would benefit more from flexibility in positioning rather than protection from cover. Space out your defenders, preferably far from your base structures, while giving them enough space to move around to evade attacks. | |
| − | + | ==== Distraction ==== | |
| − | + | If you have many tamed animals, you can zone them near the raiders, who will be distracted to fire at the animals with rockets. Enemies are much more likely to receive friendly fire when firing towards your animals right next to them. | |
| − | ==== | + | ==== Grenadiers ==== |
| − | + | Besides rocketeers, many of the enemies will also be grenadiers, which are short-ranged and are thus vulnerable to fire from a distance. Once the rockets have been taken care of, you can shoot them down with concentrated fire quite easily. Make sure to dodge the grenades if they do close in. | |
| − | + | ==== All-in melee charge ==== | |
| − | + | You can go hardcore and send in all your shielded brawlers to go straight at the enemy rocketeers. Gunners should stay out of range of rockets until all rockets launchers have been used. | |
| − | + | This is especially effective when '''they come in to chase a refugee''', leaving you enough time to position your brawlers deep into the enemy. <br> | |
| + | At any rate, expect losses this way due to the concentrated explosions. | ||
| − | + | === Base flank === | |
| − | + | Besides sending one large attack party, enemies can also split up their forces and attack your base from multiple sides. | |
| − | + | To adequately defend against this sort of attack, you may need to split up your own defenders and fight several battles at once, thus increasing the difficulty of managing the battle. | |
| − | |||
| − | |||
| − | |||
| − | + | Each of the individual groups will flee on their accord. | |
| − | |||
| − | |||
| − | |||
| − | ===== | + | ==== Divide and conquer ==== |
| − | |||
| − | + | If the enemy decides to prepare before attacking, you can afford to send out a larger attack party to eliminate the groups one-by-one. | |
| − | |||
| − | |||
| − | + | === [[Sappers]] === | |
| − | |||
| − | |||
| − | + | Sappers will mine and blast their way through any obstacles, such as natural or constructed walls, though avoiding high-health ore veins. They will also try to circumvent your defenses to attack from another direction. Their goal is to reach one of your bedrooms or barracks, where they will begin to wreak havoc. | |
| − | |||
| − | + | In an open base, sappers can usually be treated as a weaker-than-usual bunch of raiders. However, they are a great threat to turret-reliant, mountain or walled bases, including bases with killboxes. | |
| − | + | Their grenadiers and miners deal heavy damage to structures; even the toughest [[plasteel]] walls will not stop them for long. They will also persistently try to tunnel into your base, continuing even if their digger is killed or they are under attack. | |
| − | |||
| − | |||
| − | |||
| − | + | ==== Turret funneling ==== | |
| − | |||
| − | |||
| − | + | It is possible to funnel sappers with unpowered turrets, since sappers will avoid entering turret radius. Note that this doesn't appear to work to funnel sappers into killboxes. | |
| − | |||
| − | + | ==== Early interception ==== | |
| − | |||
| − | |||
| − | |||
| − | ' | + | With enough manpower, you can choose to intercept them while they're tunneling into your base. They tend not to use cover when doing so, so you can catch them by surprise. Once your defenders intercept them, they will turn to engage you. |
| − | |||
| − | ==== | + | ==== Rocket counterattack ==== |
| − | + | The [[doomsday rocket launcher]] is your best bet against sappers, if they aren't a full melee charge. Since they are bunched closely together, a single well-placed rocket can blow up most of the attacking party, causing the rest to flee in panic. If they have rocket launchers, they may drop them on death, so you may actually end up with more rockets than you started with. | |
| − | + | If you are the one using the rockets, you have the advantage of being able to fire first. Aim it at a spot where the enemy is likely to be bunched up. If you're quick you can defeat the enemy before they can even fire back at you, ensuring victory. | |
| − | |||
| − | |||
| − | |||
| − | + | Rocketeers should be behind your best cover so they can survive long enough to fire. Your other colonists should be closer to the enemy to draw fire, but out of the rocket's path lest it hits your colonists instead. | |
| − | |||
| − | + | ==== Mountain bases ==== | |
| − | |||
| − | |||
| − | ' | + | If you're in a mountain base you can draft a few melee pawns to wait at the entrance, as well as a few ranged pawns facing the entrance to fire down the tunnel. When they do break in you will already have prepared to face the raiders and can pour a stream of lead right into their face or cut them into pieces. |
| − | |||
| − | + | In a mountain base, since they take longer to mine through the rock, you may try placing an [[IED trap]] right behind the wall that a sapper is trying to tunnel through, to catch them by surprise with an explosive blast. This is especially effective if it's placed right on the other side of a loose [[rock chunk]] (easily found in tunnels), which will slow down any enemies stepping over it enough that they won't be able to retreat in time. | |
| − | |||
| − | + | ==== Aftermath ==== | |
| − | |||
| − | |||
| − | + | Remember to cover up any tunnels or gaps in your defenses as they open up an opportunity for raiders to come straight into your base. You may fortify it and turn it into a booby-trapped chokepoint to catch unsuspecting raiders seeking direct entry. | |
| − | |||
| − | |||
| − | === | + | === Drop pod attacks === |
| − | + | Sometimes pirates or mechanoids will come in drop pods. If they land at the edges, they can be treated as a normal raid party, unless you have expanded to the edges, in which they will land inside your base. <br> | |
| + | To defend against this, have a second line of defenses inside your base so you can deny the drop-podders easy entry into your base. | ||
| − | + | The main danger comes in landing right in the center of your base. Capable enemies not using alternative strategies such as sieges or sappers have a 10% chance of doing so. | |
| − | |||
| − | |||
| − | |||
| − | + | Once they choose to land there, things will get ugly. By landing in the middle, they bypass most of your conventional defenses, and you can't use your cover advantage against them. They will also break through constructed roofs on their way down, landing right inside rooms and buildings. This can put not only your colonists, but your stockpiles in grave danger, as well, especially if they land near your volatile [[mortar shell]]s or [[chemfuel]] stores, or [[Battery|batteries]]. | |
| − | |||
| − | |||
| − | + | Fortunately for you, they have a short delay ({{ticks|520}}to be exact) before they open and all hell breaks loose. They also come in smaller numbers than regular raids. | |
| − | |||
| − | + | Enemies in drop pods cannot land in tiles beneath an Overhead mountain, so tunneling deep underground can make safe rooms. | |
| − | |||
| − | + | ==== Strategy ==== | |
| − | |||
| − | + | Once you see them land, you should immediately decide what strategy will you use: attack immediately or wait and let them break furniture or steal things. In case of immediate attack, draft any nearby armed colonists to the site, whether they are your designated soldiers or not. Let them hold off the attackers for a while before your soldiers arrive to help. You have less than 9 seconds before they open, not enough for a soldier to get halfway across the map to help. | |
| − | |||
| − | |||
| − | + | Any non-combatants should immediately be evacuated. They may still stay close to help in rescue efforts, pulling out any downed colonists. Make sure it's safe to rescue them- as in rescuers not walking through the crossfire and back again to get a colonist to the hospital. You may need to forbid doors to prevent them from walking through the firefight into a hospital. Melee is useful against these attacks, for you can immediately start beating up the enemy as soon as they exit the pods. They can also shut down dangerous enemies such as rocketeers. | |
| − | + | If you decided to wait, draft your soldiers and put them near (but not close) to the drop area and wait. When raiders face no resistance, they will immediately start breaking furniture, put fire (sometimes turning the room they landed into gas chamber) and later will decide to steal some things (including furniture that can be moved), take it and flee. Let them do it, and when they take items and go, attack. While fleeing, they will not resist, making it much safer to kill all of them and return stolen back to the storage. Works best when raiders landed inside the locked room. | |
| − | + | Like other raids, humanoid raiders will attempt to flee after receiving heavy losses; however, if they land inside enclosed areas of your base, they will be trapped, allowing your colonists to down and capture them at leisure; in their panic, they won't try to fight back, until you're well into beating them up. | |
| − | |||
| − | |||
| − | ==== | + | ==== Cover ==== |
| − | + | You should use your furniture or wall corners as cover and fire from behind them. You can also have 2 colonists hiding behind each doorway for full cover. Toggle the doors to be held open, otherwise they can't fire. Be careful as enemies will also utilise cover as well; to combat this, attack from multiple angles or use melee fighters. | |
| − | |||
| − | + | Spread out colonists so they don't take collateral damage, even if it may mean some will fire out of cover. Keep heavily armored colonists up front and lightly armored colonists at the back. | |
| − | + | Colonists with high construction skill can relocate furniture quickly; use this to your advantage by creating cover for yourself and removing it from enemies. | |
| − | + | If you have larger bases, you can build indoor defensive positions along crucial corridors, but take care not to let the enemy use them. Stone [[shelf|shelves]] are an option as they are durable, non-flammable and beauty-neutral. | |
| − | ===== | + | ==== Fire management ==== |
| − | |||
| − | + | As most furniture is flammable, you will need to extinguish any fires if you want to prevent damage. One option is to reinstall and trigger a firefoam popper inside, which also fireproofs the room, preventing any further fires. | |
| − | |||
| − | + | If you prioritize the defeat of the raiders over the loss of your property, and the walls of the room are fireproof, you can simply let fires burn, or even start some more, while you evacuate the room and shut the doors, cooking the raiders alive. Watch out for fire and heat spreading to nearby rooms, and put out fires immediately once the raiders are well done. <br> | |
| − | + | Not effective against mechanoids as they aren't affected by temperature and cannot be set on fire. | |
| − | ===== | + | ==== Equipment ==== |
| − | |||
| − | + | High-DPS or melee weapons work best to deal with drop pod attacks. <br> | |
| − | + | Mid-range weapons are also good for clearing out larger rooms. <br> | |
| − | + | Long-ranged weapons are less effective due to their low damage output and the confined nature of indoor spaces rendering their superior range unnecessary. | |
| − | |||
| − | |||
| − | + | Explosive, incendiary or area denial weapons are excellent at room-clearing, but are not recommended except in dire situations due to heavy collateral damage. | |
| − | === | + | === Tribal raids === |
| − | + | [[File:Tribal_raid.png|300px|thumb|right|Group of tribal fighters.]] | |
| − | + | Tribal raiders come with relatively poor equipment, instead relying on sheer numbers for power. Their neolithic weapons can dish out heavy damage despite their low technology level. They are also adept at combat, with many being acquainted to some combat skill or another. <br> | |
| − | |||
| − | |||
| − | < | ||
| − | + | Different strategies may be required, compared to pirate or outlander raids. | |
| − | + | ==== Tribal fighters ==== | |
| − | + | They can take more of a beating compared to other poorly armored enemies as some of the clothing items they wear gives them increased endurance against pain, but when compared with other decently armored enemies they are easier to kill individually as their clothing doesn't provide much protection overall. | |
| − | + | Their archers or hunters can fire their bows from a somewhat long distance, sometimes forcing you out of cover to fire your shorter ranged weapons at them.<br> | |
| + | Warriors or berserkers don't use shields (unlike their pirate counterpart, the mercenary slasher), making them vulnerable to gunfire. | ||
| − | + | You should watch out for the pila wielded by heavy archers, as well as berserkers. | |
| + | *Despite the short range and slow fire rate, pila are incredibly deadly if they land, capable of killing or incapacitating unprotected colonists with a lucky shot to the heart, spine or limbs. | ||
| + | *Berserkers carry excellent melee weapons that dish out incredible amounts of damage once they get close. | ||
| − | ==== | + | ==== Weapons ==== |
| − | + | You will need sufficient mid-long range firepower to take down tribal archers from a distance, for getting close to them in order to fire your guns is pretty much suicide. Long-ranged weapons beyond 32 tiles can effectively hit archers at maximum range, matching or outranging them. | |
| − | + | Close-mid ranged weapons with high stopping power are good for taking down tribespeople that come too close to your defenders, but they alone cannot defeat tribals effectively just by staying in static cover. | |
| − | + | Crowd control helps greatly in defeating tribal raids. | |
| − | + | *The [[Minigun]] is extremely effective as it can easily mow down the densely packed groups of tribal invaders. | |
| + | *All explosive weapons are devastating on tribals. | ||
| + | **Rocket launchers deal heavy damage while being reasonably accurate. | ||
| + | **[[High-explosive shell]]s can pulverize a sizable group of tribals at once if they manage to hit. | ||
| + | **Grenades are less effective as you have to risk a colonist or two in order to get in range. | ||
| + | *Incendiary weapons are good at getting pesky archers out of cover for your colonists to hit. | ||
| − | + | === Empire raids === | |
| − | + | Added in the new [[Royalty DLC]], the Empire is capable of sending powerful troops to assault your base. Unlike Outlanders, Tribals, or Pirates, one major advantage they have is that their skills are matched with the weapon they use- melee Champions will actually be good at melee, while Troopers, Janissaries or Cataphracts all have excellent ranged performance. | |
| − | + | Cataphracts are among the most heavily-armored units in-game, with an outer layer of [[cataphract armor]] and an inner layer from an [[armorskin gland]]. However, their armor also slows them down significantly. | |
| − | + | This can, however, be turned to your advantage through the use of [[Psycasts]] introduced in the Royalty DLC. Using Berserk or Berserk Pulse on the most dangerous of the hostile army can cause them to turn their powerful weapons towards murdering (and being murdered by) their allies rather than your colonists. Note that Berserk Pulse can affect pawns immediately on the other side of a wall by casting the ability on a tile adjacent to a wall, allowing the ability to function as a defense against sappers or groups moving through constrained areas (such as a narrow snaking corridor leading to your killbox). | |
| − | + | == Caravan ambushes == | |
| − | + | Defensive battles don't always happen at base. Sometimes it may happen far away from it, striking one of your caravans, perhaps loaded with plenty of silver. Or maybe they creep to your traders and demand ransom, which you don't feel like paying. You always need to be prepared for ambushes when you send out caravans. | |
| − | + | === Escort === | |
| − | |||
| − | |||
| − | |||
| − | |||
| − | |||
| − | |||
| − | + | In any cargo-carrying caravan, sending only 1-2 colonists is usually not advised except in very short-distance trips as they will not be able to fend off an ambush. In this case, have combat-capable escort members which can fight and carry items, as well as medics who will patch up your colonists after battles. | |
| − | If you have | + | If you have lots of attack animals, you can also send just 1 skilled handler with the attack animals. They can swarm any attackers, and you can leave colonists back at base for work. Remember to take into account the animals' food needs; grazing animals work best for this reason. |
| − | + | If you are not carrying much besides a lone colonist, leaving him to go alone is helpful as lone colonists are hard to detect, reducing both the likelihood and the power of ambushes. A single colonist with a pack animal trained to obedience should be able to fend off most attackers. | |
| − | + | === Ambush site === | |
| − | + | The ambush site is small, restricting the space where you can conduct your battle. This renders many tactics obsolete, such as long-ranged sniping or kiting. You will often have to face off the enemy in a direct gunfight or brawl. | |
| + | Besides this, you can't escape the fight until it's over, leaving no choice but to fight back. | ||
| − | === | + | === Cover and positioning === |
| − | [[File: | + | [[File:Ambush_fight.png|600px|thumb|right|Improvised defensive position against ambushes, making the best of what is there. Colonists behind walls will enjoy up to 75% full cover, while pirates will only receive 25% at most from trees and such. Two brawlers are ready to execute a melee sortie, while another is ready to [[#Peeling|peel]] for the gunners. Combined with good equipment, this allows the fight to be won with few injuries even when outnumbered.]] |
| − | + | If you have time, go somewhere where there is cover for you, but not the enemy. This gives you a significant upper hand in defensive battles where the enemy is coming at you. You should be hiding behind walls for cover if possible, as they provide up to 75% cover, but if they are not available, use what is available, e.g. rock chunks or trees. Space out your defenders to reduce the amount of collateral damage the pirates deal. | |
| − | |||
| − | + | Melee sorties or rushes work well if you have brawlers, to negate any dangerous ranged threats; [[shield belt]]s help them traverse the short distance to engage. | |
| − | + | === Items === | |
| + | You will need to bring some items so you can be prepared for a surprise attack. | ||
==== Weapons ==== | ==== Weapons ==== | ||
| + | You usually don't have weapons to switch in a caravan unless you're bringing more than you need with you, so choosing the right weapons for your escort party is important. | ||
| + | |||
| + | *High-DPS weapons are optimal for dealing with ambushes. | ||
| + | *Long-ranged weapons are good for taking down targets at medium-long range, however their low DPS may offset their range advantage in an ambush. | ||
| + | *[[Minigun]]s are good against tightly-packed raiders hiding behind cover in an ambush. However, their heavy weight and movement speed reduction means you may want to reconsider bringing one. | ||
| + | *Melee weapons can help fight off enemy brawlers, or disrupt enemies behind cover. You should have at least 1 melee fighter in each escort. | ||
| − | + | ==== Medicine ==== | |
| − | + | You should have some medicine handy so your colonists can patch themselves up after the battle. | |
| − | + | [[Medicine]] should be your choice here; you should try to get good treatment to reduce chance of infection, as colonists don't get much rest in a caravan. [[Herbal medicine]] is useful if you have a good doctor on hand. | |
| − | |||
| − | + | === Aftermath === | |
| − | + | You can reform the caravan immediately after the battle is ended; you can bring along any downed colonists, as well as capture downed enemies. The caravan members will tend to themselves shortly afterwards. | |
| − | + | Alternatively, you can stay and forage from the ambush map before you leave. | |
| − | == | + | = Manhunters = |
| + | Animals, singly or in groups, may randomly turn mad and become hostile due to various reasons. | ||
| − | + | When mad, they will actively attack humanlikes or mechanoids, and will not attack other structures unless provoked (such as seeing someone walk through a door. Note that this includes colony animals. Manhunters can and will navigate through doors opened by colony animals, and will attack the door for a while if the door closes in front of them). They are not sophisticated in their attacks and are only capable of actively using melee. Some can explode upon death for devastating results. | |
| − | + | === Animal categories === | |
| + | Most animals can be part of a manhunter pack. Each kind has its own statistics, and can be roughly grouped as follows: | ||
| − | + | # In terms of speed: | |
| + | #*Slow: Animals that run slower than an average colonist. This allows you to kite them in addition to melee blocking. | ||
| + | #*Fast: Animals that are faster than most colonists. | ||
| + | # In terms of other properties: | ||
| + | #*Explosive: Animals that explode on death such as [[boomalope]]s or [[boomrat]]s. They can set your brawlers alight, ruining melee blocking defenses, so for these, you may need alternative tactics. These types, however, can trigger a chain reaction, as the explosion from one animal can kill others, causing further explosions and potentially further deaths. | ||
| − | + | === Occurrence === | |
| − | + | Mad animals can strike your colony in several ways. | |
| − | + | #Singular mad animals may randomly attack. | |
| + | #Manhunters packs can arrive in great numbers, afflicted by the deadly disease [[Scaria]]. | ||
| + | #Psychic waves drive all animals of a single species insane, directing them at your colonists. They are usually scattered at first, then proceed to converge on your colonists. | ||
| + | #In an unfortunate hunting incident, animals being hunted will turn on you, and may even bring their allies along. | ||
| − | + | === Melee blocking === | |
| + | |||
| + | As with any full melee attacks, '''[[#Melee blocking|melee blocking]] is an extraordinarily efficient way to defeat manhunter packs'''. This is especially so if the animals are small such that they deal little damage before being killed, one after another. | ||
| − | + | When psychic waves occur, either lure animals into one spot or set up multiple chokes for attack. | |
| − | === | + | === Animals vs. Animals === |
| − | + | One good way to fight off mad animals is with... more animals! Just draft anyone with Release-capable animals assigned, and set them out. Your colonists can watch safely from a distance, or take a potshot or two while watching the animals tear each other apart. Just remember to have someone mop up the bloodstains and haul the corpses of the fallen. As with melee blocking in general, even non-Release-trained animals can be used for defense by confining them to a single tile zone at the exit of your killbox, causing them to both body-block and attack any hostile animals that try to enter through it while your colonists shoot at them. | |
| − | === | + | === Hit-and-run === |
| − | |||
| − | |||
| − | + | A slower strategy is to draft a colonist, place it in a door to shoot a maddened animal, move the colonist back to safety and wait until the animal gives up and wanders off, then repeat. Be careful since this will draw the attention of surrounding maddened animals making them attack the door where the colonist came from, so be ready to repair it immediately. <br> | |
| + | You can either kill them directly or wait for blood loss to take its toll. Larger animals can be softened this way before you move in for the kill. | ||
| − | + | This method is best used if you don't have enough firepower to take on them directly, and you have durable enough doors or a good builder to hold against animal attacks. | |
| − | + | === Kiting === | |
| − | + | Being unsophisticated in their tactics, they can be lured easily. | |
| − | + | If you have good shooters that are fast (moving >140%), you can easily kite the faster animals. <br> | |
| + | The larger animals are usually slower and any colonist that has normal Moving will do fine against them, though it's still better with a faster-than-average colonist. | ||
| − | + | It is possible to combine this with a long-range firing squad and turrets laying fire from a distance while they are chasing the colonist; be sure that the animals do not lose track of your kiters, otherwise they will switch targets and go for somebody else. | |
| − | |||
| − | + | === Turrets === | |
| − | + | Turrets can distract manhunters for your colonists, giving them more time to shoot while enemies are occupied by the turret. They may explode when destroyed, taking out a sizeable group of animals who won't run away from exploding turrets, switching to another target only after the turret is no more. | |
| − | + | === Waiting it out === | |
| − | + | If you have a perimeter wall or a superstructure base with decent food stocks, you can simply wait it out inside while they relentlessly swarm outside the walls. | |
| − | + | Remember not to let anyone outside unless your intent is to kill the animals. Be careful with your tamed animals who may accidentally let the manhunters in by holding doors open for them. | |
| − | + | They will actively attack doors if a colonist hides behind them; as a precaution, build it out of a sturdier material such as [[plasteel]] so they don't get destroyed during a manhunter attack. They will give up after a while if the doors are not destroyed. Alternatively, simply have a builder build a wall behind the door, totally preventing manhunters from entering even if they break the door. | |
| − | + | === Scavenging dead animals === | |
| − | + | Manhunter packs are a decent source of [[meat]] for your colony. If there are still maddened animals, wait until the other animals from the pack go to sleep, walk away far enough, or get a fast colonist to try and haul the dead ones away. Note that animals with [[Scaria]] from the manhunter pack events have a high chance of instantly rotting on death and thus being unharvestable for meat or fur/hide. | |
| − | |||
| − | === | + | = Mechanoids = |
| + | {{stub|reason=Needs new Mechanoid types and Mechanoid cluster events from Biotech}} | ||
| − | + | Mechanoids come in 4 types: [[Scyther]]s, [[Lancer]]s (1.0), [[Centipede]]s, and [[Pikeman|Pikemen]] (1.1). They have much differing stats and weapons, meaning different tactics may be used. All types are armored to some degree, and are basically immune to fire damage. | |
| − | |||
| − | + | In many raids where they come/drop in at the edges, the Scythers will outrun the Centipedes by a great margin, giving some time to deal with them before the centipedes. However, they can and will support one another effectively, if given the chance for them to come together. | |
| − | + | Unlike humanlike raiders, they do not flee, meaning that all of them have to be taken out to neutralize the threat. They do not actively use cover, either. | |
| − | === | + | === General strategy === |
| − | [[ | + | Ranged mechanoids have a long attack range (at least 27 tiles), making them troublesome to deal with. A way to deal with this is to [[#Luring in|lure them into close range]]. |
| − | + | They are vulnerable to EMP damage, which can stun them, rendering them hunks of helpless metal. This can open a window of opportunity where you safely engage at close range, or even with melee. After each use of EMP, mechanoids will adapt to it, becoming immune to further stuns for a short while, so you will need to carefully time assaults and disengage when the mechanoids are about to reactivate. | |
| − | |||
| − | + | === Scythers === | |
| − | |||
| − | + | [[{{Q|Scyther|Image}}||100px|right]] | |
| − | + | Scythers are deadly with melee, and will charge head first at your defenders. They can easily win in a 1v1 fight unless your fighters are heavily armored and have high DPS. | |
| − | |||
| − | + | The optimal method of dispatching them is by [[#Melee blocking|melee blocking]], with the added effect of luring the other mechanoids closer to your base. This must be done quickly otherwise the centipedes will catch up and unleash hell on your colonists who are closely packed together in a melee blocking attack. | |
| − | + | EMP weaponry combined with melee blocking is a frighteningly effective and safe way to deal with scyther-only charges. A stunned scyther standing in the chokepoint will block all the other scythers standing behind. To prevent adaptation, only stun the mechanoids within the chokepoint. | |
| − | + | If fighting from a distance, high-damage weapons are essential to bursting them down before they reach your colonists. Make sure you always have someone to [[#Peeling|peel]] them off your gunners in case they do survive your barrage. | |
| − | |||
| − | |||
| − | |||
| − | |||
| − | ==== | + | === Lancers === |
| − | |||
| − | {{ | + | [[{{Q|Lancer|Image}}||100px|right]] |
| − | + | Lancers are capable of medium-long range supporting fire to pick out single targets. Despite their apparent role, their performance is actually better the closer you are to them, meaning that approaching them isn't a good option. | |
| − | + | They are vulnerable in melee combat, so melee rushing supported by close-range firepower can be used to take them down. Their low health makes taking them down relatively quick despite their light armor, though their damage in melee combat should not be underestimated, and concentrated fire from charge lances can make short work of shields. | |
| − | + | If fighting from a distance, cover is vital in getting the upper hand. You need to be able to get your other gunners into range while giving them reasonable cover from the high damage shots. Lancers aren't particularly good shooters (equivalent to a level 8 shooter), so you may readily outperform them with sufficient mid-long ranged firepower. | |
| − | + | === Centipedes === | |
| − | + | [[{{Q|Centipede|Image}}||100px|right]] | |
| − | + | Centipedes, on the other hand, specialize in crowd control and area denial; the [[Heavy charge blaster]] can annihilate groups of colonists, while the [[Inferno cannon]] sets your colonists ablaze and will burn down your base if you're not careful. They are incredibly durable, sporting thick armor and high health, and can take many hits before being downed. | |
| − | + | Spreading colonists apart can mitigate the crowd-control capabilities of centipedes, limiting the number of colonists hit by their weapons. | |
| − | + | The Inferno cannon is annoying to deal with and should be your priority target. Keep watch on your colonists at all times and always send them back into cover after they get hit. | |
| − | Despite | + | Despite their high resistance against sharp damage, shooting them is generally the best option. One good thing is that their large size makes them much easier to hit. |
| − | + | Engaging it in melee is possible, though you have to be careful. While centipedes don't hit hard in melee, if they are carrying the heavy charge blaster, they can deal massive damage to grouped up brawlers, while inferno cannon can cause the brawlers to ignite and run, allowing the previously locked down centipedes to fire. Ideally, all nearby centipedes must either be engaged in melee or disabled to prevent this from happening. | |
| − | + | Their slow speed and weaker blunt armor make them excellent targets for high-explosive mortar attacks. Often you can land a couple of blows before they reach firing range, weakening them. This property also allows you to kite them provided they have no lancers or scythers supporting them. | |
| − | + | === Pikemen === | |
| − | + | [[{{Q|Pikeman|Image}}||100px|right]] | |
| − | |||
| − | + | Introduced in 1.1, pikemen take over the lancer's role as snipers. Their extreme range is only matched by the [[sniper rifle]]. | |
| − | |||
| − | + | They have poor damage output, making them less threatening compared to other mechanoids. Their accuracy is also not appropriate for a sniping mech- equivalent to a level 8 shooter, it will more often than not miss at range. | |
| − | + | As the description says, engaging pikemen at close range can be a viable way to take them down, once all others have been dealt with. Charging them can be risky due to the long distance pawns need to travel, but shield belts make the charge much safer, especially when you have multiple brawlers charging at once to divert concentrated fire. Swarming them with trained animals is also a viable strategy if you lack multiple skilled melee pawns or need them elsewhere. | |
| − | |||
| − | + | === Termites === | |
| + | [[{{Q|Termite|Image}}||100px|right]] | ||
| − | + | Spawning only in mechanoid breach raids, the [[termite]] is a dedicated anti-structure opponent. The termite's [[thump cannon]] can deal tremendous damage to your structures, and are able to destroy a three tile wide section of any [[wall]] weaker than [[plasteel]] in three shots or less. Against pawns, however, it is significantly less effective with lower damage, {{AP}}, and {{DPS}} than even the lowly [[short bow]]. | |
| − | + | Since they are so specialized in breaching walls, they cannot deal much damage to your pawns. However, killing them should be prioritized after [[scyther]]s, since they will destroy your pawn's [[cover]], exposing your pawns to danger from the termites much more directly dangerous companions. | |
| − | + | === Crashed ships === | |
| − | + | Mechanoids are also part of crashed ship events. In 1.1 they drop alongside the ship in pods, while in 1.0 or earlier they swarm out when the ship is damaged. | |
| − | + | The type and where it lands are both important factors to consider when dealing with them. | |
| − | + | Psychic parts will reduce mood and occasionally drive nearby animals mad, while defoliator parts (aka. poison ship parts in 1.0) will kill nearby plants and cause serious losses to pastures or crops. You cannot deconstruct the part, only destroy it. | |
| − | + | Since they won't attack until triggered, you have some time to prepare. However, the longer you take, the worse it gets. If the defoliator ship part lands on the opposite side of your base at a map border, it is possible to leave it there, as they will also react to incoming raids and you may as well solve two problems at once. Not the same for the psychic version though. | |
| − | + | If they land between your plantations, you will need to place firefoam poppers and trigger them before combat to prevent fires; the foam will persist until it rains, but then if it is rainy, you won't need the poppers. You may also want to keep a few untriggered poppers nearby to rapidly extinguish a group of burning colonists at once. | |
| − | + | [[File:Crashed ship part using foam poppers.png|center|500px]] | |
| − | + | ==== Defense behavior ==== | |
| − | + | Mechanoids are triggered immediately when the part is damaged, or something is built within a three-tile radius. They may also be triggered by the Firefoam popper explosion. | |
| − | + | Upon triggering, scythers will immediately charge to attack, while lancers, centipedes and pikemen may instead sit in place and attempt to shoot interlopers, only moving to get within range. | |
| − | |||
| − | + | Afterwards, they will guard the ship part, engaging any hostiles that come close, and chasing them over short distances. They will return to the part if targets stray too far away from the ship. | |
| − | + | In 1.0 mechanoids chased targets over long distances and abandoned the ship part when it is at 50% health. | |
| − | + | ==== Long-range engagement ==== | |
| − | + | In the current version, it is better to trigger the mechanoids from a distance, rather than fighting way up close. This is necessary such that you can weaken the scythers with concentrated fire before they reach melee engagement range, as well as give you more time to defeat the lancers before the centipedes move within range. Scythers are especially dangerous as they come in swarms and can quickly overwhelm your gunners, as well as overpower your melee brawlers unless you outnumber or outarm them. | |
| − | + | You can trigger the mechanoids either by high-explosive mortar fire, or sniping the ship part. | |
| − | + | *By attacking with sniper rifles at maximum range you will gain a good enough lead against the mechs to be able to escape safely even without enhancements unless armor is over-encumbering your colonists. | |
| + | *Mortar volleys can soften the mechanoids, making them easier to defeat by your colonists afterwards. Mortars may also destroy the ship part itself, which both ends the threat and prevents the mechanoids from disengaging from an attack and returning to guard it (though this can be either good or bad depending on the state of your defenses). | ||
| + | *In 1.1 you can also use EMP to stun them before engaging, then retreat before they exit stun, which is 25 seconds after being hit by EMP. | ||
| − | + | ==== Weapons ==== | |
| − | |||
| − | |||
| − | |||
| − | |||
| − | |||
| − | |||
| − | |||
| − | |||
| − | + | High-DPS weapons are optimal at destroying both the ship part and its defending mechanoids. | |
| − | + | Due to the mechanoids spawning very close together, area of effect or crowd control weapons are punishing against them: | |
| − | + | *The [[minigun]] is a powerful weapon here: | |
| + | **It can make short work of the bunched-up mechanoids, then shred the ship part using its unparalleled raw DPS. | ||
| + | **Its already high DPS is further amplified when attacking centipedes as their large size makes it easier to land shots. | ||
| + | **Its long range allows you to attack from a safer distance. | ||
| + | *EMP mortar blasts are able to stun a large number of mechanoids caught in its blast. As the ship part blocks EMP pulses, fire several at once to hit all enemies with a single volley. | ||
| + | *Explosive weapons are useful for dealing damage, but keep in mind that the ship part will block the explosion. They do extra damage to the ship part. | ||
| − | + | Incendiary weapons are a poor choice for any situation involving mechanoids or crashed ships, given that both are non-flammable. | |
| − | The [[ | + | The [[orbital power beam targeter]] is the ultimate weapon against crashed ships. All you need to do is to aim the beam directly on the ship, and the beam will melt both the ship and its surrounding mechanoids. |
| − | |||
| − | + | ==== Construction ==== | |
| − | + | {{main|Defense structures#Crashed ships}} | |
| − | |||
| − | |||
| − | |||
| − | |||
| − | |||
| − | + | Construction is an important part of defeating the mechanoids in a crashed ship. Usually it is best if you can prepare ample cover, such as sandbags or walls, to shoot from. | |
| − | |||
| − | + | Keep note that building within a three-tile distance will instantly trigger the mechanoids. | |
| − | |||
| − | |||
| − | + | If done properly, [[IED trap]]s can be used to weaken a mechanoid swarm. Don't build too many or you will vaporize the mechanoid corpses, which can be deconstructed for resources. | |
| − | |||
| − | === | + | ==== Luring in ==== |
| − | |||
| − | + | If you already have ample static defenses, like killboxes, and you want to lure the mechanoids in, you will need to make the mechanoids abandon the ship by destroying it from a long distance. | |
| − | + | Previously in 1.0, you can lure the mechanoids simply by triggering at range. | |
| − | === | + | ==== Hit-and-run (1.1) ==== |
| − | |||
| − | + | Their behavior change in 1.1 makes them vulnerable to hit-and-run tactics. After taking care of the scythers, you are able to chip away at the mechanoids slowly by shooting with sniper rifles at maximum range. If all pikemen are taken out then you are able to safely engage without fear of returning fire. | |
| − | + | ==== Zoning animals ==== | |
| − | + | When dealing with a crashed psychic ship part that has been there for some time, do not let any of your tamed animals near it, for the ship part can drive them into manhunter mode. This is additionally harmful as they are capable of opening doors to attack your colonists. | |
| − | |||
| − | + | === Mechanoid breach raids === | |
| + | Mechanoid of the breach raids will not ever walk through the kill box as you wanted them to, instead they will blast walls down and head straight for your base.{{Check Tag|Detail Needed|What item do they target/path to?}} | ||
| − | + | It is worth considering the use of a [[Psychic shock lance|psychic shock]] or [[Psychic insanity lance|insanity lance]] to take down the [[termite]] from far away, as there will only be up to two termites per raid. Losing the use of the specialized anti-structure [[thump cannon]] will significantly delay the raid, as they will instead be forced to destroy walls in their path with their more traditional weaponry. This gives you time to prepare a defense behind that section of wall. | |
| − | + | Typically this raid strategy will result in the mechanoids clumping up, giving a prime target for [[EMP grenades]] or a [[triple rocket launcher]], hopefully to devastating effect. Note the mechs will not attack colonists unless they come into the range of the mechanoid's gun. The long range of the triple rocket launcher is beneficial here, only putting the wielder in range of the [[pikeman|pikemen's]] needle gun. | |
| − | |||
| − | = | + | = Infestations = |
| − | + | [[Infestation]]s will spawn under Overhead Mountains within 30 tiles of a colony [[structure]]. They can be a serious hazard in mountain bases due to the lack of free space to run away from with too many obstacles on the path, but not so much threat in open area (flat) maps. [[Insectoids]] are lightly armored, exclusively use melee and are slower than colonists. This gives them some protection against close range attacks, but leaves them vulnerable to ranged attacks and kiting tactics. | |
[[File:Infestation within mountain rooms bugs.png|400px]] | [[File:Infestation within mountain rooms bugs.png|400px]] | ||
| − | If you don't destroy them fast enough, they can reproduce, giving rise to even more hives and insects. This is especially true if you happen to have forgotten about a [[hive]], which given time can build itself into a giant mega-hive. | + | '''If you don't destroy them fast enough, they can reproduce, giving rise to even more hives and insects'''. This is especially true if you happen to have forgotten about a [[hive]], which given time can build itself into a giant mega-hive. |
=== Behavior === | === Behavior === | ||
| Line 1,007: | Line 949: | ||
The enclosed nature of mountain bases give colonists little distance to shoot from; thus, you may want some melee fighters to pair up with any ranged colonists. | The enclosed nature of mountain bases give colonists little distance to shoot from; thus, you may want some melee fighters to pair up with any ranged colonists. | ||
| − | Individual fighters will quickly get overwhelmed by the insects, so you shouldn't trickle your defensive forces in; rather, | + | Individual fighters will quickly get overwhelmed by the insects especially against large [[megaspider]]s, so you shouldn't trickle your defensive forces in; rather, send them all at once to overpower the insects. |
| − | + | === Melee blocking === | |
| − | + | If there is a single choke point for the insects to get into your base (usually a door leading to a corridor), usage of this tactic allows you to defeat insects efficiently. You may even stand a chance against massive infestations if for some reason fire isn't viable, but don't get cocky. If the infestation is large you will need to bring backup tanks to replace the initial melee blocker if he or she gets downed or heavily injured. | |
| + | |||
| + | Choke points can arise on their own from insects digging out; simply wait for them to tunnel through and massacre them once they exit. | ||
| − | + | This tactic is only viable if you have enough soldiers with ''substantial'' armor as insects inflict heavy sharp damage and will obliterate everybody not sufficiently protected. | |
| − | + | === Using fire === | |
| − | + | Fire is an effective way to clear early-mid stage infestations. If they spawn in an enclosed area with a door and plenty of flammables, all you need to do is to toss a molotov or shoot an [[incendiary launcher]] bolt into the room. The room will quickly catch fire, causing the temperature to rise fast, roasting the insects in it along with the hives. | |
| − | + | The downside of this approach is that it makes it impossible to farm any insect meat or jelly from the infestation, because it will all burn, and it is usually too hot inside the spawn room to manually extinguish the fires to save the goods (unless there is a way to quickly vent the heat, which is usually not feasible to set up). | |
| − | |||
| − | + | If there is a dedicated place in your base for infestations to spawn (see ''baiting'' below), it helps to have a few cheap wooden furniture items in that room, and maybe a few tiles of wooden floor. A great source of additional flammable material are tainted clothing items and desiccated animal bodies. Dusters and parkas have a lot of hitpoints, so they burn longer. These items are easy to get into the burn room simply by creating a stockpile with appropriate settings. A 3x3 stockpile should be more than enough to create enough heat to clear out any infestation. The fire created will usually last several hours, which is more than enough time to kill everything in the spawn room. | |
| − | + | Separating the actual spawn room from the burn room with a wooden door makes it very easy for your colonists to start the fire without the insects attacking. The heat will spread into the spawn room regardless (and burn the wooden door). | |
| − | + | Having a few flammable structures, such as cheap furniture) in the room is important, because the insects are stupid enough to attack these first when enraged from the fire, wasting time — instead of digging out of this trap. | |
| − | + | It is possible to reach the temperature maximum of 2000 degrees celsius this way. Check the temperature in the spawn room before stepping in with any colonists, because they will very quickly collapse from heat stroke and possibly catch fire and die at these ludicrous temperatures. | |
| − | + | The insects will rush for the exit of the burn room in a panic when they realize what is happening to them, and will quickly attempt to dig out to escape, so make sure the exit door is made of rock which is durable and nonflammable. | |
| − | |||
| − | If | + | If there aren't any flammables around, you can still shoot the hives with fire weaponry. They will light aflame, along with the fuel puddles created on the ground. |
| − | + | As any items inside the room are likely to catch fire and be destroyed, this tactic is not recommended in a place with many valuables such as warehouses. Also be careful with the heat spreading to nearby rooms. | |
| − | + | ==== Heat Stroke ==== | |
| − | + | By using a colonist to manually throw molotovs at the ground, either inside the bug room itself or in an adjacent room with an open doorway, you can maintain the temperature of the insect room between 150C and 200C, slowly knocking them unconscious and killing through heatstroke. As long as the temperature does not rise above 200C, the bugs will not get burn injuries, and therefore will not become aggressive. Have your colonist throw the molotovs through an open doorway in order to protect the colonist from the heat. When doing this, take care not to hit anything directly with the molotovs, as the fires created will anger the insects and set flammable objects on fire. | |
| − | + | It is important to note when doing this to make sure that all bugs are significantly above the serious heat stroke threshhold (60%) before you move in, otherwise the temperature will start falling when you stop throwing molotovs and they may recover and attack your colonists. | |
| − | + | === Explosives === | |
| − | + | Explosives are useful against large infestations. The [[Triple rocket launcher]] can raze infestations instantly. A single use [[Doomsday rocket launcher]] will deal massive damage over a large area. [[Frag grenades]] are unlimited and work well if you have the courage to send someone to close range. One blast can get several insects. <br> | |
| − | + | Explosive animals ([[boomalope]]s or [[boomrat]]s) are also effective at clearing out infestations. Have them march straight into the hive by zoning them there. When the insects attack, the animals will be injured and explode, setting the insects and hives on fire. | |
| − | + | Mortars are useless against the hives themselves as they can't hit anything below an overhead mountain. However they are an option when fighting the insects in open space, with the explosions capable of severely injuring the insects, taking out the smaller ones in 1-2 hits. | |
| − | === | + | === Late-stage infestations === |
| − | |||
| − | + | <gallery widths="500px" heights="400px" class="center" mode="nolines"> | |
| − | + | File:Infestation_ancient_shrine.png | |
| + | </gallery> | ||
| − | + | If you've accidentally left a hive or two behind or totally ignored an infestation, after a few seasons you will have a giant hive community sprawling. This is '''extremely''' hard to treat, especially if you're low on colonists. | |
| − | + | If you're still on early-midgame, it's generally recommended that you pack up and run. If not, however, you will have to deal with them slowly. You need to lure the insects out, then defeat them to buy time for others to enter and destroy the hives. Kiting is a possibility due to their slower speeds, provided they continue to chase down your colonists. | |
| − | |||
| − | + | Explosives are recommended as they deal immense damage to the closely packed hives and insects. This is especially so with the doomsday rocket launcher, which can set entire infestations on fire, destroying the hives and severely weakening the insects. | |
| − | |||
| − | |||
| − | === | + | === Prevention === |
| − | |||
| − | + | If you only have a few tiles of Overhead Mountain then it's best that you fill it up with walls to prevent any infestations from happening. If you are in a mountain base, then you will need to do more than that. | |
| − | == | + | ==== Baiting ==== |
| − | + | You can mine out rooms a distance away from your colony to somehow control insects to nest there, instead of letting them spawn right in the middle of your base. Place some cheap flammable furniture inside to confuse the insects into thinking it's a prospective nesting spot, as well as to light on fire for a quick solution to an infestation problem. You may even use wooden walls or columns, which in a large enough room will cause a roof collapse and crush insects after being destroyed. | |
| − | + | A well-lit base discourages insects from nesting, though it can still happen. If you bait insects to spawn elsewhere the chance of an infestation spawning inside is greatly reduced. | |
| − | |||
| − | If you | + | If you want the insect trap to automatically kill insects, put an [[IED incendiary trap]] inside the room, next to the flammables. Once an infestation spawns the insects will trigger the trap, lighting the room on fire and broiling the insects. |
| − | + | Alternatively, fill it with spike traps to weaken them before they strike your base, giving you the advantage. Doing this preserves the hives, which can be good if you want to farm insect jelly. | |
| − | |||
| − | + | ==== Deep freezing ==== | |
| − | + | An interesting way to completely prevent infestations is to simply set your base temperature below -17°C with coolers, and have everyone in the colony wear [[parka]]s. | |
| − | + | This means that the 'Slept in the cold' debuff will be prevalent in the colony, however, so you will need something to offset the mood. It will also incur a work speed penalty on all production facilities due to low temperature, making this strategy not very viable on all but the lowest difficulties (where infestations are not a big threat in any case). | |
| − | + | === Deep drill infestations === | |
| − | + | Deep drills can unearth insect hives, which will result in enraged insects charging up to attack after a while. | |
| − | + | When you see this happen, gather up your defense forces to fight the incoming insects. Have them approach your base where you can melee block them while evacuating other colonists so the insects don't go for them first. Nearby pets or other tamed animals will also be attacked; you can either evacuate them beforehand to reduce losses and ensure a successful melee blocking attack, or use them as bait to grab the insects' attention while your colonists lay fire on them. | |
| − | + | Note that if you have a deep drill near the walls of a room it is possible for the insects to spawn outside the room. | |
| − | |||
| − | = | + | = Prison breaks = |
| − | + | If you have prisoners (or potential colonists or hats) on hand, always expect them to break out any time. This is more so if you have many of them, each one ready to incite a riot whenever the guards aren't looking. | |
| − | + | Escaping prisoners can open any colony door, and will snatch weapons whenever they see one. | |
| − | |||
| − | |||
| − | |||
| − | === | + | === Strategy === |
| − | You should | + | You should [[#body block|body block the prisoners]] with armored wardens carrying blunt weapons, or melee attacks with guns. They will fight and down the prisoners while blocking their exit, buying time for reinforcements. |
| − | + | Against already injured yet unarmed prisoners, send 1 brawler per prisoner to minimize the risk of beating them to death. <br> | |
| + | For those at full health, 2 unarmed wardens or 1 skilled one can tackle a full-health unarmed prisoner without the wardens being downed in most cases. | ||
| − | + | Ranged wardens should attack when the prisoners are blocked by melee wardens so they can attack from a distance without much danger, and their weapons won't land in the enemy hands so easily. Don't fire too much at them as you risk permanent damage as well as accidentally killing the prisoner. | |
| − | |||
| − | + | === Weapons === | |
| + | You goal here isn't to kill the prisoners, it's to down them so you can recapture them. | ||
| − | + | *Blunt melee weapons such as the [[mace]] is a good choice for wardens to down escapees. The wounds don't bleed (unless you crush an internal organ or destroy a part entirely), nor will they be infected, giving them higher survival chances overall. | |
| + | *At a distance, use low-moderate DPS weapons that won't deal too much damage to the prisoners, or to your people when the prisoners pick them up. | ||
| + | *Don't use high damage per hit weapons such as [[sniper rifle]]s or [[longsword]]s, as you risk instantly killing them or destroying an important part. | ||
| − | + | === Turrets === | |
| − | + | Mini-turrets can be used as a form of distraction and supplementary firepower against prison breaks. Station them outside the prison doors, and they will fire on the escapees. They deliver decent firepower at short ranges, and leave no usable weapons on destruction. Prisoners also tend to stop to fight the turrets, giving wardens time to reach them. | |
| − | + | 1-3 are enough for most prisons. Don't put too many otherwise they may kill the prisoners before you can intervene. | |
{{nav/guides}} | {{nav/guides}} | ||
| − | [[Category: | + | [[Category:Guides]] |
Latest revision as of 21:44, 24 April 2024
| This page could use some more or updated images. You can help RimWorld Wiki by uploading images to make this page better. Note: New images are needed for mechanoids added in Biotech. |
Getting attacked, whether by tribals, pirates, hordes of angry animals or by something more alien is a common event in the rimworlds. Defense against these attacks is one of the keys to having a successful colony.
This page details different tactics for defense and visualizations of them, applicable to most stages of the game.
Core battle tactics[edit]
No matter what sort of defenses you use, these battle tactics may be useful.
Melee tactics[edit]
Melee soldiers are a useful asset in your colonies, if used correctly. They can disrupt ranged enemies, because being engaged in melee interrupts and prevents ranged attacks, and staggers the enemy thus slowing movement. Ranged enemies are also forced to fight back with makeshift melee attacks with their guns, which are woefully inadequate against a dedicated brawler.
In addition, melee soldiers can fend off invading brawlers charging into your lines, or beat up drop podding enemies.
Shield belts and good armor are usually necessary for your colonists to close the gap between you and the enemy. Melee attackers without the protection of shields are highly vulnerable to gunfire, even if heavily armored. Before battle, hide your melee attackers until all enemy melee attackers are engaged in battle, or put them in line in front of your gunners for quick deployment and damage absorption.
Friendly fire is a serious issue in hand-to-hand combat, as you can easily hit your own fighters. While it is still a bearable problem if their shields are up, once the shields are down you will need to manually retarget to prevent friendly fire.
Melee sortie[edit]
This tactic involves using a small element of melee colonists to charge enemy ranged attackers and take the heat off your own gunners.
Can be used to take down annoying long-ranged snipers or small gunner groups. Note that charging at entrenched ranged attackers can also divert their attention from your own entrenched forces to your charging brawlers.
Melee rush[edit]
Melee rushing is the tactic of sending your melee attackers to engage hostiles all at once, rather than focusing on shooting them down or sending small parties to take down troublesome enemies.
Melee rushes can work alone, especially with quality equipment; well-equipped melee rushes can hold off an attack and cause raiders to flee despite being slightly outnumbered. They also attract a great deal of friendly fire from the enemy, as they try to shoot down your brawlers, hitting their allies in the process.
If you aren't afraid of friendly fire, it can be combined with a firing squad from a distance for devastating effects. The brawlers cause chaos within the raiding party while the firing squad lays fire to destroy them while the raiders are trying to cope with your brawlers.
Note that enemy melee rushes are not to be countered by your own melee rush; there is a much more effective tactic detailed below.
Peeling[edit]
If a vulnerable gunner is under attack by melee attackers, you can 'peel' them away using your brawlers. Have them engage the melee attackers, who will then focus on your brawlers, allowing your gunner to get to relative safety.
Trained animals automatically peel for their assigned masters, if 'Release animals' is Off. The animals will attack any hostiles coming close rather than straying off to attack distant targets.
Setting 'Release animals' to On right when another colonist in distress near the trainer causes the animals to swarm the attacker, peeling them off.
Peeling is a relatively high-risk activity, as you are trying to put a pawn at risk in return for allowing a pawn at greater risk to escape. Peeling pawns should be expendable or decently armored.
Self-defense[edit]
Even though they aren't as good as dedicated melee weapons, guns still hurt in melee combat, even surpassing some low-quality melee weapons. This allows shooters to have a fighting chance against melee enemies.
Shooters can fight off small animals quite easily with melee, so have them fight back instead of letting the animal chew them to death.
Melee attacks with guns are a viable alternative if your colonists are adept at melee combat and the guns don't fare well at touch range. Since they don't usually emerge victorious from a 1v1 melee fight unless there is a massive skill gap, have someone else join in the fray, be it a brawler or gunner.
Body blocking[edit]

Enemies can be physically blocked by colonists or animals, denying them access to locations. This can be done to a significant tactical advantage.
Heavily armored soldiers are needed to body block active combatants, as they will take a lot of hits while blocking, and even so they will eventually collapse due to sustained damage. They should also be able to deal good damage at point-blank.
Blocking can be used to slow down prison breaks, seal off escape routes for enemies, or more aggressively to devastate melee only raids, detailed below.
You can avoid heavily injured pawns just by invisibilize your pawns continuously, they will still be blocking enemy drafted pawns in hallways but cant get retargeted. But you have to pay attention, a freshly invisible pawn does not lose the agro of enemies. As an example, if your pawn gets in the door and get targeted by an enemy equipped with a doomsday, the doomsday will be shot at the invisible pawn, there are some ways of breaking the targeting process such as loss of vision, and any kinds of jumps or teleportation.
Melee blocking[edit]
When faced with a full melee attack, instead of engaging enemies on the frontline, retreat behind your walls, and open doors to use as chokepoints. Leave up to three melee brawlers standing right behind (not in) the chokepoint to block enemies while cutting them down, stationing more nearby as replacements, and gunners behind to fire on the blocked intruders. This forces melee enemies to trickle in and fight with your soldiers one-by-one, making them significantly easier to dispatch of. Make sure all brawlers are heavily armored to block damage, and shielded to block friendly fire.
This is a horribly effective way to defeat melee attacks. Compared to a regular frontline defense, this tactic significantly reduces the casualties your side will sustain. You also don't need to build anything special for this purpose- any opening or door in the wall will do. If you use killboxes then it's best that you build it in a way such that melee blocking attacks can be conducted effectively inside.
Weapons[edit]
For maximum pain, use high-DPS guns for your backline for bringing the hurt, combined with quality melee for your frontline to deal sustained damage in between barrages.
- The chain shotgun or heavy SMG are the weapons of choice in this situation due to their unparalleled close-range DPS.
- Miniguns, while effective at shredding the tightly packed enemies behind the chokepoint, are generally not recommended due to the collateral damage to the walls. If you do choose to use them, aim at the middle of the crowd so you can hit as many enemies as possible, while also reducing the damage done to the walls.
- Grenades may also be used and can be incredibly effective at stacked melee groups trying to enter through a chokepoint, but should be ground-targeted rather than freely targeted by the pawn, to avoid grenading your own melee blockers. Grenades can land anywhere within 1 tile of the targeted tile, so place your ground target 1 tile further away to avoid accidentally grenading your own forces or blowing up the walls that are enabling you to melee block. Like miniguns, this will often shred the walls of your chokepoint, so building extra layers of walls at the chokepoint can be helpful.
- Pawns, both friendly and hostile, cannot stop and stand on top of sandbags, and are substantially slowed while moving over them. This can be used to force targets into a particular tile or slow the progress of an incoming force.
Stray bullets will not harm your tanks if the shooter is not standing too far behind; that means it is not a good idea to use long-range fire.
Combined with measures to force enemies into close range, it may be effective against ranged enemies as well, but beware as enemies can still fire until you start beating them up.
Animal Melee Blocking[edit]
Animals can be used as a form of melee blocking by creating a zone for just the single tile immediately in front of the chokepoint or door and assigning a bunch of animals to it. The animals prevent hostile attackers from traversing through that space, and the animals will generally counter-attack en masse anything that attacks them. This often results in substantial injury or death to animals, of course, so ensure the animals used are expendable (ie. not bonded or otherwise critical to the colony), and don't use explosive animals like Boomalopes or Boomrats. This is most effective against non-human threats such as manhunter packs and insectoids.
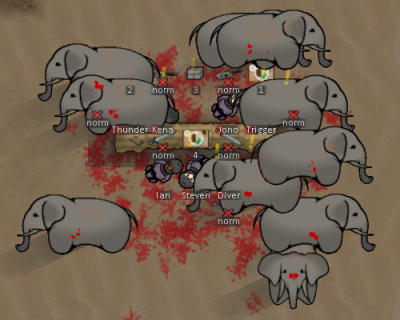
10 manhunter elephants vs 3 armored brawlers and 4 armored gunners; all colonists are downed while all elephants remain standing.

Same situation but with melee blocking; only 1 colonist downed, and all elephants defeated.


Spacing out[edit]
Each colonist should ideally stand at least 1 tile away from other colonists, thus reducing the chance of enemy bullets hitting somebody else after missing the original target, which deals a lot of damage to static grouped up defenders.
Explosives will also hit fewer people this way, though there are better countermeasures than simply spacing defenders apart.
Dealing with rockets[edit]
Rocket launchers are painful to deal with, due to the huge area damage and long range. In the mid-late game they are one of the biggest threats from the enemy.
The best way to deal with them is to distract them to fire elsewhere, in order to greatly reduce the amount of damage received.
Raiders with rocket launchers are often seen in the backline preparing their rockets, while their allies lay down fire at the front. They get distracted quite easily, wasting them on animals or lone colonists. This can be exploited simply by charging them with single units, which will cause them to fire it towards them and away from the rest of your forces. They may fire at point-blank, injuring themselves and their comrades, or with some luck in positioning and fast melee units, you can even intercept them before they can lock on with their rocket launcher, forcing them into hand-to-hand combat and eventually yielding the launcher which can be captured for future use.
This is a high-risk but necessary move to take, and some pawns may need to be sacrificed.
For successful distraction, you have to make your charging units the only available targets for them to consider attacking. If they have a better target with less possible friendly fire, they may attack them instead. To combat this, have all your other units, including animals, stay completely out of range until the rocket launchers have been neutralized.
Psychic insanity lance[edit]
Using a psychic insanity lance on a raider will cause their allies to waste rockets on them. Often, this gets rid of all of the rockets in a raid, and also causes a lot of damage. Psychic lances can generally be used from relative safety, due to their extensive range (though they do require line-of-sight to the target), and have a relatively low cost. Targeting the most durable raider will help make sure as many rockets are wasted as possible.
Shielded unit deployment[edit]
Deploy brawlers equipped with shield belts and heavy armor, letting the shields block the blast as well as some fire. There are two variations of this:
- Move in a zigzag pattern in front of the enemy to draw their attention, and dodge the rockets when they are discharged.
- Directly charge into the fray with your shielded fighters, such that any rockets fired at them will likely hit other enemies as well.
Be prepared to sacrifice someone, as their shields are very likely to be broken whether by the blasts or concentrated gunfire.
Expendable animal charge[edit]
Have animals that are both expendable and fast charge the enemy, rocket soldiers included. It's especially good if the animals can survive a rocket blast, as it allows them to continue distracting any further rockets.
For multiple rocket launchers, send animals in batches, such as by assigning animals to different handlers and setting them to attack at different times, to prevent them from being wiped out by a single blast.
While they do not need to be obedience- or release-trained, as you can use animal area zones to force them into areas, doing so is less effective as animals have a delay before moving into their assigned zones and may be very far away.
Friendly fire with rockets[edit]
Besides being caught in a blast, enemies can also take friendly fire if the rockets impact them instead of your colonists.
You can increase the chance of this happening by having the rocket travel over as many enemies as possible through aligning your distractors. Each rocket traveling over a pawn has up to 40% chance to impact, setting it off early.
If you see that an enemy rocketeer has locked onto a brawler, you can also choose to charge the enemy with that brawler. It will either cause the enemy to deal immense friendly fire, or allow you to take out the rocketeer outright.
Killbox tactics[edit]
Rockets are much more dangerous in a killbox where colonists and turrets are closely bunched together. If you're unlucky, a rocket will set off turret explosions, causing additional damage. Rocketeers are a priority target that need to be rapidly eliminated as soon as they enter.
However, killboxes do provide 2 crucial advantages: range restriction and concentrated fire. This allows you to direct concentrated fire onto the rocketeers to neutralize them rapidly.
Rescue[edit]
When a colonist is downed or severely injured, it's best to drag them out of the fight immediately. Don't leave them there otherwise they risk dying from stray bullets or blood loss. You don't really need to send them directly to hospital; just drop them off somewhere outside of active combat.
Colonists lying outside cover are riskier to rescue. Choose the right time to pull them out, ensuring that there are no melee enemy nearby that could tie up the rescuer, and use your best-protected colonists. Don't allow anyone near at other times as they may draw fire. Consider drugging your rescue team with go-juice if the pawn you are rescuing is under heavy fire, as this will both increase the rescuer's speed and improve their pain resistance, making them less likely to be downed. Using a jump pack ![]() to rapidly jump in and pull them out of combat, with the i-frames incurred during jumping, makes this significantly faster and safer for both rescuer and rescuee. Locust armor
to rapidly jump in and pull them out of combat, with the i-frames incurred during jumping, makes this significantly faster and safer for both rescuer and rescuee. Locust armor ![]() can be substituted at the cost of armor, but ideally should be paired with a shield belt to make up it. At high qualities, for the short duration of exposure, a shield belt can be superior as it prevents all damage, including that which would slow the pawn or reduce medical skills.
can be substituted at the cost of armor, but ideally should be paired with a shield belt to make up it. At high qualities, for the short duration of exposure, a shield belt can be superior as it prevents all damage, including that which would slow the pawn or reduce medical skills.
Non-combatants, such as those incapable of violence, are ideal to serve as rescue members by standing near a fight to pull out downed colonists. Non-combatant doctors should wear a shield belt and carry quality medicine at all times, so they can be drafted during combat and quickly tend to wounded colonist on the field. Non-combatants should be equipped similarly to above, though with no ranged weapons they have fewer restrictions on wearing a shield belt to prevent damage, and their value proposition improves.
If a colonist cannot reach the hospital in time, typically ~2 hours from death or less, have the doctor patch colonists up a little such that they can reach the hospital without bleeding out, then carry them there. You will have a higher infection chance this way, but it's better than the colonist bleeding to death while on their way to the hospital. The remaining injuries can then be treated in the cleaner environment. Alternatively, an untuned biosculpter pod![]() can be kept nearby and the injured pawn loaded into it. This can save pawns moments from death, that a doctor could not treat fast enough to save. The cost of the pods can be considerable however, and they must be de-tuned or deconstructed and reconstructed after each event.
can be kept nearby and the injured pawn loaded into it. This can save pawns moments from death, that a doctor could not treat fast enough to save. The cost of the pods can be considerable however, and they must be de-tuned or deconstructed and reconstructed after each event.
Friendly fire management[edit]
Friendly fire is a serious issue when facing close-range attackers, especially manhunter packs. If they manage to run past your barrage of gunfire to engage your ranged soldiers, they may receive more injuries from friendly fire in the ensuing chaos than the attackers themselves. You need to be careful when directing your troops so you don't hit your own forces by accident.
Pawns can fire over the shoulders of friendlies up to 2 tiles (i.e. 1-tile space in between) away, meaning that you can have a 3-wide row of soldiers without friendly fire, which is not recommended.
- When the enemy breaks the ranks, only let the soldiers closest to melee attackers fire at them.
- Manually re-target the others to fire at another direction, repositioning them if needed.
- Disable 'Fire at will' when the enemies are closing in so they won't switch targets, potentially causing friendly fire.
- Have only 1 line of shooters so stray bullets, including bullets fired horizontally at melee attackers, will less likely hit someone.
Firing at cover[edit]
While cover works best against attacks coming straight, it's usually better to fire straight at the target instead of from an angle. If you fire straight at it, only 1 unit of cover will be effective, but if you shoot at a diagonal angle, 2 units of cover will be effective, both being capable of blocking shots, in total contributing to higher cover effectiveness.
However, if you can get to the point where you're almost firing horizontally at the raiders, then cover becomes nearly ineffective at protecting the raider, allowing many more shots to connect. This often requires you get out of your own cover, so it's not recommended unless you can find suitable cover nearby.
For skilled medium-long range shooters it's best to shoot from a great angle to hit them from the sides.
However for not-so-good or short ranged shooters it's better to directly fire at them instead as the extra distance will make it harder to land hits, or cause the raider to exit firing range.
The below shows the difference firing angle makes on the hit chance of a pawn hiding behind cover. Cover values are from Alpha 16, but the mechanics remains unchanged.
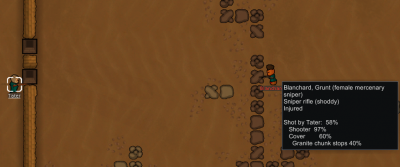
Firing straight at a raider in cover; 1 stone chunk blocks 40%.
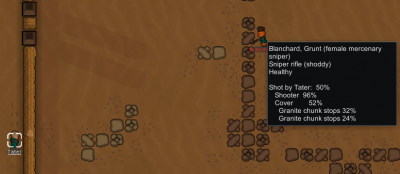
Firing at an angle; 2 stone chunks block 48% total.


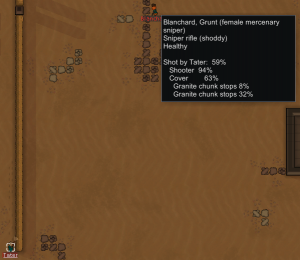
Firing at a greater angle; 2 stone chunks block 37% total.

Firing almost horizontally; 1 granite chunk blocks 8% only.


Mobile warfare[edit]
Flanking and Surrounding[edit]
To flank enemies, have some defenders approach enemies from the sides or the back instead of concentrating fire on the front. To surround them, attack from all sides.
Enemy ranged units often stay in the same spot when engaging your colonists, and they tend to have effective cover facing one direction only, making them vulnerable to flanking. Flanking enemy ranged units can distract them and cause them to lose their cover advantage with attacks coming from multiple sides. While this makes you lose the advantage of high-quality cover, it is balanced out by the enemy's loss of cover.
This works best against entrenched ranged enemies attacking you from one side. They should be occupied with attacking frontal targets so you can creep up to them to unload lead on them from another angle. It's even better if you pair with melee to tie them up, buying time for your soldiers to get into position and preventing them from moving into new positions.
Rounding up any fleeing survivors also becomes easier if you have someone (especially melee fighters) blocking off escapes from behind.
Moving in[edit]
While moving in you need to make sure you stay far enough away from enemies, and directly right-clicking on the destination will nearly always result in a path that crosses with the enemy.
This can be overcome by shift-clicking to form a path for the pawn to follow, making sure to keep sufficient distance.
Shield belts, drawing enemy fire from a different direction, or simply using walls and terrain to block projectiles are all good ways to move in.
Wide arc flank[edit]
This tactic is about scattering your fighters in a wide arc facing your enemies. Rather than huddling together behind continuous lines of cover such as lines of rock chunks, each soldier should be taking cover on their own, and be able to shoot straight at the enemy without anyone else in between.
This gives more flexibility in positioning as well as greatly reduced vulnerability against explosives or collateral damage. Engaging your flankers also results in enemy fire being scattered, so focus fire won't take down anyone easily.
You can deploy shielded colonists to draw fire effectively from your gunners, though they need to be arranged carefully so as to be able to tank without taking friendly fire.
Perfect against preparation raids or in-construction siege camps when you can't use your static cover and they won't directly attack your base upon arrival. However if the enemy has a significant cover advantage (such as sandbags) then this tactic may not work out in your favor.
Tanking[edit]
This tactic simply requires you put your shielded colonists before your static gunners to partially soak up gunfire. This is best when you have insufficient cover, or additional cover to block more bullets for your frontline tanks.
As with any tactic involving meat shields, this poses a great risk to colonists' lives. If the colonists' shields are downed and they are not well-armored, you will have to get them to retreat behind cover until their shields come back online, otherwise your colonist will be exposed to ruthless gunfire.
Beware of high damage-per-hit weapons which can instantly down shields.
Hit and run[edit]
Against slow or static targets you can employ this to weaken them. You will need several fast-moving long-ranged colonists, possibly with charge lances or bolt-action rifles. Have them move within range to fire, quickly exiting range once the enemy returns fire. Repeat until conditions are no longer safe to conduct this attack, such as enemies entering full aggression and charging.
Effective against siege camps and preparing raiders for they tend to stay put at their location until they are aggravated into attacking.
Kiting[edit]
This tactic is effective when all or the most dangerous enemies are slow moving.
Ideally, you have fast colonists - 120%+ Moving - running near moving enemies, drawing their attention. Constantly outrun the enemy while staying within their attention range. If not, the enemy will engage other targets instead. This way, kiters can distract a group of enemies by leading them around the map. Other colonists can fire at the kited enemies. And if the kiting colonist is fast enough, they can take a few potshots (once they are far enough).
As long as your colonist safely outruns hostiles, you're fine. However, if the enemy catches up, your colonist will be slowed and on his own. Even with a regular speed colonist, kiting can be beneficial, as it gives valuable time for your ranged colonists to shoot.
Equipment[edit]
A fast, long-range weapon is safest - e.g. the assault rifle or bolt-action rifle. A fast moderate-range weapon (e.g. machine pistol) may be used against melee enemies, but is riskier. Slow weapons such as sniper rifles are not recommended, as the need to stand still for extended periods puts soldiers in grave danger.
Kiting colonists should be lightly armored while still maintaining a fast speed.
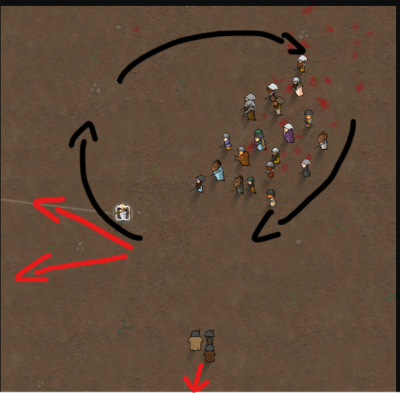
Kiting #1 - when enemies are as fast as the majority of your colonists. Optimal scenario shown - all raiders are lured to 1 colonist. Ideally you have >1 colonist faster than the enemy.
Black circle is the ideal kiting route, when your kiter is fast enough. Red lines can be used if the kiter is too slow to run a full circle. Enemies might catch up, but you've gained valuable time for colonists to shoot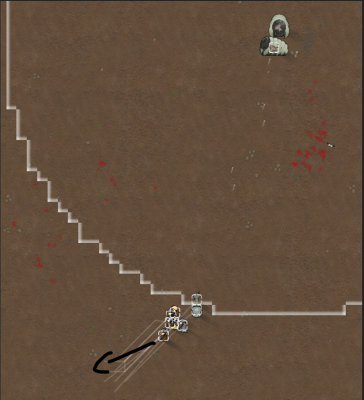
Kiting #2 - when all colonists can outrun and outrange the enemy. Retreat just before you get into enemy range.


Additional tactics[edit]
Baiting[edit]
Faster, more well-protected colonists can be used to lead enemies into traps or ambushes. This is for situations when you have defenses concentrated in one direction, but the enemy comes from another.

Cheap furniture also makes good bait. Raiders will smash any player-built furniture left out in the open, such as tables or wooden stools. This can be helpful to split them up or lure them into range of your defenders' weapons.
Luring in[edit]
Enemies can be lured closer to your base by keeping your colonists out of sight, then swarming out to attack once they draw closer to your base. Afterwards they will switch to engage your defenders.
This can be used to negate the range advantage of enemies. It also works well with melee blocking to lure enemies into trying to jam themselves into your chokepoints, rather than beating up your base.
Animals[edit]
The animals on the map, tamed or not, can be used to your advantage.
Tamed animal release[edit]
| This section is a stub. You can help RimWorld Wiki by expanding it. Reason: Please add a reason . |
With your handlers, you can amass a huge army of animals to charge the enemy. Simply find a good combat-capable animal, tame it, and train it to learn Release.
There are many animals that are good for this purpose. Main tactics are take quality vs take quantity.
- Large animals like Thrumbos, elephants or rhinos have good DPS and their large health scale means that damage is less likely to kill them before they can get patched up by your doctors. However they are harder to tame and very hard to keep a big amount. Replenish losses for a long time (especially Thrumbos). Due to smaller amounts, in case of big raid, they can block only few gunners and will sooner be downed by others.
- Wargs and bears offer a good balance of DPS, breedability and feasible number to keep (can eat bodies of raiders). Better block large number of gunners.
- Huskies significantly less DPS than the others, but are easy to breed, feed, and provide hauling. Can block big raids.
- Dryads don't need food, training, breed and can self-heal. Colony only need to maintain trees. Clawers are the best choice for meat attack, while barkskins for tanking. Use separately: clawers are faster than barkskins, and barkskins will not perform their main duty.
Tamed animals also cause pirates to fire near their allies in a bid to get them off their allies, potentially causing friendly fire.
Strategic zoning[edit]
Raiders take their sweet time to exterminate any trace of your tamed animals on the map. This can be exploited to your advantage, as long as you're willing to have a few animals valiantly sacrifice themselves.
- Distraction: If you let your animals run all over the place, raiders may be tied up trying to wipe out the animals. This can give your colonists time to prepare, such as entering defensive positions or running to your mortars to fire a few rounds, as well as scatter the raiders making them easier to deal with. Raiders wielding rocket launchers also tend to waste them on your animals, leaving your colonists and structures mostly unharmed. However if they see better targets they will come at them instead.
- Direct offense: Besides distraction, animals may also engage raiders, harming or killing them.
- Manipulation: Animals can be moved around without the need of training Release, simply by changing the allowed zone of your animals. A short time later, the animals will move towards the zone and stay there. When animals are sleeping you can put animal sleeping spots beneath them and then remove them to wake them up. Changing the animal's zone also immediately forces it to move, at high speed, if they are not in the area of the new zone. This can also be used to update an existing zone's area by changing the animal to a different zone (which they aren't in the area of) and then back to the original zone again. Untrained animals will flee from threats, but will fight back to defend themselves if they are damaged by a hostile.
- Aggressive zoning: Zone animals in a place where you are expecting an encounter with enemies. Enemies will notice the animals and will start attacking, making them fight back and injure or even down the attackers. This method works for any animal, even those that cannot be trained. Remember to undo the zoning otherwise the animals may starve. Boomrats are especially useful by causing explosions, setting raiders on fire and delaying their assault.
- Animal chokepoint: Zone the animals in a chokepoint, creating a dense cluster.
- This is vulnerable to AoE weaponry so increase the area of the zone to make it that animals don't get too tightly together, if the enemy has explosives.
- Animal chokepoint: Zone the animals in a chokepoint, creating a dense cluster.
Aggravating animals[edit]
If you have any easily enraged wild animals (emus, thrumbos, etc) standing near the enemy, you can shoot them to anger them and make them charge at the enemy.
You can also opt to enrage an animal then have a fast colonist (>130% Moving) lead it towards the enemy. Some enemies will stop and engage the animal, potentially causing it to switch targets. For quite the obvious reasons it's best to equip a shield belt on the kiting colonist if he isn't the one enraging the animal.
For this, larger animals are best due to their high health and damage. A thrumbo can be considered a godsend in a raid; just send 1 straight into the raider hordes, and let 'er rip.
Smaller animals are faster and hard to hit, making them decent distraction and causing a hefty amount of friendly fire among the enemy as well.
Remember, if you can down the animal easily with colonists, so can the raiders.
Similarly to this, a Manhunter pulse on a flock of wild (or tamed but not trained) animals can wreak havoc on raiders, just make sure that your own pawns are too far away to be targeted. It may make sense to have some fenced-in pastures at the edge of the map for this very purpose.
Meat shield[edit]
The animals surrounding a handler can be used as a convenient meat shield as they take bullets, arrows and other projectiles (but not explosions) for their master. Provided they don't stray too far, they won't receive friendly fire as the shooters simply fire over them. All you need is to train Obedience, instead of Release.
Slaves with shield belts are also a good sponge for bullets. New meat shields can be obtained from survived and enslaved raiders.
Base scattering[edit]
This is a last-ditch tactic to defeat humanlike enemies if you are significantly outnumbered.
Instead of engaging them right away, let enemies scatter around the base first. After they scatter widely apart, divide and conquer, using large groups of soldiers to overcome them with ease, while others are busy demolishing other parts of your base.
Remember to patch up the base after the damage done. Coolers are especially tricky as they serve as weak points and are expensive.
Outside help[edit]
If the storyteller is feeling somewhat merciful, outside help may come to save the day.
Don't count on this however, as these rarely happen on their own, and most of the time you still need to fend off the raiders yourself.
Friendly reinforcements[edit]
Occasionally while hostiles are on the map, a friendly military caravan will come to bolster your defenses. The threats may also coincide with friendly trade caravans, visitors or passersby, who will help to engage a common enemy.
This requires you be already allied with some factions, so that they will send help of meaningful value; otherwise they may just send a few people who will quickly get downed and serve no purpose other than distraction.
Besides actual assistance, traders may also come with around 550 - 1000 points, enough to hold their own against a smaller raid. This allows you to have decent fire support around half the time, simply by calling in 1 trade caravan once every day (assuming alliances with all 4 non-pirate factions). It costs goodwill (or silver pre-0.19) but allows you to trade, as well.
You may also call for additional help from allied outlanders at a cost of -20 goodwill (tribals are unable to send help due to technological limitations). This can be repaired by diplomatic gifts, or rescuing and treating downed friendlies.
Common enemy[edit]
If mechanoids, manhunters or another enemy faction show up, raiders may stop to engage them. This causes losses to both groups of enemies, making it easier to pick off the stragglers. Being concurrently raided by two different enemies at once is more common during the ship reactor start-up phase, making it slightly easier to survive the onslaught.
If there are unopened ancient shrines you can open them, which may contain artifacts, mechanoids, confused spacers, all useful against raiders, or none of the above.
Using the psychic animal pulser or the Manhunter Pulse psychic ability is essentially invoking this tactic, but you need to be very careful when using it.
Environmental hazards[edit]
Very rarely, when unable to put up a proper fight, you can count on Mother Nature to play for your side. Invaders will come to you without proper protection against the weather. You will be able to fend off the attack without confrontation.
Choosing to play on an extremely hot or cold map, such as in a sea ice biome near the poles, seals the fate of all raiders foolhardy enough to come.
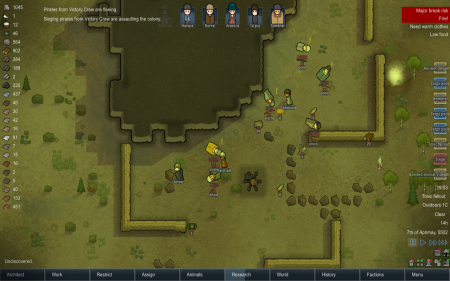
Siege flees from Toxic fallout and hypothermia.

Free prisoners in bulk.


Humanoid assaults[edit]
Raiders[edit]
"Raiders" come in a wide variety of sub-types, and with a surprising variety of tactics. But they all need to be explained the error of their ways...
Behavior[edit]
Raiders will attack randomly chosen constructed objects, colonists and colony animals. They will not attack natural rock walls (except for sappers), non-hostile wild animals or unpowered turrets. They will attack prisoners if they are captured from their enemy factions.
They usually set fire to crops in growing zones, power generators, power conduits, and other production buildings. They will melee attack furniture, doors and walls. They will also use thrown explosives on structures, and some use EMP grenades to stun your turrets.
Raiders will prioritize firing on colonists or turrets that are actively engaging in the fight, but will otherwise attack random objects.
If humanlike non-mechanoid raiders are unable to defeat your colony in time, they may give up. Normal raiders will give up between 26,000 ticks (7.22 mins) to 38,000 ticks (10.56 mins) after the raid begins, while sappers will give up between 33,000 ticks (9.17 mins) to 38,000 ticks (10.56 mins) after they begin the attack.
Preparation[edit]
Humanlike raiders will sometimes start by standing around in a group where they spawned and will continue this until they lose a certain amount of raiders or they hit a certain preparation time limit, at which point they begin the assault. When a colonist is close to the raiders they will attack the colonist.
Equipment[edit]
Raiders spawn with randomized equipment determined by their "pawn kind". While the budget for "purchasing" each individual of the different pawn kind is determined by the storyteller and the current raid points value, the equipment itself is decided by the weapon and clothing budgets and type restrictions of the pawn kind. More information on the pawn kinds can be seen in the Pawns sections on each factions' page.
Apparel[edit]
Pirates can range from only wearing a tattered pair of pants to flak vests to full sets of marine armor. Mercenary slashers will always come in shield belts and only they do so.
Tribals always come in tribalwear, with some in war masks or veils. Some later game come with plate armor as well.
In cold environments, both will come in wearing parkas or tuques, protecting them from temperatures of around -40 to -50°C, sometimes up to -110°C if they wear wool parkas. They don't usually come in wearing dusters or cowboy hats in hot areas, making them vulnerable to the heat.
They tend to wear leather, cloth or synthread clothes, which don't provide good protection, and less commonly the more protective devilstrand or hyperweave.
While mid-late game pirates usually come with normal quality flak and marine armor providing around 100% sharp armor, with quality apparel you can push yours to have more than 130%, even without masterworks or legendaries, giving you the upper hand.
Weapons[edit]
For most factions, skills are assigned at random, meaning that raiders are not always given weapon appropriate for their skills; skilled shooters can be randomly equipped with melee weapons and melee pawns equipped with guns. So if you have your colonists equip weapons according to their skills, you already have an advantage over many enemies. Unlike the other factions, the Empire![]() will ensure that its soldiers have skills appropriate for their issued weapons.
will ensure that its soldiers have skills appropriate for their issued weapons.
Tribals usually come equipped with primitive weapons of random quality, either melee weapons or ranged weapons limited to bows and pila. Melee weapons are not to be underestimated however, as blunt armor is often lacking and both longswords and spears are relatively common and have respectable AP.
Pirates and outlanders can spawn with most weapons in the game, up to and including dangerous doomsday rocket launchers.
However, some classes of raider always come with the same weapon or same category of weapon. For example, mercenary snipers always use sniper rifles, grenadiers always wield either frag grenades or molotov cocktails, and tribal archers of all types always use neolithic ranged weaponry.
Drugs[edit]
Pirates or Outlanders may utilize some form of combat-enhancing drug, namely go-juice, yayo and luciferium. They will usually start off addicted to them, and will carry some in their inventory which is dropped upon death. They may also use multiple drugs, disregarding the risk of overdose.
These can reduce the amount of the pain received, making the raider last longer in battle before going down. Increased movement speed also allow raiders to get into position earlier, and brawlers to harass your defenders more easily.
- Go-juice is an excellent combat drug that makes the raider much more efficient in battle. It eliminates 90% of pain, gives a 30% movement speed buff, and a 10% consciousness buff for more accuracy. The raider is almost guaranteed to fight until death, or the rarer case of incapacitation through a shattered spine, severe brain damage or removal of both legs.
- It's almost always more worth it to use body part-destroying weapons such as the Sniper rifle to kill them, as Go-juice does not reduce the actual damage they take.
- Yayo grants a 15% buff to speed and eliminates half of pain received. Enemies under the effect of yayo are more durable against damage not concentrated on a vital body part
- It will take more hits to down them, and more likely the raider dies first due to lethal damage, but is still possible.
- Luciferium grants a wide range of buffs to the user, from increased organ function, to slight movement speed and consciousness buffs, to reduced pain.
- It's more troublesome to capture addicted raiders since you'll need to regularly feed them luciferium to sustain their lives, which is very expensive and hard to come by -- it's usually more worthwhile to just strip and finish them on the spot.
- Although it is possible to farm this drug by addicting raiders to it and release them, the next time they come they will bring some with them.
Sieges[edit]
During a siege, raiders go to a location outside your base, receive materials via drop pod and will proceed to build a simple mortar camp. The mortar camp will generally have 2 mortars and sandbags as cover. The sandbags need not cover the mortars, nor will they necessarily face your base.
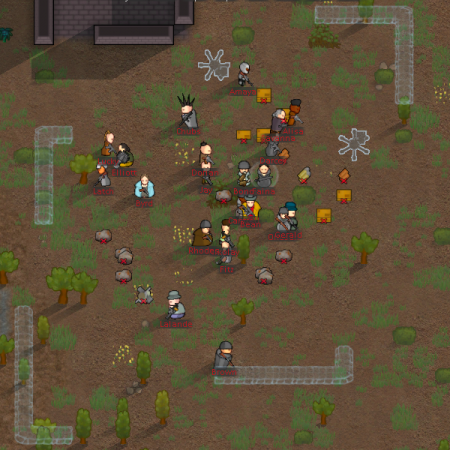
Siege camp under construction.

Finished siege camp. Note that sieges always come with 2 mortars.


When faced with a siege, there are a few strategies you can use.
In most cases it's better to attack the siege camp as the raiders will continuously siege the colony even if you're in hiding, and most likely you will eventually need to face off against the raiders yourself.
Camp assault[edit]
If you assault their camp, one possibility is sniping the raiders, prompting them to assault your colony directly instead of continuing their siege once you down several of them. Defeating them early enough will result in most of their items remaining intact, which you can take for yourself.
Another alternative is to snipe the mortars, hoping an explosion will take out many raiders, but keep in mind that for those you will need to either send someone dangerously close to enemy fire, or draw all attention to one side to allow flankers to snipe and detonate them.
Unlike most defensive situations, this time they will have the advantage of good cover on their side. You will have to find suitable cover, such as rock chunks, which you can fire from.
Sniping mortars under construction, when they have much lower health, is effective at wasting the enemy's resources.
They are vulnerable to flanking if they haven't finished their sandbags or left a side uncovered. However, once all cover is completed, flanking is less of an effective solution.
Early interception[edit]
The best time to attack them is when they've just started building their camp. At this time their resources would have arrived.
Attacking them at this time forces them to use rock chunks just like you do, instead of having the superior sandbags on their side. Their mortars won't be ready as well.
Attack only when their resources have arrived, otherwise they will flee and not send any resources, which you could've stolen had you attacked later.
Hit-and-run[edit]
An effective tactic to lure sieging raiders out is to conduct hit-and-run attacks against them. Taking down someone usually causes them to give up on sieges and directly attack, making them lose their cover advantage.
Countering with mortars[edit]
If you have your own mortars, you can use them to fire back at the raiders. The raiders will stay put to defend the camp, making them easy targets for mortar strikes. It's best to wait for the raiders to arrive at their siege encampment location so leading the target isn't required.
High-explosive shells deal heavy damage to tight groups of raiders if they hit, ignoring all cover but solid walls in the process. A tight volley can devastate mortar camps, forcing them to either attack or flee outright. Waiting for their supplies to be dropped gives you the possibility of causing their own mortar shells to explode on them causing significant additional damage.
Incendiary shells are an effective way of distracting sieges as the raiders will be preoccupied with extinguishing the resultant flames. 2 mortars are usually enough to keep them from doing any activity other than firefighting, unless it is raining or there are no flammables nearby. This deals little damage to them, however.
EMP shells can stun the mortars, preventing them from firing. It is perhaps better used as a support weapon while your defenders assault the camps, to reduce the damage done to your base.
Sneak attack[edit]
If you don't have the strength to attack directly, you can wait for them to sleep at night, then use the opportunity to set your colonists into position for a sneak attack.
Once someone receives an injury, everybody will wake up, so be sure to have everything in place.
- Get within range and throw a coordinated barrage of frag grenades at the enemy, blowing the defenseless raiders to bits.
- Go very close (no more than 3 tiles) then unload your guns on the exposed raiders. Nearly every bullet will connect, dealing heavy amounts of damage upfront.
- 1 well-aimed doomsday rocket launcher can end the siege easily. While also effective at day, it is much safer to approach at night, and the raiders will also be more tightly packed.
- Send brawlers straight in, beating up dangerous enemies like rocketeers first.
- Steal their supplies and wait for them to send more. Free food and mortar shells!
- Scatter chemfuel canisters around the camp, pick up shells and survival meals. Retreat. Load one incendiary round into your mortar. Do one shoot, enjoy the popcorn.
- Burn the enemy with fire, a task made much easier while they are off-guard. This will eventually force them out to attack after suffering from heavy losses.
- Lighting the mortars on fire allows them to be destroyed with ease.
- Surround the camp with fire. Upon waking up, they will put forward their futile efforts in controlling the raging sea of fire around them, eventually giving up and attacking.
Deep tunneling[edit]
Mortars cannot hit anything that is under an overhead mountain. This makes deep mining a effective defensive strategy against heavy bombardment. If you don't build your base into a mountain, you may at least consider digging out at least one panic room for non-combatants to hide within from the shells while others head out for the assault.
Firefoam shell jamming[edit]

An interesting way to nullify the threat of a mortar attack is to launch a transport pod filled with firefoam shells to a location closer to the mortars than the shells they brought with them. When the shells arrive, the enemy will load them shells into the mortar instead. This means that the damage to your base will be much reduced, as firefoam shells do little damage beyond damaging roofs.
Shielded melee charges[edit]

Pirates or Outlanders can come with all-melee charges, with most enemies wearing shield belts. This can prove a threat to ranged-reliant defenses as they charge towards the colonists directly with their shield belts blocking large amounts of damage.
While they are vulnerable when their shields are down, many can still reach your colonists and engage them in melee combat.
Melee blocking[edit]
The Melee blocking tactic is especially useful here; for better effectiveness, open multiple chokepoints to spread out enemies and keep them busy trying to squeeze in, otherwise they will get bored and wander off to attack other things.
Shields don't stand a chance against concentrated fire poured down a narrow entrance. Using EMP Grenades or EMP Launchers can entirely disable the enemy shields, making mowing them down much easier, but ensure you don't accidentally short out the shields of your own melee blockers. It's best to order the grenadier or launcher wielder to attack a specific ground point rather than letting them freely select their target, as they may try to grenade a target right next to your own melee blockers. Both grenades and launchers can deviate by up to 1 tile in any direction from the targeted square, so take that into account when selecting your aiming point.
Sniper party[edit]
Raiders can come using only sniper rifles, giving them a very long range but low overall damage.
The danger comes in that if you engage them conventionally, you may need to exit your quality cover, removing your cover advantage.
Sniping them back is not recommended unless you have a surplus of skilled snipers and cover.
Luring in[edit]
Instead of engaging them on the frontline, you can keep everyone out of sight, then rush out only once they get close to your base, negating their range advantage.
Killbox[edit]
A well-designed killbox can entirely negate any advantage that sniper parties field. Critical to that is ensuring that line of sight is entirely blocked for incoming attackers until they are in range of your own forces, preventing them from being able to take cover once inside the killbox, and using sandbags to force them to walk (slowly) while already under concentrated fire without being able to return fire.
Heavy explosives assault[edit]
Enemies may come in mainly equipped with area damage weapons, such as rocket launchers, grenades and miniguns. This can cause serious damage to your base, your colonists, and the raiders themselves.
The main danger, as always, is from the rockets. The ideal method is to distract them from the main defending force, not only reducing damage taken by friendly forces, but also increasing friendly fire the enemy takes. The fact that so many of the raiders have rocket launchers means that friendly fire can be so serious that the raiders will decide to retreat to cut losses by friendly fire alone.
Due to the wide use of explosives, cover is less useful; you would benefit more from flexibility in positioning rather than protection from cover. Space out your defenders, preferably far from your base structures, while giving them enough space to move around to evade attacks.
Distraction[edit]
If you have many tamed animals, you can zone them near the raiders, who will be distracted to fire at the animals with rockets. Enemies are much more likely to receive friendly fire when firing towards your animals right next to them.
Grenadiers[edit]
Besides rocketeers, many of the enemies will also be grenadiers, which are short-ranged and are thus vulnerable to fire from a distance. Once the rockets have been taken care of, you can shoot them down with concentrated fire quite easily. Make sure to dodge the grenades if they do close in.
All-in melee charge[edit]
You can go hardcore and send in all your shielded brawlers to go straight at the enemy rocketeers. Gunners should stay out of range of rockets until all rockets launchers have been used.
This is especially effective when they come in to chase a refugee, leaving you enough time to position your brawlers deep into the enemy.
At any rate, expect losses this way due to the concentrated explosions.
Base flank[edit]
Besides sending one large attack party, enemies can also split up their forces and attack your base from multiple sides.
To adequately defend against this sort of attack, you may need to split up your own defenders and fight several battles at once, thus increasing the difficulty of managing the battle.
Each of the individual groups will flee on their accord.
Divide and conquer[edit]
If the enemy decides to prepare before attacking, you can afford to send out a larger attack party to eliminate the groups one-by-one.
Sappers[edit]
Sappers will mine and blast their way through any obstacles, such as natural or constructed walls, though avoiding high-health ore veins. They will also try to circumvent your defenses to attack from another direction. Their goal is to reach one of your bedrooms or barracks, where they will begin to wreak havoc.
In an open base, sappers can usually be treated as a weaker-than-usual bunch of raiders. However, they are a great threat to turret-reliant, mountain or walled bases, including bases with killboxes.
Their grenadiers and miners deal heavy damage to structures; even the toughest plasteel walls will not stop them for long. They will also persistently try to tunnel into your base, continuing even if their digger is killed or they are under attack.
Turret funneling[edit]
It is possible to funnel sappers with unpowered turrets, since sappers will avoid entering turret radius. Note that this doesn't appear to work to funnel sappers into killboxes.
Early interception[edit]
With enough manpower, you can choose to intercept them while they're tunneling into your base. They tend not to use cover when doing so, so you can catch them by surprise. Once your defenders intercept them, they will turn to engage you.
Rocket counterattack[edit]
The doomsday rocket launcher is your best bet against sappers, if they aren't a full melee charge. Since they are bunched closely together, a single well-placed rocket can blow up most of the attacking party, causing the rest to flee in panic. If they have rocket launchers, they may drop them on death, so you may actually end up with more rockets than you started with.
If you are the one using the rockets, you have the advantage of being able to fire first. Aim it at a spot where the enemy is likely to be bunched up. If you're quick you can defeat the enemy before they can even fire back at you, ensuring victory.
Rocketeers should be behind your best cover so they can survive long enough to fire. Your other colonists should be closer to the enemy to draw fire, but out of the rocket's path lest it hits your colonists instead.
Mountain bases[edit]
If you're in a mountain base you can draft a few melee pawns to wait at the entrance, as well as a few ranged pawns facing the entrance to fire down the tunnel. When they do break in you will already have prepared to face the raiders and can pour a stream of lead right into their face or cut them into pieces.
In a mountain base, since they take longer to mine through the rock, you may try placing an IED trap right behind the wall that a sapper is trying to tunnel through, to catch them by surprise with an explosive blast. This is especially effective if it's placed right on the other side of a loose rock chunk (easily found in tunnels), which will slow down any enemies stepping over it enough that they won't be able to retreat in time.
Aftermath[edit]
Remember to cover up any tunnels or gaps in your defenses as they open up an opportunity for raiders to come straight into your base. You may fortify it and turn it into a booby-trapped chokepoint to catch unsuspecting raiders seeking direct entry.
Drop pod attacks[edit]
Sometimes pirates or mechanoids will come in drop pods. If they land at the edges, they can be treated as a normal raid party, unless you have expanded to the edges, in which they will land inside your base.
To defend against this, have a second line of defenses inside your base so you can deny the drop-podders easy entry into your base.
The main danger comes in landing right in the center of your base. Capable enemies not using alternative strategies such as sieges or sappers have a 10% chance of doing so.
Once they choose to land there, things will get ugly. By landing in the middle, they bypass most of your conventional defenses, and you can't use your cover advantage against them. They will also break through constructed roofs on their way down, landing right inside rooms and buildings. This can put not only your colonists, but your stockpiles in grave danger, as well, especially if they land near your volatile mortar shells or chemfuel stores, or batteries.
Fortunately for you, they have a short delay (520 ticks (8.67 secs)to be exact) before they open and all hell breaks loose. They also come in smaller numbers than regular raids.
Enemies in drop pods cannot land in tiles beneath an Overhead mountain, so tunneling deep underground can make safe rooms.
Strategy[edit]
Once you see them land, you should immediately decide what strategy will you use: attack immediately or wait and let them break furniture or steal things. In case of immediate attack, draft any nearby armed colonists to the site, whether they are your designated soldiers or not. Let them hold off the attackers for a while before your soldiers arrive to help. You have less than 9 seconds before they open, not enough for a soldier to get halfway across the map to help.
Any non-combatants should immediately be evacuated. They may still stay close to help in rescue efforts, pulling out any downed colonists. Make sure it's safe to rescue them- as in rescuers not walking through the crossfire and back again to get a colonist to the hospital. You may need to forbid doors to prevent them from walking through the firefight into a hospital. Melee is useful against these attacks, for you can immediately start beating up the enemy as soon as they exit the pods. They can also shut down dangerous enemies such as rocketeers.
If you decided to wait, draft your soldiers and put them near (but not close) to the drop area and wait. When raiders face no resistance, they will immediately start breaking furniture, put fire (sometimes turning the room they landed into gas chamber) and later will decide to steal some things (including furniture that can be moved), take it and flee. Let them do it, and when they take items and go, attack. While fleeing, they will not resist, making it much safer to kill all of them and return stolen back to the storage. Works best when raiders landed inside the locked room.
Like other raids, humanoid raiders will attempt to flee after receiving heavy losses; however, if they land inside enclosed areas of your base, they will be trapped, allowing your colonists to down and capture them at leisure; in their panic, they won't try to fight back, until you're well into beating them up.
Cover[edit]
You should use your furniture or wall corners as cover and fire from behind them. You can also have 2 colonists hiding behind each doorway for full cover. Toggle the doors to be held open, otherwise they can't fire. Be careful as enemies will also utilise cover as well; to combat this, attack from multiple angles or use melee fighters.
Spread out colonists so they don't take collateral damage, even if it may mean some will fire out of cover. Keep heavily armored colonists up front and lightly armored colonists at the back.
Colonists with high construction skill can relocate furniture quickly; use this to your advantage by creating cover for yourself and removing it from enemies.
If you have larger bases, you can build indoor defensive positions along crucial corridors, but take care not to let the enemy use them. Stone shelves are an option as they are durable, non-flammable and beauty-neutral.
Fire management[edit]
As most furniture is flammable, you will need to extinguish any fires if you want to prevent damage. One option is to reinstall and trigger a firefoam popper inside, which also fireproofs the room, preventing any further fires.
If you prioritize the defeat of the raiders over the loss of your property, and the walls of the room are fireproof, you can simply let fires burn, or even start some more, while you evacuate the room and shut the doors, cooking the raiders alive. Watch out for fire and heat spreading to nearby rooms, and put out fires immediately once the raiders are well done.
Not effective against mechanoids as they aren't affected by temperature and cannot be set on fire.
Equipment[edit]
High-DPS or melee weapons work best to deal with drop pod attacks.
Mid-range weapons are also good for clearing out larger rooms.
Long-ranged weapons are less effective due to their low damage output and the confined nature of indoor spaces rendering their superior range unnecessary.
Explosive, incendiary or area denial weapons are excellent at room-clearing, but are not recommended except in dire situations due to heavy collateral damage.
Tribal raids[edit]

Tribal raiders come with relatively poor equipment, instead relying on sheer numbers for power. Their neolithic weapons can dish out heavy damage despite their low technology level. They are also adept at combat, with many being acquainted to some combat skill or another.
Different strategies may be required, compared to pirate or outlander raids.
Tribal fighters[edit]
They can take more of a beating compared to other poorly armored enemies as some of the clothing items they wear gives them increased endurance against pain, but when compared with other decently armored enemies they are easier to kill individually as their clothing doesn't provide much protection overall.
Their archers or hunters can fire their bows from a somewhat long distance, sometimes forcing you out of cover to fire your shorter ranged weapons at them.
Warriors or berserkers don't use shields (unlike their pirate counterpart, the mercenary slasher), making them vulnerable to gunfire.
You should watch out for the pila wielded by heavy archers, as well as berserkers.
- Despite the short range and slow fire rate, pila are incredibly deadly if they land, capable of killing or incapacitating unprotected colonists with a lucky shot to the heart, spine or limbs.
- Berserkers carry excellent melee weapons that dish out incredible amounts of damage once they get close.
Weapons[edit]
You will need sufficient mid-long range firepower to take down tribal archers from a distance, for getting close to them in order to fire your guns is pretty much suicide. Long-ranged weapons beyond 32 tiles can effectively hit archers at maximum range, matching or outranging them.
Close-mid ranged weapons with high stopping power are good for taking down tribespeople that come too close to your defenders, but they alone cannot defeat tribals effectively just by staying in static cover.
Crowd control helps greatly in defeating tribal raids.
- The Minigun is extremely effective as it can easily mow down the densely packed groups of tribal invaders.
- All explosive weapons are devastating on tribals.
- Rocket launchers deal heavy damage while being reasonably accurate.
- High-explosive shells can pulverize a sizable group of tribals at once if they manage to hit.
- Grenades are less effective as you have to risk a colonist or two in order to get in range.
- Incendiary weapons are good at getting pesky archers out of cover for your colonists to hit.
Empire raids[edit]
Added in the new Royalty DLC, the Empire is capable of sending powerful troops to assault your base. Unlike Outlanders, Tribals, or Pirates, one major advantage they have is that their skills are matched with the weapon they use- melee Champions will actually be good at melee, while Troopers, Janissaries or Cataphracts all have excellent ranged performance.
Cataphracts are among the most heavily-armored units in-game, with an outer layer of cataphract armor and an inner layer from an armorskin gland. However, their armor also slows them down significantly.
This can, however, be turned to your advantage through the use of Psycasts introduced in the Royalty DLC. Using Berserk or Berserk Pulse on the most dangerous of the hostile army can cause them to turn their powerful weapons towards murdering (and being murdered by) their allies rather than your colonists. Note that Berserk Pulse can affect pawns immediately on the other side of a wall by casting the ability on a tile adjacent to a wall, allowing the ability to function as a defense against sappers or groups moving through constrained areas (such as a narrow snaking corridor leading to your killbox).
Caravan ambushes[edit]
Defensive battles don't always happen at base. Sometimes it may happen far away from it, striking one of your caravans, perhaps loaded with plenty of silver. Or maybe they creep to your traders and demand ransom, which you don't feel like paying. You always need to be prepared for ambushes when you send out caravans.
Escort[edit]
In any cargo-carrying caravan, sending only 1-2 colonists is usually not advised except in very short-distance trips as they will not be able to fend off an ambush. In this case, have combat-capable escort members which can fight and carry items, as well as medics who will patch up your colonists after battles.
If you have lots of attack animals, you can also send just 1 skilled handler with the attack animals. They can swarm any attackers, and you can leave colonists back at base for work. Remember to take into account the animals' food needs; grazing animals work best for this reason.
If you are not carrying much besides a lone colonist, leaving him to go alone is helpful as lone colonists are hard to detect, reducing both the likelihood and the power of ambushes. A single colonist with a pack animal trained to obedience should be able to fend off most attackers.
Ambush site[edit]
The ambush site is small, restricting the space where you can conduct your battle. This renders many tactics obsolete, such as long-ranged sniping or kiting. You will often have to face off the enemy in a direct gunfight or brawl.
Besides this, you can't escape the fight until it's over, leaving no choice but to fight back.
Cover and positioning[edit]

If you have time, go somewhere where there is cover for you, but not the enemy. This gives you a significant upper hand in defensive battles where the enemy is coming at you. You should be hiding behind walls for cover if possible, as they provide up to 75% cover, but if they are not available, use what is available, e.g. rock chunks or trees. Space out your defenders to reduce the amount of collateral damage the pirates deal.
Melee sorties or rushes work well if you have brawlers, to negate any dangerous ranged threats; shield belts help them traverse the short distance to engage.
Items[edit]
You will need to bring some items so you can be prepared for a surprise attack.
Weapons[edit]
You usually don't have weapons to switch in a caravan unless you're bringing more than you need with you, so choosing the right weapons for your escort party is important.
- High-DPS weapons are optimal for dealing with ambushes.
- Long-ranged weapons are good for taking down targets at medium-long range, however their low DPS may offset their range advantage in an ambush.
- Miniguns are good against tightly-packed raiders hiding behind cover in an ambush. However, their heavy weight and movement speed reduction means you may want to reconsider bringing one.
- Melee weapons can help fight off enemy brawlers, or disrupt enemies behind cover. You should have at least 1 melee fighter in each escort.
Medicine[edit]
You should have some medicine handy so your colonists can patch themselves up after the battle.
Medicine should be your choice here; you should try to get good treatment to reduce chance of infection, as colonists don't get much rest in a caravan. Herbal medicine is useful if you have a good doctor on hand.
Aftermath[edit]
You can reform the caravan immediately after the battle is ended; you can bring along any downed colonists, as well as capture downed enemies. The caravan members will tend to themselves shortly afterwards.
Alternatively, you can stay and forage from the ambush map before you leave.
Manhunters[edit]
Animals, singly or in groups, may randomly turn mad and become hostile due to various reasons.
When mad, they will actively attack humanlikes or mechanoids, and will not attack other structures unless provoked (such as seeing someone walk through a door. Note that this includes colony animals. Manhunters can and will navigate through doors opened by colony animals, and will attack the door for a while if the door closes in front of them). They are not sophisticated in their attacks and are only capable of actively using melee. Some can explode upon death for devastating results.
Animal categories[edit]
Most animals can be part of a manhunter pack. Each kind has its own statistics, and can be roughly grouped as follows:
- In terms of speed:
- Slow: Animals that run slower than an average colonist. This allows you to kite them in addition to melee blocking.
- Fast: Animals that are faster than most colonists.
- In terms of other properties:
- Explosive: Animals that explode on death such as boomalopes or boomrats. They can set your brawlers alight, ruining melee blocking defenses, so for these, you may need alternative tactics. These types, however, can trigger a chain reaction, as the explosion from one animal can kill others, causing further explosions and potentially further deaths.
Occurrence[edit]
Mad animals can strike your colony in several ways.
- Singular mad animals may randomly attack.
- Manhunters packs can arrive in great numbers, afflicted by the deadly disease Scaria.
- Psychic waves drive all animals of a single species insane, directing them at your colonists. They are usually scattered at first, then proceed to converge on your colonists.
- In an unfortunate hunting incident, animals being hunted will turn on you, and may even bring their allies along.
Melee blocking[edit]
As with any full melee attacks, melee blocking is an extraordinarily efficient way to defeat manhunter packs. This is especially so if the animals are small such that they deal little damage before being killed, one after another.
When psychic waves occur, either lure animals into one spot or set up multiple chokes for attack.
Animals vs. Animals[edit]
One good way to fight off mad animals is with... more animals! Just draft anyone with Release-capable animals assigned, and set them out. Your colonists can watch safely from a distance, or take a potshot or two while watching the animals tear each other apart. Just remember to have someone mop up the bloodstains and haul the corpses of the fallen. As with melee blocking in general, even non-Release-trained animals can be used for defense by confining them to a single tile zone at the exit of your killbox, causing them to both body-block and attack any hostile animals that try to enter through it while your colonists shoot at them.
Hit-and-run[edit]
A slower strategy is to draft a colonist, place it in a door to shoot a maddened animal, move the colonist back to safety and wait until the animal gives up and wanders off, then repeat. Be careful since this will draw the attention of surrounding maddened animals making them attack the door where the colonist came from, so be ready to repair it immediately.
You can either kill them directly or wait for blood loss to take its toll. Larger animals can be softened this way before you move in for the kill.
This method is best used if you don't have enough firepower to take on them directly, and you have durable enough doors or a good builder to hold against animal attacks.
Kiting[edit]
Being unsophisticated in their tactics, they can be lured easily.
If you have good shooters that are fast (moving >140%), you can easily kite the faster animals.
The larger animals are usually slower and any colonist that has normal Moving will do fine against them, though it's still better with a faster-than-average colonist.
It is possible to combine this with a long-range firing squad and turrets laying fire from a distance while they are chasing the colonist; be sure that the animals do not lose track of your kiters, otherwise they will switch targets and go for somebody else.
Turrets[edit]
Turrets can distract manhunters for your colonists, giving them more time to shoot while enemies are occupied by the turret. They may explode when destroyed, taking out a sizeable group of animals who won't run away from exploding turrets, switching to another target only after the turret is no more.
Waiting it out[edit]
If you have a perimeter wall or a superstructure base with decent food stocks, you can simply wait it out inside while they relentlessly swarm outside the walls.
Remember not to let anyone outside unless your intent is to kill the animals. Be careful with your tamed animals who may accidentally let the manhunters in by holding doors open for them.
They will actively attack doors if a colonist hides behind them; as a precaution, build it out of a sturdier material such as plasteel so they don't get destroyed during a manhunter attack. They will give up after a while if the doors are not destroyed. Alternatively, simply have a builder build a wall behind the door, totally preventing manhunters from entering even if they break the door.
Scavenging dead animals[edit]
Manhunter packs are a decent source of meat for your colony. If there are still maddened animals, wait until the other animals from the pack go to sleep, walk away far enough, or get a fast colonist to try and haul the dead ones away. Note that animals with Scaria from the manhunter pack events have a high chance of instantly rotting on death and thus being unharvestable for meat or fur/hide.
Mechanoids[edit]
| This article is a stub. You can help RimWorld Wiki by expanding it. Reason: Needs new Mechanoid types and Mechanoid cluster events from Biotech. |
Mechanoids come in 4 types: Scythers, Lancers (1.0), Centipedes, and Pikemen (1.1). They have much differing stats and weapons, meaning different tactics may be used. All types are armored to some degree, and are basically immune to fire damage.
In many raids where they come/drop in at the edges, the Scythers will outrun the Centipedes by a great margin, giving some time to deal with them before the centipedes. However, they can and will support one another effectively, if given the chance for them to come together.
Unlike humanlike raiders, they do not flee, meaning that all of them have to be taken out to neutralize the threat. They do not actively use cover, either.
General strategy[edit]
Ranged mechanoids have a long attack range (at least 27 tiles), making them troublesome to deal with. A way to deal with this is to lure them into close range.
They are vulnerable to EMP damage, which can stun them, rendering them hunks of helpless metal. This can open a window of opportunity where you safely engage at close range, or even with melee. After each use of EMP, mechanoids will adapt to it, becoming immune to further stuns for a short while, so you will need to carefully time assaults and disengage when the mechanoids are about to reactivate.
Scythers[edit]

Scythers are deadly with melee, and will charge head first at your defenders. They can easily win in a 1v1 fight unless your fighters are heavily armored and have high DPS.
The optimal method of dispatching them is by melee blocking, with the added effect of luring the other mechanoids closer to your base. This must be done quickly otherwise the centipedes will catch up and unleash hell on your colonists who are closely packed together in a melee blocking attack.
EMP weaponry combined with melee blocking is a frighteningly effective and safe way to deal with scyther-only charges. A stunned scyther standing in the chokepoint will block all the other scythers standing behind. To prevent adaptation, only stun the mechanoids within the chokepoint.
If fighting from a distance, high-damage weapons are essential to bursting them down before they reach your colonists. Make sure you always have someone to peel them off your gunners in case they do survive your barrage.
Lancers[edit]

Lancers are capable of medium-long range supporting fire to pick out single targets. Despite their apparent role, their performance is actually better the closer you are to them, meaning that approaching them isn't a good option.
They are vulnerable in melee combat, so melee rushing supported by close-range firepower can be used to take them down. Their low health makes taking them down relatively quick despite their light armor, though their damage in melee combat should not be underestimated, and concentrated fire from charge lances can make short work of shields.
If fighting from a distance, cover is vital in getting the upper hand. You need to be able to get your other gunners into range while giving them reasonable cover from the high damage shots. Lancers aren't particularly good shooters (equivalent to a level 8 shooter), so you may readily outperform them with sufficient mid-long ranged firepower.
Centipedes[edit]

Centipedes, on the other hand, specialize in crowd control and area denial; the Heavy charge blaster can annihilate groups of colonists, while the Inferno cannon sets your colonists ablaze and will burn down your base if you're not careful. They are incredibly durable, sporting thick armor and high health, and can take many hits before being downed.
Spreading colonists apart can mitigate the crowd-control capabilities of centipedes, limiting the number of colonists hit by their weapons.
The Inferno cannon is annoying to deal with and should be your priority target. Keep watch on your colonists at all times and always send them back into cover after they get hit.
Despite their high resistance against sharp damage, shooting them is generally the best option. One good thing is that their large size makes them much easier to hit.
Engaging it in melee is possible, though you have to be careful. While centipedes don't hit hard in melee, if they are carrying the heavy charge blaster, they can deal massive damage to grouped up brawlers, while inferno cannon can cause the brawlers to ignite and run, allowing the previously locked down centipedes to fire. Ideally, all nearby centipedes must either be engaged in melee or disabled to prevent this from happening.
Their slow speed and weaker blunt armor make them excellent targets for high-explosive mortar attacks. Often you can land a couple of blows before they reach firing range, weakening them. This property also allows you to kite them provided they have no lancers or scythers supporting them.
Pikemen[edit]

Introduced in 1.1, pikemen take over the lancer's role as snipers. Their extreme range is only matched by the sniper rifle.
They have poor damage output, making them less threatening compared to other mechanoids. Their accuracy is also not appropriate for a sniping mech- equivalent to a level 8 shooter, it will more often than not miss at range.
As the description says, engaging pikemen at close range can be a viable way to take them down, once all others have been dealt with. Charging them can be risky due to the long distance pawns need to travel, but shield belts make the charge much safer, especially when you have multiple brawlers charging at once to divert concentrated fire. Swarming them with trained animals is also a viable strategy if you lack multiple skilled melee pawns or need them elsewhere.
Termites[edit]

Spawning only in mechanoid breach raids, the termite is a dedicated anti-structure opponent. The termite's thump cannon can deal tremendous damage to your structures, and are able to destroy a three tile wide section of any wall weaker than plasteel in three shots or less. Against pawns, however, it is significantly less effective with lower damage, AP, and DPS than even the lowly short bow.
Since they are so specialized in breaching walls, they cannot deal much damage to your pawns. However, killing them should be prioritized after scythers, since they will destroy your pawn's cover, exposing your pawns to danger from the termites much more directly dangerous companions.
Crashed ships[edit]
Mechanoids are also part of crashed ship events. In 1.1 they drop alongside the ship in pods, while in 1.0 or earlier they swarm out when the ship is damaged.
The type and where it lands are both important factors to consider when dealing with them.
Psychic parts will reduce mood and occasionally drive nearby animals mad, while defoliator parts (aka. poison ship parts in 1.0) will kill nearby plants and cause serious losses to pastures or crops. You cannot deconstruct the part, only destroy it.
Since they won't attack until triggered, you have some time to prepare. However, the longer you take, the worse it gets. If the defoliator ship part lands on the opposite side of your base at a map border, it is possible to leave it there, as they will also react to incoming raids and you may as well solve two problems at once. Not the same for the psychic version though.
If they land between your plantations, you will need to place firefoam poppers and trigger them before combat to prevent fires; the foam will persist until it rains, but then if it is rainy, you won't need the poppers. You may also want to keep a few untriggered poppers nearby to rapidly extinguish a group of burning colonists at once.

Defense behavior[edit]
Mechanoids are triggered immediately when the part is damaged, or something is built within a three-tile radius. They may also be triggered by the Firefoam popper explosion.
Upon triggering, scythers will immediately charge to attack, while lancers, centipedes and pikemen may instead sit in place and attempt to shoot interlopers, only moving to get within range.
Afterwards, they will guard the ship part, engaging any hostiles that come close, and chasing them over short distances. They will return to the part if targets stray too far away from the ship.
In 1.0 mechanoids chased targets over long distances and abandoned the ship part when it is at 50% health.
Long-range engagement[edit]
In the current version, it is better to trigger the mechanoids from a distance, rather than fighting way up close. This is necessary such that you can weaken the scythers with concentrated fire before they reach melee engagement range, as well as give you more time to defeat the lancers before the centipedes move within range. Scythers are especially dangerous as they come in swarms and can quickly overwhelm your gunners, as well as overpower your melee brawlers unless you outnumber or outarm them.
You can trigger the mechanoids either by high-explosive mortar fire, or sniping the ship part.
- By attacking with sniper rifles at maximum range you will gain a good enough lead against the mechs to be able to escape safely even without enhancements unless armor is over-encumbering your colonists.
- Mortar volleys can soften the mechanoids, making them easier to defeat by your colonists afterwards. Mortars may also destroy the ship part itself, which both ends the threat and prevents the mechanoids from disengaging from an attack and returning to guard it (though this can be either good or bad depending on the state of your defenses).
- In 1.1 you can also use EMP to stun them before engaging, then retreat before they exit stun, which is 25 seconds after being hit by EMP.
Weapons[edit]
High-DPS weapons are optimal at destroying both the ship part and its defending mechanoids.
Due to the mechanoids spawning very close together, area of effect or crowd control weapons are punishing against them:
- The minigun is a powerful weapon here:
- It can make short work of the bunched-up mechanoids, then shred the ship part using its unparalleled raw DPS.
- Its already high DPS is further amplified when attacking centipedes as their large size makes it easier to land shots.
- Its long range allows you to attack from a safer distance.
- EMP mortar blasts are able to stun a large number of mechanoids caught in its blast. As the ship part blocks EMP pulses, fire several at once to hit all enemies with a single volley.
- Explosive weapons are useful for dealing damage, but keep in mind that the ship part will block the explosion. They do extra damage to the ship part.
Incendiary weapons are a poor choice for any situation involving mechanoids or crashed ships, given that both are non-flammable.
The orbital power beam targeter is the ultimate weapon against crashed ships. All you need to do is to aim the beam directly on the ship, and the beam will melt both the ship and its surrounding mechanoids.
Construction[edit]
Construction is an important part of defeating the mechanoids in a crashed ship. Usually it is best if you can prepare ample cover, such as sandbags or walls, to shoot from.
Keep note that building within a three-tile distance will instantly trigger the mechanoids.
If done properly, IED traps can be used to weaken a mechanoid swarm. Don't build too many or you will vaporize the mechanoid corpses, which can be deconstructed for resources.
Luring in[edit]
If you already have ample static defenses, like killboxes, and you want to lure the mechanoids in, you will need to make the mechanoids abandon the ship by destroying it from a long distance.
Previously in 1.0, you can lure the mechanoids simply by triggering at range.
Hit-and-run (1.1)[edit]
Their behavior change in 1.1 makes them vulnerable to hit-and-run tactics. After taking care of the scythers, you are able to chip away at the mechanoids slowly by shooting with sniper rifles at maximum range. If all pikemen are taken out then you are able to safely engage without fear of returning fire.
Zoning animals[edit]
When dealing with a crashed psychic ship part that has been there for some time, do not let any of your tamed animals near it, for the ship part can drive them into manhunter mode. This is additionally harmful as they are capable of opening doors to attack your colonists.
Mechanoid breach raids[edit]
Mechanoid of the breach raids will not ever walk through the kill box as you wanted them to, instead they will blast walls down and head straight for your base.[Detail Needed]
It is worth considering the use of a psychic shock or insanity lance to take down the termite from far away, as there will only be up to two termites per raid. Losing the use of the specialized anti-structure thump cannon will significantly delay the raid, as they will instead be forced to destroy walls in their path with their more traditional weaponry. This gives you time to prepare a defense behind that section of wall.
Typically this raid strategy will result in the mechanoids clumping up, giving a prime target for EMP grenades or a triple rocket launcher, hopefully to devastating effect. Note the mechs will not attack colonists unless they come into the range of the mechanoid's gun. The long range of the triple rocket launcher is beneficial here, only putting the wielder in range of the pikemen's needle gun.
Infestations[edit]
Infestations will spawn under Overhead Mountains within 30 tiles of a colony structure. They can be a serious hazard in mountain bases due to the lack of free space to run away from with too many obstacles on the path, but not so much threat in open area (flat) maps. Insectoids are lightly armored, exclusively use melee and are slower than colonists. This gives them some protection against close range attacks, but leaves them vulnerable to ranged attacks and kiting tactics.

If you don't destroy them fast enough, they can reproduce, giving rise to even more hives and insects. This is especially true if you happen to have forgotten about a hive, which given time can build itself into a giant mega-hive.
Behavior[edit]
Insects have a hive mindset; they will remain tending to their hive cluster, until they see an intruder, in which case they begin to engage all at once. They may also attack random furniture and structures in your colony.
Fighting infestations[edit]
The enclosed nature of mountain bases give colonists little distance to shoot from; thus, you may want some melee fighters to pair up with any ranged colonists.
Individual fighters will quickly get overwhelmed by the insects especially against large megaspiders, so you shouldn't trickle your defensive forces in; rather, send them all at once to overpower the insects.
Melee blocking[edit]
If there is a single choke point for the insects to get into your base (usually a door leading to a corridor), usage of this tactic allows you to defeat insects efficiently. You may even stand a chance against massive infestations if for some reason fire isn't viable, but don't get cocky. If the infestation is large you will need to bring backup tanks to replace the initial melee blocker if he or she gets downed or heavily injured.
Choke points can arise on their own from insects digging out; simply wait for them to tunnel through and massacre them once they exit.
This tactic is only viable if you have enough soldiers with substantial armor as insects inflict heavy sharp damage and will obliterate everybody not sufficiently protected.
Using fire[edit]
Fire is an effective way to clear early-mid stage infestations. If they spawn in an enclosed area with a door and plenty of flammables, all you need to do is to toss a molotov or shoot an incendiary launcher bolt into the room. The room will quickly catch fire, causing the temperature to rise fast, roasting the insects in it along with the hives.
The downside of this approach is that it makes it impossible to farm any insect meat or jelly from the infestation, because it will all burn, and it is usually too hot inside the spawn room to manually extinguish the fires to save the goods (unless there is a way to quickly vent the heat, which is usually not feasible to set up).
If there is a dedicated place in your base for infestations to spawn (see baiting below), it helps to have a few cheap wooden furniture items in that room, and maybe a few tiles of wooden floor. A great source of additional flammable material are tainted clothing items and desiccated animal bodies. Dusters and parkas have a lot of hitpoints, so they burn longer. These items are easy to get into the burn room simply by creating a stockpile with appropriate settings. A 3x3 stockpile should be more than enough to create enough heat to clear out any infestation. The fire created will usually last several hours, which is more than enough time to kill everything in the spawn room.
Separating the actual spawn room from the burn room with a wooden door makes it very easy for your colonists to start the fire without the insects attacking. The heat will spread into the spawn room regardless (and burn the wooden door).
Having a few flammable structures, such as cheap furniture) in the room is important, because the insects are stupid enough to attack these first when enraged from the fire, wasting time — instead of digging out of this trap.
It is possible to reach the temperature maximum of 2000 degrees celsius this way. Check the temperature in the spawn room before stepping in with any colonists, because they will very quickly collapse from heat stroke and possibly catch fire and die at these ludicrous temperatures.
The insects will rush for the exit of the burn room in a panic when they realize what is happening to them, and will quickly attempt to dig out to escape, so make sure the exit door is made of rock which is durable and nonflammable.
If there aren't any flammables around, you can still shoot the hives with fire weaponry. They will light aflame, along with the fuel puddles created on the ground.
As any items inside the room are likely to catch fire and be destroyed, this tactic is not recommended in a place with many valuables such as warehouses. Also be careful with the heat spreading to nearby rooms.
Heat Stroke[edit]
By using a colonist to manually throw molotovs at the ground, either inside the bug room itself or in an adjacent room with an open doorway, you can maintain the temperature of the insect room between 150C and 200C, slowly knocking them unconscious and killing through heatstroke. As long as the temperature does not rise above 200C, the bugs will not get burn injuries, and therefore will not become aggressive. Have your colonist throw the molotovs through an open doorway in order to protect the colonist from the heat. When doing this, take care not to hit anything directly with the molotovs, as the fires created will anger the insects and set flammable objects on fire.
It is important to note when doing this to make sure that all bugs are significantly above the serious heat stroke threshhold (60%) before you move in, otherwise the temperature will start falling when you stop throwing molotovs and they may recover and attack your colonists.
Explosives[edit]
Explosives are useful against large infestations. The Triple rocket launcher can raze infestations instantly. A single use Doomsday rocket launcher will deal massive damage over a large area. Frag grenades are unlimited and work well if you have the courage to send someone to close range. One blast can get several insects.
Explosive animals (boomalopes or boomrats) are also effective at clearing out infestations. Have them march straight into the hive by zoning them there. When the insects attack, the animals will be injured and explode, setting the insects and hives on fire.
Mortars are useless against the hives themselves as they can't hit anything below an overhead mountain. However they are an option when fighting the insects in open space, with the explosions capable of severely injuring the insects, taking out the smaller ones in 1-2 hits.
Late-stage infestations[edit]

If you've accidentally left a hive or two behind or totally ignored an infestation, after a few seasons you will have a giant hive community sprawling. This is extremely hard to treat, especially if you're low on colonists.
If you're still on early-midgame, it's generally recommended that you pack up and run. If not, however, you will have to deal with them slowly. You need to lure the insects out, then defeat them to buy time for others to enter and destroy the hives. Kiting is a possibility due to their slower speeds, provided they continue to chase down your colonists.
Explosives are recommended as they deal immense damage to the closely packed hives and insects. This is especially so with the doomsday rocket launcher, which can set entire infestations on fire, destroying the hives and severely weakening the insects.
Prevention[edit]
If you only have a few tiles of Overhead Mountain then it's best that you fill it up with walls to prevent any infestations from happening. If you are in a mountain base, then you will need to do more than that.
Baiting[edit]
You can mine out rooms a distance away from your colony to somehow control insects to nest there, instead of letting them spawn right in the middle of your base. Place some cheap flammable furniture inside to confuse the insects into thinking it's a prospective nesting spot, as well as to light on fire for a quick solution to an infestation problem. You may even use wooden walls or columns, which in a large enough room will cause a roof collapse and crush insects after being destroyed.
A well-lit base discourages insects from nesting, though it can still happen. If you bait insects to spawn elsewhere the chance of an infestation spawning inside is greatly reduced.
If you want the insect trap to automatically kill insects, put an IED incendiary trap inside the room, next to the flammables. Once an infestation spawns the insects will trigger the trap, lighting the room on fire and broiling the insects.
Alternatively, fill it with spike traps to weaken them before they strike your base, giving you the advantage. Doing this preserves the hives, which can be good if you want to farm insect jelly.
Deep freezing[edit]
An interesting way to completely prevent infestations is to simply set your base temperature below -17°C with coolers, and have everyone in the colony wear parkas.
This means that the 'Slept in the cold' debuff will be prevalent in the colony, however, so you will need something to offset the mood. It will also incur a work speed penalty on all production facilities due to low temperature, making this strategy not very viable on all but the lowest difficulties (where infestations are not a big threat in any case).
Deep drill infestations[edit]
Deep drills can unearth insect hives, which will result in enraged insects charging up to attack after a while.
When you see this happen, gather up your defense forces to fight the incoming insects. Have them approach your base where you can melee block them while evacuating other colonists so the insects don't go for them first. Nearby pets or other tamed animals will also be attacked; you can either evacuate them beforehand to reduce losses and ensure a successful melee blocking attack, or use them as bait to grab the insects' attention while your colonists lay fire on them.
Note that if you have a deep drill near the walls of a room it is possible for the insects to spawn outside the room.
Prison breaks[edit]
If you have prisoners (or potential colonists or hats) on hand, always expect them to break out any time. This is more so if you have many of them, each one ready to incite a riot whenever the guards aren't looking.
Escaping prisoners can open any colony door, and will snatch weapons whenever they see one.
Strategy[edit]
You should body block the prisoners with armored wardens carrying blunt weapons, or melee attacks with guns. They will fight and down the prisoners while blocking their exit, buying time for reinforcements.
Against already injured yet unarmed prisoners, send 1 brawler per prisoner to minimize the risk of beating them to death.
For those at full health, 2 unarmed wardens or 1 skilled one can tackle a full-health unarmed prisoner without the wardens being downed in most cases.
Ranged wardens should attack when the prisoners are blocked by melee wardens so they can attack from a distance without much danger, and their weapons won't land in the enemy hands so easily. Don't fire too much at them as you risk permanent damage as well as accidentally killing the prisoner.
Weapons[edit]
You goal here isn't to kill the prisoners, it's to down them so you can recapture them.
- Blunt melee weapons such as the mace is a good choice for wardens to down escapees. The wounds don't bleed (unless you crush an internal organ or destroy a part entirely), nor will they be infected, giving them higher survival chances overall.
- At a distance, use low-moderate DPS weapons that won't deal too much damage to the prisoners, or to your people when the prisoners pick them up.
- Don't use high damage per hit weapons such as sniper rifles or longswords, as you risk instantly killing them or destroying an important part.
Turrets[edit]
Mini-turrets can be used as a form of distraction and supplementary firepower against prison breaks. Station them outside the prison doors, and they will fire on the escapees. They deliver decent firepower at short ranges, and leave no usable weapons on destruction. Prisoners also tend to stop to fight the turrets, giving wardens time to reach them.
1-3 are enough for most prisons. Don't put too many otherwise they may kill the prisoners before you can intervene.
- Progression
- Quickstart Guides • Basics • Intermediate Midgame Guide • Advanced Endgame Guide • Ending the game
- Scenarios
- Lost Tribe Guide • Rich Explorer Guide • Naked Brutality Guide • The Mechanitor Guide

- Survival
- Extreme Heat Guide • Extreme Cold Guide • Extreme Desert Guide • Ice Sheet Guide • Sea Ice Guide • Events Guide
- Combat
- Defense tactics • Offense tactics • Weapon Guide
- Construction
- Colony Building Guide • Defense structures
- Production
- Food production • Money making guide
- Other
- Skill Training • Permadeath save conversion guide •
Ideology Min-Maxing