Difference between revisions of "Ice Sheet Guide"
PigeonGuru (talk | contribs) |
PigeonGuru (talk | contribs) (I attempted to patch together the two versions of the ice sheet guide- it isn't pretty, so do expand on it, just make sure that you won't be arguing over the edits again) |
||
| Line 1: | Line 1: | ||
| − | + | This guide details how to survive in one of the most hostile environments in Rimworld - an ice sheet. We focus on the [[Scenario_system#Lost_Tribe|Lost Tribe]] start because it is the hardest one to thrive in hostile environments since you got more people to feed and less technology to help you. | |
| − | + | == Introduction == | |
| − | {| | + | {{see also|Biomes#Ice Sheet}} |
| − | |||
| − | + | Ice sheets are the coldest option of cold maps. They have very little animal life and no plants. In fact, you should not expect to find anything more than five [[snowhare]]s in your start. You should also not expect to see more than one new [[snowhare]] every five days and one new [[polar bear]] per month. | |
| + | In addition to that, they do not have any soil available, so anything that you want to grow must be grown on the stony soil patches- that is if you can even grow anything due to the cold. You will struggle a lot until you get a [[heater]] and a [[sun lamp]], then you can plant something indoors. | ||
| − | + | Even the warmest ice sheet it really cold. Their average varies from {{Temperature|-20}} to {{Temperature|-40}} and they never have growing periods due to the temperature. You still need to eventually make a [[Colony_Building_Guide#Freezer|freezer]] though, because the summer temperature is hot enough to spoil your food. Expect to have problems with hypothermia during fall, winter, spring and during [[events#cold snap|cold snap]]s in summers. | |
| − | + | == Before the start == | |
| + | You can opt to sweeten your survival experience with a combination of well-picked colonists and landing spot, or choose to go hard and randomise everything. The below assumes you are going for the former. | ||
| − | == | + | === Landing site === |
| − | + | [[File:icesheetsite.png|300px|thumb|right|Example of a decent landing site.]] | |
| − | |||
| − | |||
| − | + | In all maps you should choose your landing site carefully to increases your chances of survival. You want to build a colony in an area with some of the following characteristics: | |
| − | |||
| − | |||
| − | |||
| − | |||
| − | * | + | * Near a tundra (faster moving around) |
| − | * | + | * Near a friendly faction base (faster trading) |
| − | * | + | * Near a road (faster moving around) |
| − | * | + | * Without many mountains around (faster moving) |
| − | [[ | + | * With coast (to turn into large growing areas later) |
| + | * With [[caves]] (early food source) | ||
| − | + | Ice sheets do not have roads or rivers, but that does not mean you can not settle close to a road. While you should not be surrounded by mountains, the landing site itself can be mountainous. | |
| − | |||
| − | |||
| + | You do not need to land in an area in all those characteristics, but try to get as many of them as you can. | ||
| − | === | + | === Starting colonists === |
| − | + | Ice sheet is so harsh that you will have to resort to cannibalism, so you may want to have a crew that can tolerate that. That means having one butcher that does not mind butchering people and everyone resistant to mental breaks. | |
| − | + | {{see also|Traits}} | |
| + | Your butcher should be either Cannibal, Bloodlust or Psychopath. | ||
| − | + | All your crew should ideally be either Cannibal, Sanguine, Optimist, Iron-Willed, Steadfast or Masochist with scars. Couples also enjoy extra happiness so try to bring couples instead of bachelors, likewise Beautiful and Pretty colonists are also good since they are more likely to fall in love with someone. | |
| − | + | Surely you do not need to have all five starting colonists with those characteristics, but the more resistant colonists you have the better. | |
| + | == The first step == | ||
| − | + | Once you choose your landing site and colonists you should '''immediately pause the game'''. This gives you time to make decisions. | |
| − | |||
| − | |||
| − | |||
| − | |||
| + | === Base area === | ||
| − | + | You need to choose your base area wisely. It is important to notice that this area does not need to be final, it is just the area where you are more likely to survive the early game. | |
| + | You want to find an area with the characteristics: '''near steam geysers''', '''near steel''', '''more growing areas''' and '''easily defendable'''. | ||
| − | + | More growing areas means more stony patches and an easily defendable area is an area with few entrances where you can lay down traps. Your priority is steam geysers. You have to make the base on top of a steam geyser, or else you will die of hypothermia very fast. | |
| − | + | Since you do not have trees, you can not build a big base yet. You can either take a ruin, make a cave or make a small steel base. It all comes down to what you have near the steam geysers. If you have a ruin, take it. If you have a hill, make a cave. If you have none of these, make a small steel base. | |
| + | [[File:icesheetarea.png|400px|thumb|center|Good starting area near the geyser.]] | ||
| − | === | + | === Work === |
| − | + | Analyze your team, set their priorities. Haul everything towards your chosen ruin and don't use wood at all except for the campfire. | |
| − | |||
| + | Start mining steel as your main construction material or begin caving in. Play as minimalistic as possible. Gather enough steel to build walls by setting everyone to mine. Use terrain features to get the smallest home you can make besides any nearby structures. | ||
| − | + | If you have researchers, rush electricity research. You don't need to build a fortress yet, and electricity can be extremely helpful in survival. | |
| − | + | === Animals & Hunting === | |
| − | + | Set an animal zone away from your food, you don't want them eating your food as you can't win the game with pets alone. Let them all die of starvation, sorry. Starving pets are excellent lures for predators and while wild animals attack your pets, they won't turn their hunger rage towards you and you can attack them without danger, so long as their target is mid to big size (terriers die in a bear hit or two). | |
| − | + | [[File:Terrier bait to lure a cougar.png|400px|right|Using starting pets to lure predators.]] | |
| + | Hunt every time you see meat, as animals have the tendency to leave the map and won't remain roaming around for long. When you find one snowhare, you find the others. Double click on zoomed out view to reduce the time spent on searching. | ||
| − | + | Always keep an eye on the polar bear food bar- you will need to know when it will strike. | |
| − | + | === Steam geysers === | |
| + | Now that you've selected somewhere to settle, the next step is to build a decent base. | ||
| − | + | You should settle on the steam geyser due to the heat source. Living on top of a geyser provides warmth enough up to 10 degree Celsius, just to escape hypothermia. If your colonists complain about "sleeping in the cold", you tell them to man up. The only two reasons to build a campfire are to cook and an emergency extra source of heat when hard snow hits during Winter or a cold snap. Build a wall around it(10x10, the geothermal power plant is 6x6 so between the wall and the steam, the 8x8 line will become a one tile surrounding corridor just enough to place beds around), either by emulating a heater in the center of your room or by pulling a one tile corridor towards your home, even possibly digging a tunnel depending on the terrain altitude map of choice. | |
| + | Eventually, you should ideally repeat the same geyser-room procedure with other steams in proximity, this is because cold and starvation will not kill you, but mental breaks will. For example, having more than two characters on berserk. Sometimes, two geysers may be close to each other, allowing you to use them at both ends while you build everything else in between. This lucky situation can allow to start building individual rooms for your people and get rid of the barrack penalties. | ||
| − | == Cannibalism == | + | === Cannibalism === |
| − | |||
| − | |||
| + | It's inevitable. Just be very selective when butchering other humans as the character performing the action will receive mood penalties that can easily set it to mental breaks. It is okay if your characters complain of hunger. Again, keep your food supply on check and only feed your people when starvation kicks in, unless of course, their mental break is too dangerous to risk keeping them unhappy. When butchering human corpses it's best to set one same character to chomp many at once so that all the penalty goes to just that one guy, and performing the action on same day will keep the penalty length shorter instead of extending after each consecutive day. Best if the penalty wears off all at once. | ||
| − | + | Remember that [[human leather]] is worth a lot and it is better to make something with it first, then sell it. First, give your colonists [[bedroll]]s to sleep, then make [[duster]]s since they are more profitable than anything else. Cannibal and Bloodlust colonists will want to wear human leather clothes, give them human leather [[button-down shirt]]s and [[pants]], but not [[parka]]s as the material is just too bad at insulating. | |
| + | == The second step == | ||
| − | == | + | === Research === |
| − | After electricity, go for Batteries, Solar panels and then Stonecutting so that you can start building plantation-rooms. [[Sun lamp]]s consume large amounts of electricity and you should by then have enough power and stored energy so that your crops grown steady. [[Solar generator]]s will not perform to their maximum capacity due to the short solar cycles common in polar regions as oppose to | + | After electricity, go for Batteries, Solar panels and then Stonecutting so that you can start building plantation-rooms. [[Sun lamp]]s consume large amounts of electricity and you should by then have enough power and stored energy so that your crops grown steady. [[Solar generator]]s will not perform to their maximum capacity due to the short solar cycles common in polar regions as oppose to equatorial regions. |
| + | If you are not in a hurry, you can include complex furniture research, so you can make beds, as well as stonecutting so you can use the more abundant stone. | ||
| − | == | + | === Greenhouse === |
After you have researched Electricity, Batteries, Solar Panels and Stonecutting AND crafted lots of stone blocks is when you can start building your first plantation room. Since the biome has scarce fertile tiles, you can easily select to mark a Grow zone and just drag your cursor on a 50x50 tiles area so that the game automatically marks where there is a "large" concentration of farmable area. Then just select the Sun lamp so that you can have the radius on your cursor ready to match such area. If you happen to lack said farmable tiles anywhere close to your base, you can fill in the blanks with hydroponic basins later on. | After you have researched Electricity, Batteries, Solar Panels and Stonecutting AND crafted lots of stone blocks is when you can start building your first plantation room. Since the biome has scarce fertile tiles, you can easily select to mark a Grow zone and just drag your cursor on a 50x50 tiles area so that the game automatically marks where there is a "large" concentration of farmable area. Then just select the Sun lamp so that you can have the radius on your cursor ready to match such area. If you happen to lack said farmable tiles anywhere close to your base, you can fill in the blanks with hydroponic basins later on. | ||
| − | |||
<center>[[File:Plantation room.png|800px]]</center> | <center>[[File:Plantation room.png|800px]]</center> | ||
{{clear}} | {{clear}} | ||
| − | |||
Then use "Delete zones" to remove all growing zones that were created during the scan for farmable tiles, and use the "order" to "plan" to draw a cross of 11 tiles with tile number six (the crossing), being the location where the Sun lamp will be located. This will give you the radius of the lamp so that you can start setting the structure plans. Do use double walls for better insulation and with an airlock system as well. | Then use "Delete zones" to remove all growing zones that were created during the scan for farmable tiles, and use the "order" to "plan" to draw a cross of 11 tiles with tile number six (the crossing), being the location where the Sun lamp will be located. This will give you the radius of the lamp so that you can start setting the structure plans. Do use double walls for better insulation and with an airlock system as well. | ||
| − | |||
<center>[[File:Plantation room 2 double walls.png|800px]]</center> | <center>[[File:Plantation room 2 double walls.png|800px]]</center> | ||
{{clear}} | {{clear}} | ||
| − | |||
Once everything within the plantation room has been built, click the sun lamp and press "'''H'''" for the sun lamp itself to create a growing zone for you (instead of the conventional manual way). Start with rice, and harvest enough so that you can bring everybody else who has been in cryptosleep all this time for your colony to start running in full strength. Remind yourself that once temperature starts to drop again in Winter, you will need to install several '''[[heater]]s''' or plants will die. | Once everything within the plantation room has been built, click the sun lamp and press "'''H'''" for the sun lamp itself to create a growing zone for you (instead of the conventional manual way). Start with rice, and harvest enough so that you can bring everybody else who has been in cryptosleep all this time for your colony to start running in full strength. Remind yourself that once temperature starts to drop again in Winter, you will need to install several '''[[heater]]s''' or plants will die. | ||
| − | |||
<center>[[File:Plantation room 3.png|800px]]</center> | <center>[[File:Plantation room 3.png|800px]]</center> | ||
{{clear}} | {{clear}} | ||
| − | |||
In the meantime, there's no need to rush directly your research towards hydroponics. You can go through Complex clothing, Drug production, Penoxycyline and then Hydroponics. Of course each player will play different stories, so adjust to circumstances as needed. | In the meantime, there's no need to rush directly your research towards hydroponics. You can go through Complex clothing, Drug production, Penoxycyline and then Hydroponics. Of course each player will play different stories, so adjust to circumstances as needed. | ||
| − | |||
<center>[[File:First harvest in 75 days.png|800px]]</center> | <center>[[File:First harvest in 75 days.png|800px]]</center> | ||
{{clear}} | {{clear}} | ||
| − | |||
In this demonstration, the first harvest takes place 75 days after start. Now you have both shelter and food. From here on, it's all up to you. Good luck! | In this demonstration, the first harvest takes place 75 days after start. Now you have both shelter and food. From here on, it's all up to you. Good luck! | ||
| + | == The third step == | ||
| − | == | + | === World quests === |
| − | |||
| − | == | ||
| − | |||
| − | |||
| − | |||
| − | |||
| − | |||
| − | |||
| − | |||
| − | |||
| − | |||
| − | |||
| − | |||
| − | |||
| − | |||
| − | |||
| − | |||
| − | |||
| − | |||
| − | |||
| − | |||
| − | |||
| − | |||
| − | |||
| − | |||
| − | |||
| − | |||
| − | |||
| − | |||
| − | |||
| − | |||
| − | |||
| − | + | You can start to do world quests for factions, once you stabilised your food supplies. | |
| − | * | + | * Go get [[Events#Item Stash Opportunity (Time Remaining)|item stashes]]. |
| − | * | + | * Go help [[Events#Incapacitated refugee|incapacitated refugees]]. |
| − | * | + | * Go [[Events#Prisoner rescue opportunity|rescue prisoners]]. |
| + | * Go [[Events#Bandit camp opportunity|destroy enemy outposts]]. | ||
| + | Whenever you reach a quest location, you wanna look for [[berries]], [[healroot]], [[animals]] and [[wood]]. [[Animals]] and marginally other humans should be butchered before leaving, if the [[meat]] is too heavy and you still have time you can use the local [[wood]] to make lots of [[campfire]]s and turn all into [[meals]] to reduce weight. | ||
| − | + | === Slighly more advanced technology === | |
| − | |||
| − | |||
| − | |||
| − | |||
| + | Once you research nutrient paste, you can make food efficiently for your people. This also frees a cook to do other things. | ||
| + | If you have enough power, hydroponics basins can also be helpful in feeding your people. This allows you to build greenhouses freely instead of being restricted to growing food in the stony soil patches. | ||
| − | == | + | == Emergency measures == |
| − | + | If the game is bearing down on you, you can use these measures to prolong your colonists' lives. These can ruin the true experience of an ice sheet survival though, so make these a last-ditch measure. | |
| + | === Cryptosleep === | ||
| − | + | If you come across an [[ancient shrine]], you can put your colonists to sleep inside. This helps to extend your food stocks when you fall on hard times. | |
| − | |||
| − | |||
| − | |||
| − | + | === Caravaning === | |
| − | |||
| + | Another alternative is to escape while you still can- the ice sheet just isn't for you. Gather whatever food you can, along with some supplies, then break for it. | ||
{{Nav/guides}} | {{Nav/guides}} | ||
[[Category:Gameplay]] | [[Category:Gameplay]] | ||
Revision as of 14:24, 5 September 2018
This guide details how to survive in one of the most hostile environments in Rimworld - an ice sheet. We focus on the Lost Tribe start because it is the hardest one to thrive in hostile environments since you got more people to feed and less technology to help you.
Introduction
Ice sheets are the coldest option of cold maps. They have very little animal life and no plants. In fact, you should not expect to find anything more than five snowhares in your start. You should also not expect to see more than one new snowhare every five days and one new polar bear per month.
In addition to that, they do not have any soil available, so anything that you want to grow must be grown on the stony soil patches- that is if you can even grow anything due to the cold. You will struggle a lot until you get a heater and a sun lamp, then you can plant something indoors.
Even the warmest ice sheet it really cold. Their average varies from -20 °C (-4 °F) to -40 °C (-40 °F) and they never have growing periods due to the temperature. You still need to eventually make a freezer though, because the summer temperature is hot enough to spoil your food. Expect to have problems with hypothermia during fall, winter, spring and during cold snaps in summers.
Before the start
You can opt to sweeten your survival experience with a combination of well-picked colonists and landing spot, or choose to go hard and randomise everything. The below assumes you are going for the former.
Landing site
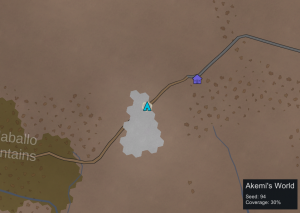
In all maps you should choose your landing site carefully to increases your chances of survival. You want to build a colony in an area with some of the following characteristics:
- Near a tundra (faster moving around)
- Near a friendly faction base (faster trading)
- Near a road (faster moving around)
- Without many mountains around (faster moving)
- With coast (to turn into large growing areas later)
- With caves (early food source)
Ice sheets do not have roads or rivers, but that does not mean you can not settle close to a road. While you should not be surrounded by mountains, the landing site itself can be mountainous.
You do not need to land in an area in all those characteristics, but try to get as many of them as you can.
Starting colonists
Ice sheet is so harsh that you will have to resort to cannibalism, so you may want to have a crew that can tolerate that. That means having one butcher that does not mind butchering people and everyone resistant to mental breaks.
Your butcher should be either Cannibal, Bloodlust or Psychopath.
All your crew should ideally be either Cannibal, Sanguine, Optimist, Iron-Willed, Steadfast or Masochist with scars. Couples also enjoy extra happiness so try to bring couples instead of bachelors, likewise Beautiful and Pretty colonists are also good since they are more likely to fall in love with someone.
Surely you do not need to have all five starting colonists with those characteristics, but the more resistant colonists you have the better.
The first step
Once you choose your landing site and colonists you should immediately pause the game. This gives you time to make decisions.
Base area
You need to choose your base area wisely. It is important to notice that this area does not need to be final, it is just the area where you are more likely to survive the early game.
You want to find an area with the characteristics: near steam geysers, near steel, more growing areas and easily defendable.
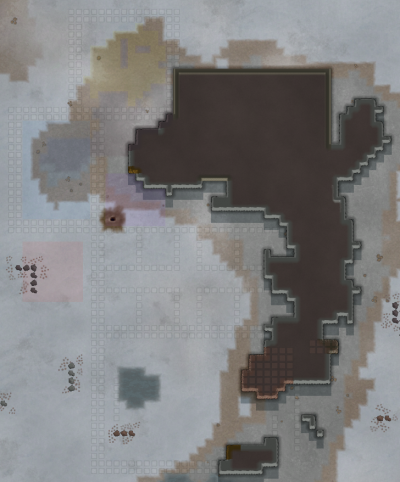
More growing areas means more stony patches and an easily defendable area is an area with few entrances where you can lay down traps. Your priority is steam geysers. You have to make the base on top of a steam geyser, or else you will die of hypothermia very fast.
Since you do not have trees, you can not build a big base yet. You can either take a ruin, make a cave or make a small steel base. It all comes down to what you have near the steam geysers. If you have a ruin, take it. If you have a hill, make a cave. If you have none of these, make a small steel base.
Work
Analyze your team, set their priorities. Haul everything towards your chosen ruin and don't use wood at all except for the campfire.
Start mining steel as your main construction material or begin caving in. Play as minimalistic as possible. Gather enough steel to build walls by setting everyone to mine. Use terrain features to get the smallest home you can make besides any nearby structures.
If you have researchers, rush electricity research. You don't need to build a fortress yet, and electricity can be extremely helpful in survival.
Animals & Hunting
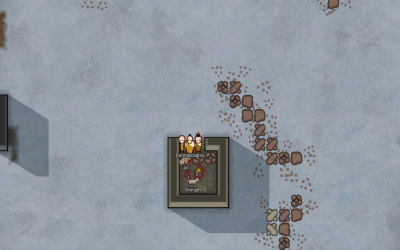
Set an animal zone away from your food, you don't want them eating your food as you can't win the game with pets alone. Let them all die of starvation, sorry. Starving pets are excellent lures for predators and while wild animals attack your pets, they won't turn their hunger rage towards you and you can attack them without danger, so long as their target is mid to big size (terriers die in a bear hit or two).
Hunt every time you see meat, as animals have the tendency to leave the map and won't remain roaming around for long. When you find one snowhare, you find the others. Double click on zoomed out view to reduce the time spent on searching.
Always keep an eye on the polar bear food bar- you will need to know when it will strike.
Steam geysers
Now that you've selected somewhere to settle, the next step is to build a decent base.
You should settle on the steam geyser due to the heat source. Living on top of a geyser provides warmth enough up to 10 degree Celsius, just to escape hypothermia. If your colonists complain about "sleeping in the cold", you tell them to man up. The only two reasons to build a campfire are to cook and an emergency extra source of heat when hard snow hits during Winter or a cold snap. Build a wall around it(10x10, the geothermal power plant is 6x6 so between the wall and the steam, the 8x8 line will become a one tile surrounding corridor just enough to place beds around), either by emulating a heater in the center of your room or by pulling a one tile corridor towards your home, even possibly digging a tunnel depending on the terrain altitude map of choice.
Eventually, you should ideally repeat the same geyser-room procedure with other steams in proximity, this is because cold and starvation will not kill you, but mental breaks will. For example, having more than two characters on berserk. Sometimes, two geysers may be close to each other, allowing you to use them at both ends while you build everything else in between. This lucky situation can allow to start building individual rooms for your people and get rid of the barrack penalties.
Cannibalism
It's inevitable. Just be very selective when butchering other humans as the character performing the action will receive mood penalties that can easily set it to mental breaks. It is okay if your characters complain of hunger. Again, keep your food supply on check and only feed your people when starvation kicks in, unless of course, their mental break is too dangerous to risk keeping them unhappy. When butchering human corpses it's best to set one same character to chomp many at once so that all the penalty goes to just that one guy, and performing the action on same day will keep the penalty length shorter instead of extending after each consecutive day. Best if the penalty wears off all at once.
Remember that human leather is worth a lot and it is better to make something with it first, then sell it. First, give your colonists bedrolls to sleep, then make dusters since they are more profitable than anything else. Cannibal and Bloodlust colonists will want to wear human leather clothes, give them human leather button-down shirts and pants, but not parkas as the material is just too bad at insulating.
The second step
Research
After electricity, go for Batteries, Solar panels and then Stonecutting so that you can start building plantation-rooms. Sun lamps consume large amounts of electricity and you should by then have enough power and stored energy so that your crops grown steady. Solar generators will not perform to their maximum capacity due to the short solar cycles common in polar regions as oppose to equatorial regions.
If you are not in a hurry, you can include complex furniture research, so you can make beds, as well as stonecutting so you can use the more abundant stone.
Greenhouse
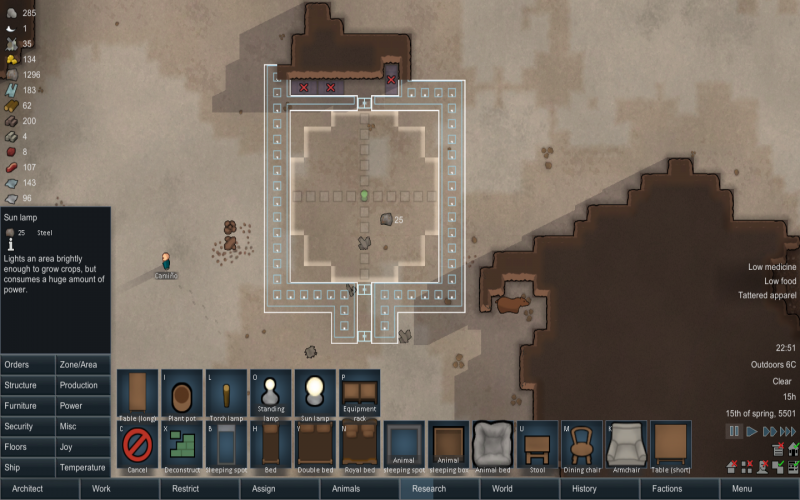
After you have researched Electricity, Batteries, Solar Panels and Stonecutting AND crafted lots of stone blocks is when you can start building your first plantation room. Since the biome has scarce fertile tiles, you can easily select to mark a Grow zone and just drag your cursor on a 50x50 tiles area so that the game automatically marks where there is a "large" concentration of farmable area. Then just select the Sun lamp so that you can have the radius on your cursor ready to match such area. If you happen to lack said farmable tiles anywhere close to your base, you can fill in the blanks with hydroponic basins later on.
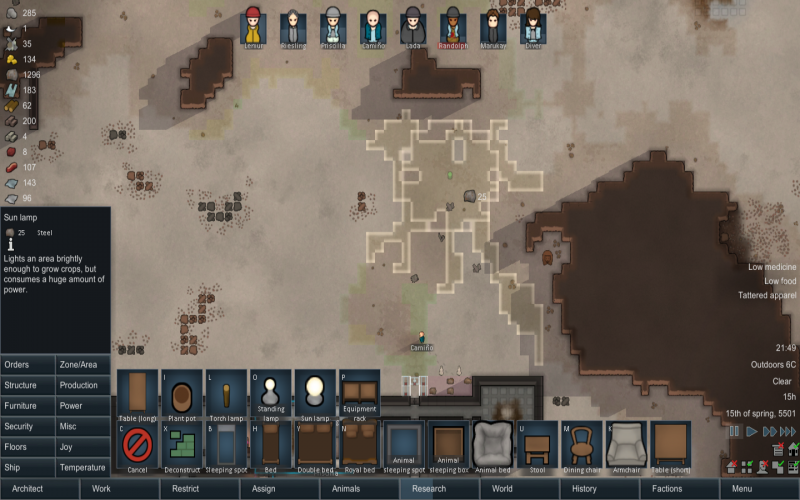
Then use "Delete zones" to remove all growing zones that were created during the scan for farmable tiles, and use the "order" to "plan" to draw a cross of 11 tiles with tile number six (the crossing), being the location where the Sun lamp will be located. This will give you the radius of the lamp so that you can start setting the structure plans. Do use double walls for better insulation and with an airlock system as well.
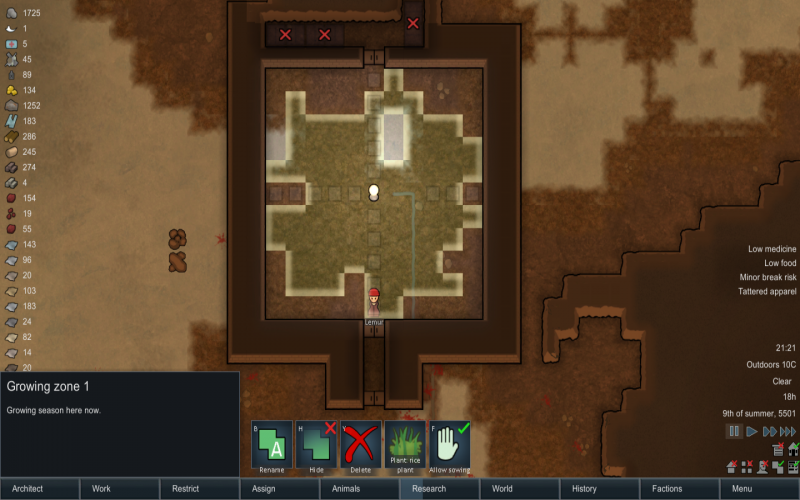
Once everything within the plantation room has been built, click the sun lamp and press "H" for the sun lamp itself to create a growing zone for you (instead of the conventional manual way). Start with rice, and harvest enough so that you can bring everybody else who has been in cryptosleep all this time for your colony to start running in full strength. Remind yourself that once temperature starts to drop again in Winter, you will need to install several heaters or plants will die.
In the meantime, there's no need to rush directly your research towards hydroponics. You can go through Complex clothing, Drug production, Penoxycyline and then Hydroponics. Of course each player will play different stories, so adjust to circumstances as needed.
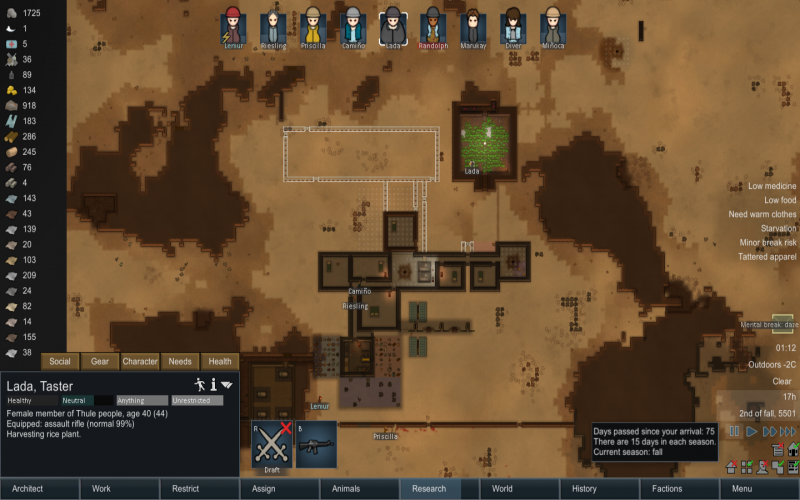
In this demonstration, the first harvest takes place 75 days after start. Now you have both shelter and food. From here on, it's all up to you. Good luck!
The third step
World quests
You can start to do world quests for factions, once you stabilised your food supplies.
- Go get item stashes.
- Go help incapacitated refugees.
- Go rescue prisoners.
- Go destroy enemy outposts.
Whenever you reach a quest location, you wanna look for berries, healroot, animals and wood. Animals and marginally other humans should be butchered before leaving, if the meat is too heavy and you still have time you can use the local wood to make lots of campfires and turn all into meals to reduce weight.
Slighly more advanced technology
Once you research nutrient paste, you can make food efficiently for your people. This also frees a cook to do other things.
If you have enough power, hydroponics basins can also be helpful in feeding your people. This allows you to build greenhouses freely instead of being restricted to growing food in the stony soil patches.
Emergency measures
If the game is bearing down on you, you can use these measures to prolong your colonists' lives. These can ruin the true experience of an ice sheet survival though, so make these a last-ditch measure.
Cryptosleep
If you come across an ancient shrine, you can put your colonists to sleep inside. This helps to extend your food stocks when you fall on hard times.
Caravaning
Another alternative is to escape while you still can- the ice sheet just isn't for you. Gather whatever food you can, along with some supplies, then break for it.
