Difference between revisions of "Basics"
(→Colonist Selection: <!-- don`t know pawns max limit if there is one -->) |
(→At the beginning: Removing thumb|, thumb|, thumb| and thumb|. They will be obsolete soon plus their size too big while showing little) |
||
| Line 87: | Line 87: | ||
=== Early Scramble === | === Early Scramble === | ||
| − | |||
| − | |||
| − | |||
| − | + | ||
You start the game crashlanded on an earthlike alien world. It may take a few seconds for your colonists to land but after all three land you will notice materials, weapons, and a pet of some sort nearby. Immediately pause the game once all your colonists are on the ground to take stock of what you have. | You start the game crashlanded on an earthlike alien world. It may take a few seconds for your colonists to land but after all three land you will notice materials, weapons, and a pet of some sort nearby. Immediately pause the game once all your colonists are on the ground to take stock of what you have. | ||
Revision as of 14:11, 1 May 2017
|
Tutorial

The tutorial teaches the basics by highlights including: game set up, short walkthrough about building a small colony and defeating the first raider. At the end, the player can continue the same game after choosing a storyteller. This feature was added in Alpha 16 version.
While the tutorial mode teaches you the basics, this article provides more insight while still not getting into depth.
The basics
This page excludes content addressed elsewhere such as Game creation, Scenario system, AI Storytellers, World generation and Biomes. Instead, it focusing on basic topics like: Prisoners, hunting, trade, animal taming and much more.
New colony

Main menu

Scenario Selection

Storyteller Selection

World Generation
Landing Selection


For your first time playing it is strongly suggested that you:
- Pick the standard Crashlanded scenario since it is to what most tutorials/information are geared towards.
- Select the storyteller Cassandra Classic or Phoebe Chillax on Base Builder difficulty.
- Alternatively, you may pick Peaceful but you may lose out on learning how to deal with major threats.
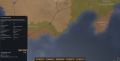
- Pick your landing site by clicking on the generated map.
- For biomes, choose Temperate Forest' or Arid Shrubland, this will give you a comfortable location to learn the game and food will not be a factor unless during events.
- For climate, choose an area where the growing season is 'Year-round', that way you can grow crops year-round, and the temperature never falls low enough to become a threat.
- For terrain, choose Flat or Small Hills, this gives you enough area to expand later on.
Colonist Selection
You will start with three colonists, picks are randomized and cannot be fully customized by the player`s will. There are three aspects worth taking into consideration:
- Colonists who are incapable of violence, will not be able to fight incoming raids.
- Look into their traits. Some are extremely toxic:
- Abrasive will tend to insult others and start fights.
- Chemical interest/fascination will often go on drug binges.
- Volatile colonists go into mental breaks very easily.
- Pyromaniacs will start fires randomly, doing so more often when stressed.
- Some other traits are not as bad but are still worth watching out:
- Prosthophobes will reject any form of bionic enhancement.
- Some traits bring both benefit and harm:
- Trigger-happy colonists fire faster but are less accurate.
- Neurotic colonists work faster but also more prone to breakdown.
- Watch their health conditions. For example, older characters are frail and may die faster and asthmatic characters will require constant medical attention.
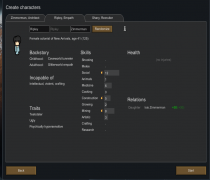
Colonist #1 incapable of violence.
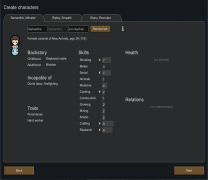
Colonist #2 is a pyromaniac.
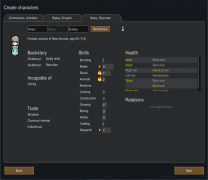
Colonist #3 with health issues.


Aim to get all three colonists who combined are incapable of none. Additionally, at least one colonist should be proficient in the following skills (you are aiming for 5+ skills, max is 20):
- Social - Recruiting new colonists
- Medicine - Healing the colonists you have
- Cooking - Making food
- Construction - Building
- Growing - Growing/harvesting food
- Mining - Hollowing out mountains/hills and mining for mineral resources
- Crafting - Creating clothing, weapons and other trade goods
- Research - Advancing your technology
Additionally, characters have Passions which are represented by fire icons (single and double) meaning that will learn faster such skill.
But do not worry too much about traits as characters will evolve within time base on the orders you give to them. And others will be joining soon!
At the beginning
Early Scramble
You start the game crashlanded on an earthlike alien world. It may take a few seconds for your colonists to land but after all three land you will notice materials, weapons, and a pet of some sort nearby. Immediately pause the game once all your colonists are on the ground to take stock of what you have.
Starter Materials
-
 Silver - A trade good. Consider this your form of money in the game.
 -
 Wood - Simple construction material.
 -
 Steel - Intermediate construction material.
 -
 Packaged survival meal - Food that does not spoil. It will deteriorate if left outdoors and uncovered though.
 -
 Medicine - Material for healing colonists.
 -
 Components - Advanced construction material.
Starter Weapons
Immediately examine your colonists to see who is best suited for each weapon by clicking on them and selecting the character tab. If you have brawlers (denoted in the bottom left of the character screen under Traits) take the one with the highest melee skill and give them the knife as they will get a negative mood modifier if they are using a ranged weapon. Afterwards, the best shot should be given the survival rifle and the remaining colonist the pistol. Give every colonist a weapon, even if that means giving a brawler a ranged weapon. You can make them a shiv later.
Go ahead and unpause to let your colonists gather weapons.
Once your colonists have equipped weapons start to unforbid the various materials near you. Do not go all over the map as it takes time for your colonists to retrieve them and you have more pressing things to do immediately. You can mass unforbid by double clicking on a single item to select all of that type on screen then clicking 'F' or the button at the bottom left.
Forbidding an item tells all colonists not to touch it. This is useful when you have something you don't want them getting at. For instance, once you have a thriving food production set up it would be wise to forbid your Packaged Survival Meals as they never spoil and can be reserved for use in an emergency. Note that forbid does not work on animals or visitors.
Making a home
Food and shelter, your colonists primary concerns. Look around the area near to where you land and try to find some place that is defensible. Chokepoints (without water!) are good things to look for. Any preconstructed facilities are also a plus for helping you get set up quickly.
In this case I found a small valley to start my colony in with an almost constructed ruin. I filled in the gaps and threw down three beds for the colonists.
Be sure to place an animal sleeping spot indoors as well. Animals must be in these locations to receive medical care and you want to control where your animals sleep as well. If they sleep outdoors they run the risk of getting eaten or being subject to the weather.
Initial Farm Setup
Once you've established a base location, set aside some areas for farming. You will not need much land with year round growing. In this case I made three 5x10 plots. There are three basic food you can plant in Rimworld: rice, potatoes, and corn. Rice grows quickly but is nutrient weak; corn grows slowly but is nutrient dense; and potatoes are the middle ground.
In this instance I threw down a plot of rice for quick cheap food, cotton for clothing, and potatoes for long term food production.
If you have a colonist with a farming skill at or above 8 you should also start growing healroot. It is a low tech variant to medicine that your colonists can use to heal each other. It is not as effective but is better than nothing.
At this stage you should be more concerned about making beds and building roofs rather than giving each colonist their own king-sized bedroom, so don't be too ambitious and grossly overexpand your base.
Work
Your colonists will all have tasks that need completion, but you will notice that some only work on certain things. This is controlled through the Work tab at the bottom. Once in the tab, mouse over a task name to see what that task covers.
You may be inclined to simply check all the boxes (a viable strategy for early game set up) but this is actually a poor decision to make long term.
The best situation is to start using the Manual Priorites (check box at the top right)
This will give you 5 degrees of priority for each task (1 - 4 and unassigned). Additionally tasks are prioritized left to right.
In this case, despite our colonist Booker having six tasks at priority level 1, the tasks on the left have a higher weight than the tasks on the right. For example, take a situation that had simultaneously a fire (Firefight), a prisoner requiring food (Warden), and a stone to be hauled (Hauling). Booker would fight the fire first, then feed the prisoner, then haul the stone. This is because all tasks are weighted left to right, so even marking everything at 1 has every task in an order. You break this left to right work priorities by assigning them different values.
A colonist will look at all level 1 tasks, left to right, to see if any need accomplishing. If the colonist cannot find a level 1 task that needs accomplishing, he/she will move onto any level 2 tasks, then 3, then 4. They will never work on any task that is unnumbered.
While setting up a colonists work priorities there are three visual cues that help give you an idea of this colonists suitability for the task. The first is the box outline itself for the number becomes brighter the more proficient a colonist is at the task. In this case, Booker is our best Warden, Nabs is our best Cook, and Masaru is our best Handler. The final two cues are the small fire marks in the bottom corner of a task box. These denote the colonists passion for the task, or how quickly they will learn it. A colonist with no passion learns at 33%, with a single passion at 100%, and with a double passion at 150%. Consider making colonists with low skill but high passions work their preferred task as they will skill up quickly.
...low skilled Doctors should ideally practice on prisoners...
Stockpiles
There are two types of stockpiles in the game (controlled through the Architect -> Zones): Dumping and Stockpile. They work similarly but have different uses. Stockpiles are for wanted goods, while dumping piles are for unwanted junk.
Start by creating a dumping stockpile a ways from your home (not too far though!). This can be out in the open. It will be initially used for dead animals, stone chunks, raider bodies, etc.
Then create a close by regular stockpile. Be sure to wall this one in and create a roofed area for it. Any items left out in the open will deteriorate over time so it is in your best interest to have a dry goods storage area.
Stockpiles have a huge number of settings you can tinker with to get the perfect set up. Ideally you will have quite a few littered around your base as the game progresses, such as one that is a freezer for food capable of spoiling, another for weapons and armor, another for building materials, another for trade goods, etc. To access the settings of a stockpile, click on the highlight it creates on the ground. If there is something in the way (i.e., something being stored in that area) just click again and it will cycle through the items in that square.
Food Production
You should focus on creating a kitchen once you have the basics down. Colonists can eat raw food but they will become unhappy about it unless they are eating raw berries.
Find a nearby area and wall off enough to create a simple kitchen, table, and chairs.
You'll need only a butchers table and fueled cooking stove at first. The difference between a fueled cooking stove and a normal stove is that a fueled cooking stove is powered by wood and a normal stove uses electricity. Considering you do not have electricity set up, use the fueled stove first.
Be sure to throw down a table and some chairs for your colonists to eat at as they will get a negative mood modifier if they do not eat at a table.
Chairs can (and should) be placed at the work location for a workstation as well, giving the colonist working at it a positive mood modifier for being comfortable. It is not a high priority but something that should be considered once you get established.
Making your first bill
A bill on a workbench or stove denotes a request for colonists to use that bench. Start by clicking on a bench then clicking 'Add Bill'
In this case I started with the stove. We need to ensure that our colonists always have food available. I like to set aside 5 items of food per colonist to start with, so click on the 'Do X Times' and it will give you the option to instead 'Do until you have X.'
This is useful for ensuring that we always have, in this case, 15 food prepared for our colonists. It's overkill at the moment, but it gets the job done.
For the butcher table, do the same thing but this time set it up to butcher creatures. You cannot cook a whole carcass; it has to be butchered first.
In this case we want to butcher every creature we kill, so go ahead and set it up to 'Do Forever.'
And now your food production is set. Your colonists will ensure there is at least 15 food set aside and all dead animals will be butchered for their meat/pelt.
Refrigeration of food
Most of the food can spoil due to high temperature. The higher the temperature, the faster the food spoils. However, at 0C (32F) or lower, food will be frozen and won't spoil at all. That is why it is important to build a refrigerator to freeze food.
Building a refrigerator requires energy and a room. It is recommended to use a room with double-walls, to lower the amount of heat that gets inside of the refrigerator. Then, it is required to put a cooler in the refrigerator. However, it is important to put the cooler in the right direction. Red square means that cooler will release heat into that direction. While blue square means that cooler will take heat from that direction. Change the direction of the cooler with Q and E keys, so that blue square is inside of the room. It is recommended to put at least 2 coolers in the room, to make sure that the temperature is always below freezing point.
Next step is to lower the temperature of the coolers with use of the buttons below. The cooler will lower the temperature until it is at the specific temperature (shown in lower left corner under 'Target temperature'). Set the temperature just below freezing point, to prevent random temperature deviations. If you are using 2 coolers, then it is recommended to set one of them 1 degree higher, to lower the energy consumption.
Now create a stockpile inside of the refrigerator. Press 'Clear all' and set Priority to 'Preferred' or 'Important'. It will make sure that your colonists will bring all food to the refrigerator. Now allow your colonists to bring 'Foods' and 'Animal corpses' under 'Corpses' tab. It might also help to press '*Allow rotten'.
All done! From now on, your colonists will bring dead animals and food into the freezer. Just make sure you have enough space in it and always have energy to keep coolers running.
Joy
Your colonists need to carry out joy-activities from time to time to keep their spirits high. Overworked colonists without time to wind down will suffer from mood penalties ranging from -5 to -20 depending on how desperately they need a break, while well-entertained colonists gain a mood bonus of +5 to +10.
The simplest way to have your colonists relax is to simply give him some free time. Even without anything else, they can still carry out some relaxing activities such as going for a walk, skygazing, meditating or praying. If you have a table or a campfire they will also gather near it to relax and exchange some small talk.
However, carrying out a category of joy activity too often leas to a joy tolerance, making it less effective. Without anything else, colonists quickly get tired of Meditative or Social activities.
A simple solution is to build some Horseshoes Pins. They cost only 15 materials, making them a very cheap solution to early-game entertainment. As you build your colony you can also get other joy sources, such as Chess, Billiards, TV or telescopes.
Basic Defense
Not too long after you crash down onto this unknown RimWorld, there will be hostile factions that will raid your colony to try and get as many valuables as possible to sell on the black market, pillage, or even kidnap. As this is your colony and you'll always have to defend; you can't retaliate but you can establish defensive structures which will give you that advantage when the raids do come. This following image shows two cheap and possible structures which are sufficient to provide security for the very early game: an open-bunker (left), and an arrangement of debris (right). Do note that you can also place chunks in front of the bunker as opposed to sandbags, and vice versa for the arrangement.

As expected, the open bunker would be more effective as a security structure as the sandbags provide more cover than the rock chunks can give. Additionally, there are solid steel walls meaning that there is ample cover provided, and the steel walls can take a fair amount of gunfire before giving in. Do note that any stone type is more durable than Steel as well as not flammable, so it's worth replacing steel walls with stone walls as soon as you can.
However, the open bunker is also more expensive to construct (but still dirt cheap resource-wise, and less expensive than a full bunker) than a simple rock chunk 'barricade', with a requirement of 158 Steel for the particular construction demonstrated on the left hand side, whereas the right is simply a matter of a minor hauling project. 158 steel isn't terribly hard to obtain though; being a matter of simply mining 5 pieces of Compacted Steel - and still having some left over.
Do note that you need to create dumping stockpile zones for the chunks, and you need to make it so that non-smeltable weapons and bodies aren't stores there, and that the priority is at least Preferred. This way, designated chunks will be hauled to your defences first before placed into your general dumping stockpile zone.
Constructed Defenses
For a more in-depth guide see Defense tactics.
Always consider your defenses BEFORE you need them. Nothing is instant in Rimworld, so trying to scramble something last minute will be difficult, if you aren't dead already from lack of preparation.
Building a Wall
For now, we are going to create a simple exterior wall. This will help protect our colonists and animals inside from at least the animals outside and some external threats.
You need to chop down some wood for more material if necessary. Wood is the absolute worst structure building material (weak, flammable) but it should be plentiful in a temperate environment. You can do this through Architect -> Orders -> Chop Wood.
Before your workers finish building the wall to keep raiders out. Make sure you let them know you don't want a roof over this area. Go to Architect -> Zones -> Enable No Roof Area
Roofs can collapse if not properly supported so it is in your best interest to deroof an area prior to deconstruction or in this case simply tell your colonists you do not want a roof there.
Practice Defense
Now select all your colonists and then click to 'Draft' them in the bottom right.
We're going to practice by killing all the random animals in our courtyard (DON'T KILL YOUR DOG!). With all the colonists selected move them someplace central. Deselect the melee individual, and instruct the other two to shoot at an animal by right clicking on it. Ensure you have some distance as some animals (bears, cougars, wolves, etc) are violent when attacked.
In the case of a violent animal, as soon as it becomes violent click on the animal. In the bottom left it will state which colonist the animal is charging. Start that colonist running away immediately from the main group and the animal. The other colonists should be able to still shoot at the animal while the chased colonists 'kites' it.
With all the animals dead in the yard, select them and unforbid their corpses so your cook will butcher them for meat/pelts.
If you have no animals in your yard I suggest practicing with an animal outside your yard to get the feel for how combat works. Something small like a squirrel, rabbit or Thrumbo will do fine.
Fire Handling
Fire is a very real threat in Rimworld. The first thing you need to consider, especially building with wood, is how fire will spread through out your base.
In this case, mow your lawn.

Go to Architect -> Orders - Cut Plants and select all plants NOT part of your growing zones inside your courtyard. We want to remove all plants from growing inside as it is just kindling in the event of a lightning storm. Note that this will probably take some time and you will probably have to redo it a few times to get all the stragglers. You should also consider mowing a few tiles from your walls on the outside as well if you intend on keeping wood walls for any extended period of time. You can install wooden floors if you want to force no plants to grow there.
In the event you do get a fire there are two ways you can handle it.
- You can let the colonists handle it on their own. They will automatically put out fires inside your home zone (Architect -> Zones -> Home Area) so long as they are prioritized to do so. This can lead to rather haphazard fire fighting though, with colonists all over the place.
- You can draft your colonists and move them adjacent to a fire. While drafted a colonist will fight the fire and you can coordinate your efforts.
Trading
At some point you will be visited by nearby colonies/tribes. They might just pass by but occasionally they will be available for trade. You can see this by looking for a '?' above one of the visitor's heads.
Find your colonist with the best social and right click on that visitor to select the option to trade. Here you can see if you have anything you can sell or buy from them.
Small caravans are normally fairly light on the trade goods but some, like orbital trade ships, carry extensive goods including rare animals or additional colonists. It is wise to create a decent stockpile of silver in the event you find something useful from a trader.
Research
At some point you should consider building a research bench. Sooner rather than later, as there are some tech items that are fairly invaluable.
It can be built outdoors and does not require power. In this case I threw it near the bedroom.
Once completed click the Research tab in the bottom right and select the item you are going to start on. I chose stonecutting so I could upgrade the wooden walls to something a little less flammable.
If one of your colonists is prioritized to research they will spend some time at the bench researching. Again, it would be smart to give them a stool or chair to sit at.
Research takes time, especially for someone unskilled at an unpowered station. Start it early as you will need some items before you know it.
Power
All the advanced equipment runs on power. The best source of reliable power early game is the solar panel (always giving 100% during the day outside of events) but the wind turbine gives power at night. Both require batteries to ensure 100% uptime.
Find a nice out of the way area to set up some power generation. In this case I threw down a solar panel in the top right corner of my base.
I also created a small room to house our batteries nearby.
Be sure to tell your colonists to build a roof there if the area was previously set to a no roof area. Architect -> Zones -> Build Roof
You'll notice I left a small hole. Battery fires are bad. Really bad. Especially in a small contained area. The hole lets any heat vent out so that our colonists can safely fight the fire. Just ensure the hole is not over any battery as they can short circuit in the rain and explode.
Wind turbines require adequate clear space to run properly. No trees, walls, mountains, etc in their way. They can go over solar panels and fields though, so you can tightly pack three solar panels under a wind turbine if you chose.
Finally run a power line near what you want to connect to. Only batteries and power generating items require being directly connected. Everything else connects within a small radius. In this case, I put a light in the kitchen and the power line along the top of it is close enough to connect.
Raids
It will not take long for your first raid. Typically it is a single individual armed with a melee weapon. He may or may not immediately attack.
Once he does attack, draft your men and prepare them near where he will be coming from.
If you're lucky, you'll down him quickly.
Then click on him and evaluate his benefit if you tried to capture/recruit him.
In this case I decide against the raider because he is asthmatic and a pyro. We live in wooden houses people! No FIRE.
So I selected one of our melee colonists and instructed him to melee attack the raider until he died. Though it's always better that you strip a downed raider before finishing him off.
Once he is dead you need a place to put them. You have five real options.
- Bury them in a grave
- Place them in a dumping stockpile
- Cremate them (molotovs or a crematorium)
- Eat them (mood penalty for non-cannibals)
- Use them for animal feed
At this point in the game, your best bet is to just bury them. Set aside some graves outside your base.
Crashlanded Colonists
Occasionally you will get a space traveler who crash lands nearby. If after evaluating their skills you want them to join you, you can attempt to capture and recruit them.

You will need to create a new room for a bed before you do so. I chose a small cave and walled it off.

Once the room and bed is complete, select the bed and set it for prisoners only. This will make it orange/yellow.

Finally select a colonist and right click on the crashlanded individual. You will have three options, Rescue, Capture, and Strip. Rescue is for catch and release and improves faction standings with whomever that person belongs to. Capture is to attempt to make them a prisoner to sell or recruit them. Strip is to take off all their clothes (you perv).

In this case, select 'Capture.'
Once he is place in a bed you will have a new tab for him labeled prisoner. Under this tab you can control his treatement.

You can select what type of medical treatment he receives, whether or not he is given food, and what kind of warden attention he is given. In this case, we want to give him food, medicine, and chat/recruit.
Besides capturing, you can also rescue them and patch them up. They have a chance of instantly joining your colony this way. Still, capturing provides a near-certain chance (barring prison breaks) that they will join in the long run, and also provides an opportunity to train up your wardens.
Cleaning
After a while, you may find that dirt is starting to build up all over your colony. Having dirt in a room makes it look ugly, giving your colonists a mood debuff. If you need to do surgery, it also makes it more likely to fail.
Rooms with high traffic, such as your barracks, are more likely to be dirty. Hospitals are also very easily soiled as your colonists bleed out all over the ground while your doctors try desperately to save them.
Though it seems like a rather low-priority job, you should still have someone to clean up your colony occasionally.
Intermediate Colony Construction
When you've satisfied your colonists' basic needs- a roof over their head, comfy beds to sleep in and tables to eat from, a fully self-sufficinet food supply, it's time to look bigger.
Personal Quarters
Barracks can give your colonists a heavy mood debuff; in addition to the Shared Bedroom debuff with a -5 mood penalty, they also get the Disturbed Sleep debuff, which stacks up to 4 times to give a -6 penalty. Thus, if you have a good colony up and running, and taken care of everything else, you should think about giving your colonist their own bedroom.
Even an awful bedroom is better than all but the best barracks, and also makes it harder for you colonists' sleep to be interrupted.
Stonecutting
Stone blocks are a superior building material in many ways; it is relatively cheap, easy to obtain and is completely fireproof.
You can make stone blocks out of the many stone chunks lying around (unless you're in a Sea Ice biome; if you're already that far into the game, what're you still doing here?). Each chunk makes 20 blocks, enough for 4 walls.
To start making stone blocks, you need to build a stonecutter's table using steel and another material, preferably wood. You also need a crafter to cut the chunks into usable blocks.
Building stone structures is a key part of upgrading your base to becoming more durable. It is not essential to survival however, and is best done mid-game. Stone also has its shortcomings; stone structures take ages to build, and are less comfortable. Unless you really need your beds to be fireproof, build them out of wood instead.
Quality Furniture
See also: Quality
While it gets the job done, your colonists definitely won't be happy with sleeping on an Awful bed for the next of their life as a colonist, or sitting on a chair that feels like it's gonna topple over anytime soon.
By this time you should already have at least 1 decent builder if you didn't mess up character selection. Get them to deconstruct your furniture and build new ones in their place.
Quality furniture has good effects. They provide more beauty, contributing to a better environment that makes colonists feel happier. Having good beds and chairs also make colonists feel more comfortable for those sweet, sweet mood bonuses, and colonists will rest faster in a better bed too.
Decoration
You should also decorate your colony to make your colonists...er...well... who doesn't like happy colonists? They feel happier when their surroundings are more beautiful, or they use a room that feels impressive to them.
Sculptures and flower pots are a good early-mid game method to decorate your base. Simply put/build them where you need them, and the room magically becomes more beautiful.
You will need a sculptor's table in order to start making statues. This is also when your artists, previously useless until now, begin to shine.
Besides this, building better floors also helps. It is completely reckless at all but late end-game to build silver or gold tiles, however, you can still get a good replacement. Smooth stone floors are just as good as silver tiles, and stone tiles or carpets (when researched) can be placed anywhere while providing a modest boost to beauty.
TODO LIST
- Cleaning -Incomplete, needs pictures and expansion
- Mining
- Medicine and treatment.
- A new colonist.
- Single quarters. -Needs pictures
- Night owls and nudists.
- Hunting
- Refrigeration.
- Sculpting, flowers and better rooms. -Incomplete, needs pictures and expansion
- Turrets
- Temperature control
- Animal Handling