Difference between revisions of "User:PigeonGuru/Archive"
PigeonGuru (talk | contribs) |
PigeonGuru (talk | contribs) |
||
| Line 61: | Line 61: | ||
Note that they will charge immediately upon seeing colonists so this is a measure to buy time at best. | Note that they will charge immediately upon seeing colonists so this is a measure to buy time at best. | ||
| − | |||
| − | |||
| − | |||
| − | |||
| − | |||
| − | |||
| − | |||
| − | |||
| − | |||
| − | |||
| − | |||
| − | |||
| − | |||
| − | |||
| − | |||
| − | |||
| − | |||
| − | |||
| − | |||
| − | |||
| − | |||
| − | |||
| − | |||
| − | |||
| − | |||
| − | |||
| − | |||
| − | |||
| − | |||
| − | |||
| − | |||
| − | |||
| − | |||
| − | |||
| − | |||
| − | |||
| − | |||
| − | |||
| − | |||
| − | |||
| − | |||
| − | |||
| − | |||
| − | |||
| − | |||
| − | |||
| − | |||
| − | |||
| − | |||
| − | |||
| − | |||
| − | |||
| − | |||
| − | |||
| − | |||
| − | |||
| − | |||
| − | |||
| − | |||
| − | |||
| − | |||
| − | |||
| − | |||
| − | |||
| − | |||
| − | |||
| − | |||
| − | |||
| − | |||
| − | |||
| − | |||
| − | |||
| − | |||
| − | |||
| − | |||
| − | |||
| − | |||
| − | |||
| − | |||
| − | |||
| − | |||
| − | |||
| − | |||
| − | |||
| − | |||
| − | |||
| − | |||
| − | |||
| − | |||
| − | |||
| − | |||
| − | |||
| − | |||
| − | |||
| − | |||
| − | |||
| − | |||
| − | |||
| − | |||
| − | |||
| − | |||
| − | |||
| − | |||
| − | |||
| − | |||
| − | |||
| − | |||
| − | |||
| − | |||
| − | |||
| − | |||
| − | |||
| − | |||
| − | |||
| − | |||
| − | |||
| − | |||
| − | |||
| − | |||
| − | |||
| − | |||
| − | |||
| − | |||
| − | |||
| − | |||
| − | |||
| − | |||
| − | |||
| − | |||
| − | |||
| − | |||
| − | |||
| − | |||
| − | |||
| − | |||
| − | |||
| − | |||
| − | |||
| − | |||
| − | |||
| − | |||
| − | |||
| − | |||
| − | |||
| − | |||
| − | |||
| − | |||
| − | |||
| − | |||
| − | |||
| − | |||
| − | |||
| − | |||
| − | |||
| − | |||
| − | |||
| − | |||
| − | |||
| − | |||
| − | |||
| − | |||
| − | |||
| − | |||
| − | |||
| − | |||
| − | |||
| − | |||
| − | |||
| − | |||
| − | |||
| − | |||
| − | |||
| − | |||
| − | |||
| − | |||
| − | |||
| − | |||
| − | |||
| − | |||
| − | |||
| − | |||
| − | |||
| − | |||
| − | |||
| − | |||
| − | |||
| − | |||
| − | |||
| − | |||
| − | |||
| − | |||
| − | |||
| − | |||
| − | |||
| − | |||
= Extreme desert guide (old) = | = Extreme desert guide (old) = | ||
Revision as of 11:40, 4 September 2018
Defense tactics/structures
Weapons (melee charge)
- High-DPS single-target weapons are optimal in this situation. Focus fire to break down shields and quickly down the exposed enemy.
- EMP weapons can be used to devastating effect by knocking out their shields with 1 hit. A lucky hit with an EMP shell can take out most of the shields in a melee raid.
- Explosive weapons may be used to break their shields, though they block the entire explosion so a single explosion won't hurt them much. They should be used in conjunction with EMP weapons if you're looking for #damage.
- Incendiary weapons penetrate the shield and set the raider on fire, distracting them. While their shields continue to block gunfire, the distraction makes it easier for them to be broken, as well as scatters enemies apart.
- Sniper rifles are capable of breaking a weaker shield with a single shot. Combined with their long range, this makes them a good supporting weapon to weaken an incoming charge.
- The Firefoam popper is a surprisingly effective option in this situation. In addition to spreading a wide field of foam over the ground that slows down anyone walking over it, the popper will deplete shields, stripping melee attackers of their crucial protection.
Weapons (manhunters)
High DPS weapons are good at taking down packs at close to medium range.
Long-ranged weapons work to provide long-distance firepower when paired with other high damage weapons, but are inadequate on their own.
The sniper rifle works well against larger animals, but is poor against hard-to-hit small animals, as a missed shot is punishing due to its long reload, and its high damage is grossly overkill.
Longswords, or any other high-damage melee weapon, are a must-have to fight off animals at melee range, which often happens with fast animals.
Crowd control
The Minigun is an excellent weapon against manhunter packs of any size. At a distance, it can destroy the tightly packed groups of incoming animals, while at point-blank, it can rip large animals to shreds, often with just a single barrage of bullets. Aim for an animal in the middle of the pack, and the bullets will hit others around it as well.
Chain shotguns are also a good choice at defeating manhunter packs at close to point-blank range, though its short range makes it risky to use against faster enemies.
Explosives are excellent at clearing out manhunter packs, when used carefully. They can hit a lot of animals at once, and don't miss easily, especially against small animals which can evade bullets.
- Rocket launchers are an effective yet easy-to-use one-use solution. Be careful when using them near your base or colonists though, and disengage if animals come dangerously close to allies.
- The Doomsday rocket launcher can obliterate a swarm of smaller animals using its giant incendiary blast.
- The Triple rocket launcher excels against larger animals with its high damage 3-round salvo.
- Mortars aren't very useful as animals generally run faster than the mortars can hit, but if you have a kiting colonist or trained animals distracting them and you aim ahead, you can still achieve great results.
- Grenades are good for groups, but are too short-ranged to be safe to use against raging animals.
Distraction structures
Once you have lots of bulk materials, but don't have enough industry to build proper defenses, you can build an distractions to temporarily delay raids.
Doing this can delay raids in early-mid game if you have the effort and materials, but as you enter mid-late game it's better that you replace the suppressor with something else, such as a killbox, which can actually bring the hurt.
Attention suppressor

Start like you're making a 29-wide room, but instead of doors, just leave one-tile openings at opposite ends. That way it doesn't get a roof. If needed, use a no roof area. Down the middle of the attention suppressor leave an open path, which will actually be traveled by your colonists. Pack the sides with alternating walls, leaving numerous blind alleys branching off the open path. The attention suppressor should look like two giant combs facing each other across the path.
A raider entering through an attention suppressor is presented with numerous blind alleys, each one of which could hold something important (in their perspective). Raiders will typically only resist the lure of a dozen or so blind alleys, before turning off into one to look for something to attack. In many cases they'll attack the walls, but the general effect is that a raiding force will spend a long time milling around in the attention suppressor, deeply distracted, and slowly trickle out of it toward your base alone, or (for a large raid) in twos and threes. This slow trickle of raiders is easily handled by a few colonists with basic weapons, or later a few turrets and a repairman.
Colonists and visitors with specific business on one side or the other of the attention suppressor will go quickly down the middle without being distracted. However, colonists pursuing joy activities like going for a walk will usually be diverted to do so in the blind alleys of the attention suppressor. As a result, it's not safe to fill with deathtraps.
Pros
- Effectively distracts and delays raiders
Cons
- Does not deal damage
- Takes up large amounts of space
- Expensive and time-consuming to build a lot of walls
- Makes it harder to eliminate all raiders at once
Dummy power grid
Place many wires randomly around the area. This causes enemies to stop and ignite or fight the wires, delaying them.
Note that they will charge immediately upon seeing colonists so this is a measure to buy time at best.
Extreme desert guide (old)
This guide details how to survive in one of the most hostile environments in Rimworld - an extreme desert.
Brief
Extreme deserts are even hotter than a regular desert. Temperatures can be high enough to cause heatstroke for colonists that are not dressed for hot weather.
In an extreme desert plants are scarce and there is a lack of fertile soil to grow plants in. Although in normal deserts there are still small parches of arable land, in an extreme desert there are only gravel patches available to farm on.
Starting area
It is important to consider the terrain of your extreme desert. The main two options are flat maps and hilly/mountainous maps.
- Flat maps will have growing zones scattered on the map randomly while high altitude maps will mostly have growing areas at the foot of the mountains. This means it is possible to centralize your colony on a flat map while on a high altitude map your growers will have to travel further.
- Flat maps will have more animals like Dromedaries, Fennel foxes and Iguanas. Foxes are the only threat present when hunting. There may also be some Megascarab on the map which while slow, can cause a lot of damage to your colonists so it is important to take care of them early on.
It is not recommended to pick flat maps near the sea since they have less area available for building and the water cannot be used for fishing.
Lost Tribe
- Main Article: Scenario system - Lost tribe
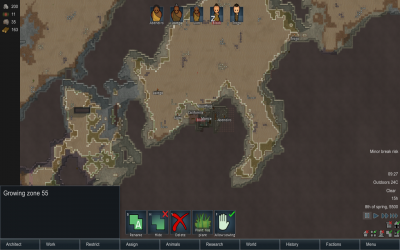
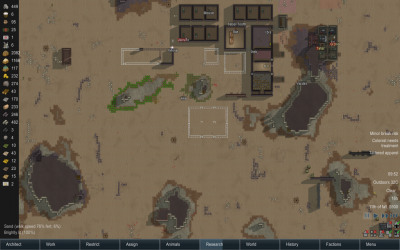
Extreme desert mountainous growing zones layout
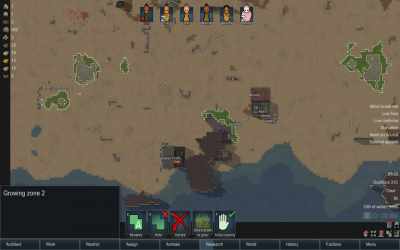
Extreme desert flat growing zones layout


- Find and claim an intact structure that can fit five characters. The starting wood should be reserved for doors and coolers only.
- Prioritize mining and crafting. It is important to conserve materials therefore place all production benches inside one large room.
- Hunting will be one of the main food sources at the beginning since the starter pemmican will run out quickly. Hunt everything on the map and build a butchers table. Harvest any agave and other resources on the map. Starter animals can also be a source of food.
- Immediately start growing rice at the beginning.
- Only build essential production benches such as a stonecutting bench and a butchering bench. Try to use steel that can be found on the map instead of the starter wood.
- At the beginning feed your colonists raw food until you research electricity.
- If there is a heatwave build passive coolers. This is the reason wood needs to conserved since a heatwave can easily wipe out your entire colony.
- Using a tailor bench, craft cowboy hats and dusters as soon as you can from leather, and later on once you have a good supply of food, from cotton you have planted.
- Research: If playing on a flat map, stonecutting will be important to allow you to build more walls. If playing on a mountainous maps, it is possible to build a colony inside the mountain and start researching electricity first.
- The very first visitor will be your savior as will be bringing some pemmican, but with just 200 starter silver, you can only buy like 55 units which isn't much or 60 if selling the spare weapon.
Food
Immediately start growing rice or you won't make it past a week. Rice is not a good choice of crop in poor soil, but they grow fast. Once you have decent food stocks, replace this with potatoes as they perform better in poor soil.
Somewhere around your fifth day, your colony will have no food available at all and your only chances for survival will be opening an ancient shrine and hope there is at least one hive that has a spelopede or megaspider to hunt. These creatures will chase any intruder up to some 30 tiles away from their hive so they won't chase you forever, but they are very fast. Since you only start with two short bows and a bundle of pila, it is still possible to hunt without harm but will require good concentration and familiar tactic knowledge of kitting. To kite, means having a fast bait run towards a direction where nobody else is, while at the same time, the others shoot at the chasing creature. Use the Plan grid to draw their attack range.
Opening ancient structure purely for survival

Hive guardians pursuit range of 30 tiles


If you are lucky, the same moment you need to open the ancient shrine will coincide with the timing of your first newcomer who might be better equipped to hunt, most likely a pistol. Which means you can go to up a max of four hunters. One more mouth to feed but safer hunting. The newcomer may likely as well arrive with some packaged survival meal, but it won't be enough for more than a day.
Insect jelly will start spawning, which will become another nutritional source, and this one never rots. But, hives will live so long as there is a guardian keeping maintenance, and if you kill them all, they will stop producing jelly. Soon after, by the time you might be picking them up. Glow pods will appear too, replacing torch lamps.
Animal herds may also help you survive from starvation.
Check your rice plantation periodically, as the plant can be harvested as early as 66% growth. While it may not yield much food, it's still better than nothing.
Check on the few agaves, they may be ready for harvest by now.
Check if any other life form has ventured to your territory.
Reached your first 100% ready harvest? Congratulations, you made it!

Gathering materials
Due to the lack of trees, instead of using wood (Saguaro cactus provide merely 13 wood), it is best to build with steel as there's abundance in comparison, so it is wise to start mining this resource before you need them. Later on after researching stonecutting, you can upgrade to stone.
Those in high elevation areas should start caving in. During this process you may likely strike other minerals, which are slower to mine. But their empty space will do better for laying out a proper cave system, otherwise you will find yourself mining too much when going after said minerals gaining more work afterwards with the increasing need to build walls where those minerals were located to avoid mountain roof collapse.
Remember that ancient shrine? That room can also be used to build more facilities.
Continuing research
Did you notice winter temperature is around 30 Celsius? Imagine peak summer time. Double time on research to get electricity. Lucky if you have a night owl in the team.
Summer
Summer is going to start soon, and while the season itself is not a threat, heat wave is as it rises temperature up to 60 degrees Celsius. You will need to build passive coolers which require 50 wood each so that your colony doesn't die of heatstroke. Any temperature below 30 degrees Celsius will allow your people to recover at night.
Base relocation or upgrade
After you have gone past your first heatwave, it's time to make life more comfortable so that none of your people are psychologically nor emotionally disturbed. Try to make the most of the whole map with as less effort as possible. And the rest it's up to you. Good luck!
Ancient structure converted into primitive private rooms.
Base relocation close to six geysers.


Ice sheet guide (new)
This guide details how to survive in one of the most hostile environments in Rimworld - an ice sheet. We focus on the Lost Tribe start because it is the hardest one to thrive in hostile environments since you got more people to feed and less technology to help you.
Introduction
Ice sheets are the coldest option of cold maps. They have very little animal life and no plants. In fact, you should not expect to find anything more than five snowhares in your start. You should also not expect to see more than one new snowhare every five days and one new polar bear per month.
In addition to that, they do not have any soil available, if you wanna grow something you would be doing it in stony patches around hills and mountains. But you can not, because it is too cold outside. You will struggle a lot until you get a heater and a sun lamp, then you can plant something indoors.
Even the warmest ice sheet it really cold. Their average varies from -20 °C (-4 °F) to -40 °C (-40 °F) and they never have growing periods due to the temperature. You still need to eventually make a freezer though, because the summer temperature is hot enough to spoil your food. You should expect to have problems with hypothermia during fall, winter, spring and during cold snaps in summers.
Landing site

In all maps you should to choose carefully your landing site to increases your chances of survival. You want to build a colony in an area with some of the following characteristics:
- Near to tundra (faster moving around)
- Near to a friendly faction base (faster trading)
- Near to a road (faster moving around)
- Without many mountains around (faster moving around)
- With coast (to turn into large growing areas later)
- With caves (early food source)
Ice sheets do not have roads or rivers, but that does not mean you can not settle close to a road. While you should not be surrounded by mountains, the landing site itself can be mountainous.
Of course you do not need to land in an area in all those characteristics, but try to get as many of them as you can.
Starting colonists
Ice sheet is so harsh that you will have to resort to cannibalism, so you wanna have a crew that can tolerate that. That means having one butcher that does not mind butchering people and everyone resistant to mental breaks.
Your butcher should be either Cannibal, Bloodlust or Psychopath.
And all your crew should ideally be either Cannibal, Sanguine, Optimist, Iron-Willed, Steadfast or Masochist with scars. Couples also enjoy extra happiness so try to bring couples instead of bachelors, likewise Beautiful and Pretty colonists are also good since they are more likely to became in love with someone.
Surely you do not need to have all five starting colonists with those characteristics, but the more resistant colonists you have the better.
Base area
Once you choose your landing site and colonists you should also choose your base area. It is important to notice that this area does not need to be final, it is just the area where you are more likely to survive the early game.
You want to find an area with the characteristics: near steam geysers, near steel, more growing areas and more easily defendable.
More growing areas means more stony patches and more easily defendable area is an area with few entrances where you gonna lay down your traps. Your priority is steam geysers. You have to make the base on top of a steam geyser, otherwise you will die of hypothermia very fast.
Since you do not have trees, you can not build a big base yet. You can then either take a ruin, make a cave or make a small steel base. It all comes down to what you have near the steam geysers. If you have a ruin, take it. If you have a hill, make a cave. If you have none of these, make a small steel base.

First agenda
- Get some easily accessible steel and use it to build your stuff, so you do not have to use wood.
- Make your starter base on top of a steam geyser. Give people a place to sleep, eat and play.
- Hunt those snowhares before they leave the map.
- Kill your starting animals.
- Only use wood to make campfires, either for cooking or heating up. Make sure your wood is forbidden so they do not refuel it unnecessarily.
- Get rid of some colonists.
Notes
Now you gonna be struggling for food for a long time. If you have caves in your map, it will help a lot. You wanna keep the insects alive, so make sure to seal off the caves so that they do not freeze during winter and the hive does not dies due to lack of maintenance. Enjoy while it is warm and go visit your nearby friendly base to trade whatever you can for food. For that, you gotta get something you can trade:
- You can mine expensive things like components, plasteel, uranium, jade, silver or gold.
- You can open the ancient shrine and sell whatever you find there.
Regardless, you still will not have enough food for five people for so long, you simply have to get rid of some of them. The best way is to put some of them inside the ancient cryptosleep caskets.

You can also send some people out while it is warm to raid the closest base outside the ice sheet, try to not raid your closest friendly neighbor. Hunt the animals and harvest the plants around the base and run back to your base. You can make peace with them later. You have to bring the colonists back in the beginning of next season before it gets too cold.
Another more undesirable option is to sell some colonists. They are usually worth a lot, but do not expect to see them again.
Likewise, another even worse option is to kill some colonists, but they are not worth many meals.
But you gotta do something, feeding five people will not happen. Three people is about what you can you feed.

Second agenda
- Make a killbox.
- Make steel deadfall traps.
- Eat any raider that shows up.
- Eat any wanderers that decides to join.
- Eat anyone who arrive in a escape pod.
- Offer help to any refugee being chased. Then eat him. Also eat the raiders following him.
- Wear their tainted parkas and tuques.
- Buy cloth from your neighbors.
- Make your research bench and start researching complex clothing. Once you done, make parkas and tuques with your cloth.
- Make human leather bedrolls.
- Make lots of dusters with all the human leather and sell it.
Notes
Now the cannibalism starts, you will eat anyone that is not one of your starting colonists or from a friendly faction. That includes anyone who tries to join your colony, that also means offering help to refugees just so you can eat them later. You also better be sure you got clothes before fall starts.
You will not have time to make your own clothes, you will have to use the raiders tainted clothes. Try to get some of them alive, drop them near your base, strip them and kill them. That way, their clothes will not be tainted. But you should also buy cloth to ensure everyone has a parka and a tuque.

Since you gonna often offer help to refugees, you better make a proper killbox with lots of deadfall traps. The fighting starts outside though, with all the ice and snow the raiders gonna be really slow. Shot them while they are approaching because it takes a while for them to move to cover. Then once they are in cover, go back to your killbox.
Remember that human leather is worth a lot and it is better to make something with it first, then sell it. First give your colonists bedrolls to sleep, then make dusters since they are more profitable then anything else. Cannibal and Bloodlust colonists will want to wear human leather clothes, give them human leather button-down shirts and human leather pants, but do not give them human leather parkas. The material is just too bad at insulating.

Third agenda
- Research complex furniture. Once you done, make steel beds.
- Go get item stashes so you can hunt and harvest in the area.
- Go help incapacitated refugees so you can hunt and harvest in the area. Then eat him.
- Go rescue prisoners in outposts so you can hunt and harvest in the area. Then eat them all.
- Go destroy enemy outposts so you can hunt and harvest in the area. Then eat them all.
- Replace the less insulating parkas for cloth parkas.
- Research stone cutting so you can start using stone instead of steel.
Notes
Once you have your colonists with parkas and tuques you should take every opportunity available to go to another map. If you placed your colony near tundra, then it is likely that the quests will appear in tundra maps and that they will have much more resources than your frozen home.

Whenever you reach a quest location, you wanna look for berries, healroot, animals and wood. Animals should be butchered before leaving, if the meat is too heavy and you still have time you can use the local wood to make lots of campfires and turn all into meals to reduce weight.
Winter is coming, it is gonna so cold that not any parka will do. Anything with worse insulation than cloth should be replaced by cloth. Cloth is average in insulation but really cheap to buy.

Fourth agenda
- Replace the cloth parkas for better insulating parkas.
- Use stone to reinforce your walls with a second layer for better insulation.
- Research electricity.
- Research battery.
Notes
Now it is cold, so cold that even cloth parkas are not enough.
Try to replace your cloth(cold insulation 18) for bearskin(cold insulation 20), bluefur(cold insulation 20), foxfur(cold insulation 20), devilstrand(cold insulation 20), alpaca wool(cold insulation 22), synthread(cold insulation 22), wolfskin(cold insulation 24), muffalo wool(cold insulation 24), megasloth wool(cold insulation 26), hyperweave(cold insulation 26),chinchilla fur(cold insulation 30), heavy fur(cold insulation 30), thrumbofur(cold insulation 34).
Likewise, now you should only send people out on quests if you got a strong insulating parka for them.
Raiders are now more numerous and if you keep doing quests you should have enough food to feed five people.

Fifth agenda
- Make your first greenhouse with a sun lamp and heaters.
- Plant potatoes.
- Research air conditioning.
Notes
Winter is gone and summer is coming, you should get ready to make a freezer so your food will not spoil.
Finally you are ready to make a greenhouse and plant potatoes. Ideally, try to connect your greenhouse to your steam geyser.
Since you got a reliable food source, you can now accept more people. You are not free of cannibalism yet, but you can stop offering help to refugees and stop going to quests just to get more food.

Sixth agenda
- Research hydroponics.
- Research nutrient paste dispenser.
Notes
With hydroponics basins you may make greenhouses without having to stick to stony patches. Getting anything planted here is expensive, so you should make a nutrient paste dispenser to save on food, once you got one you may stop doing cannibalism.
Since the worse is gone, you can now move to a proper area, a more central location where you can build that huge colony you always dreamed of.

Finding a large pound is much easier than finding a large stony patch. If happen to have a large pound in a central location or your map has coast you should focus on moisture pumps, with them you can create larger crops fields so you do not need to stick to stony patches around mountains.

Extreme desert guide (new)
This guide details how to survive in one of the most hostile environments in Rimworld - an extreme desert. We focus on the Lost Tribe start because it is the hardest one to thrive in hostile environments since you got more people to feed and less technology to help you.
Introduction
Extreme deserts are the most arid option of hot maps. They have the least amount of animal and plants. In fact, you should not expect to find anything more than three iguanas and a single cactus in your start. You should also not expect to see more than one new iguana per week and not a single plant ever growing in the wild.
In addition to that, they do not have any soil available, if you wanna grow something you will be doing it in stony patches around hills and mountains.
They are not necessary hot though, their average varies from 30 °C (86 °F) to 10 °C (50 °F) and growing periods varies from all year to half year days due to the temperature. You should expect to only have problems with heatstroke during summer and during heat waves.
Landing site

In all maps you should to choose carefully your landing site to increases your chances of survival. You want to build a colony in an area with some of the following characteristics:
- Near to a friendly faction base (faster trading)
- Near to a road (faster moving around)
- Without many mountains around (faster moving around)
- With a river (enable watermills)
- With coast (to turn into large growing areas later)
- With caves (early food source)
While you should not be surrounded by mountains, the landing site itself can be mountainous.
Of course you do not need to land in an area in all those characteristics, but try to get as many of them as you can.
Base area
Once you choose your landing site you should also choose your base area. It is important to notice that this area does not need to be final, it is just the area where you are more likely to survive the early game.
You want to find an area with the characteristics: more growing areas and more easily defendable.
More growing areas means more stony patches and more easily defendable area is an area with few entrances where you gonna lay down your traps.
Since you do not have trees, you can not build a big base yet. You can then either take a ruin, make a cave or make a small steel base. Ruins might look like good starting locations but are often on undesirable areas. It is easier to make a cave in a good location, since choke points are always surrounded by hills and mountains. But if you happen to get a ruin in the right place, then go for it. If you can not find a hill or a ruin in a good area then just make a small steel base.

First agenda
- Get some easily accessible steel and use it to build your stuff, so you do not have to use wood.
- Make your starter base. Give people a place to sleep, eat and play.
- Hunt those iguanas before they leave the map.
- Kill your starting animals.
- Only use wood to make campfires and passive coolers, for cooking and cooling down respectively. Make sure your wood is forbidden so they do not refuel them unnecessarily.
- Plant rice. You can not survive long enough to wait grow anything else yet.
- Plant strawberries, if you do not have much growing area then plant potatoes.
- Make your research bench and start researching stone cutting so you can start using stone instead of steel.
Notes
Surviving until your first rice harvest is the hardest part. Your pemmican plus your hunting plus your starting animals is not enough. If you have caves in your map, you can go insect hunting and that might be enough, but if you do not... You gotta go visit your nearby friendly base to trade whatever you can for food. For that, you gotta get something you can trade:
- You can mine expensive things like components, plasteel, uranium, jade, silver or gold.
- You can open the ancient shrine and sell whatever you find there.
One smart way to reduce your food consumption is to put some colonists inside the ancient cryptosleep caskets until your first harvest.

You can also go to the closest base outside the extreme desert and attack them. Hunt the animals and harvest the plants around the base and run back to your base. You can make peace with them later.
Another more undesirable option is to sell some colonists. They are usually worth a lot and it results on a lower food consumption which makes things much easier, but do not expect to see them again.
Likewise, another even worse option is to kill some colonists, but they are not worth many meals.
If you do survive though... Now life will be much easier.

Second agenda
- Plant cotton. Later you will use it to make dusters and cowboy hats.
- Plant healroot.
- Make stone deadfall traps.
- Plant cactus. Your future wood source.
- Plant smokeleaf. This will help your guys relax later.
- Research complex furniture. Once you done, make steel or stone beds.
- Research complex clothing. Once you done, make dusters and cowboy hats with your cloth.
Notes
Hopefully, now you grow strawberries, so you will not need to worry about wood. If you decided to stick with potatoes, you gonna have to make some extra visits to your nearby friendly base and buy wood for cooking because your cactus plantation gonna take a while to kick in.
Summer is coming, focus on getting cloth to give your colonists dusters and cowboy hats. After that you can replace their tribalwears for button-down shirts and pants.
You can also make some smokeleaf joints to help with the moods.
Always keep a stock of wood with you because if a heat wave happens you will need those passive coolers.
If you want, now you can accept more people in your colony.
Now the usual threats start, time to make some deadfall traps to defend your base. Since you do not have wood and probably not enough steel, you will have to go for stone deadfall traps.

Third agenda
- Research eletricity.
- Research battery.
- Research air conditioning.
Notes
Your colony is looking better, you have food, wood, clothing, drugs and defenses. You should focus on making a freezer for all that food you got.
Since the worse is gone, you can now move to a proper area, a more central location where you can build that huge colony you always dreamed of.

If your map has coast you should focus on moisture pumps, with them you can create larger crops fields so you do not need to stick to stony patches around mountains. They also remove the patches of soft sand preventing you from building.
