Offense tactics
This page details strategies to defeat the enemy in offensive attacks. For repelling raiders, see Defense tactics.
While offense means attacking the enemies, this doesn't mean you cannot use defensive tactics as well.

Upon entering enemy territory, your soldiers will remain drafted and ready to fight. Attacking enemies does not mean you have to fight right away. Enemies will remain roaming around their base initially and then come at you. This gives you time to set up minimal defensive positions, but not enough to build a whole base (which is pointless because the map is temporal).
One common concern may be counting their numbers, but always remember that once around half of them are defeated, the remaining survivors will flee. If planned carefully, you can take down the most dangerous ones first, leaving lesser ones to clean up later.
The first problem is that your caravan will follow the Work tab you use at your base (ideally, we could have more work tabs). This can prove detrimental if your settings have for example Firefighting with priority one and same for Cleaning. Both tasks are completely unnecessary, as fire can help you just as like when raiders set your base on fire and cleanliness is unimportant. You also don't want to be taming animals at this moment. So you will have to make adjustments while invading and then remember to set it back to the Home setting.
Undrafting them immediately can be very dangerous if for example, some of your people or pets are starving, as they will proceed to rush towards the food storage of the enemy regardless of the threat (!). So if the enemies do not attack you right away, let your people recover from the journey, mostly eat and regain some joy while at the same time you start building some defenses.
Strategies
Setting up
Once you arrive at the enemy base, instead of charging straight at them, set up defensive positions a distance away from the enemy. Make sure that enemy snipers can't reach you from their sandbags (i.e. at least 45 tiles away).
Enemies holed up in their base will have the cover advantage on their side, as well as additional defenses such as turrets. By staying out of range, they will be forced to use stone chunks or walls as cover (same as you), negating their advantage. It also allows you to stay out of reach of enemy turrets.
You can move the map's stone chunks to your advantage by setting up dumping stockpile zones, then designating the chunks to be hauled. By arranging the chunks you can create better cover.
Sniping
Lone enemies can be sniped without getting the enemy's full charge against you, unless it coincidentally is the same time they are actually initiating their offense. This allows you to take out a couple of enemies before they go full aggressive mode on you.
Stampede
Train your offensive animals for "Release" command, then assign them to owners, leaving out pack animals. You will lose some but if you have been breeding them enough at your home farm, their loss won't affect you much, since they will keep breeding and replenishing their numbers. All enemies will be drawn to them for the bait and you can attack them from behind. Big animals such as elephants may even survive and be strong enough for a second run.
Alternatively, you can easily target the enemy base, centered right in the middle of the map, for your animals to be run over. Since animals of burden are slower than humans, you can zone out leaving them behind and then re-zone-in. This can make your party re-appear on a different side of the map from where you left, and your animals who were left behind will attempt to rejoin you. Make them cross the enemy base (or create an animal zone behind them).
Starvation
Basically, the game design has its flaws. You may enter an enemy outpost and leave immediately, triggering the map but not playing in it just yet. The enemy base design is not intended to support life, they don't farm and cook. So this means that as long as your caravan is better stocked with food than them, you can wait until they run out of food and get into mental breaks first and then engage a debilitated enemy.

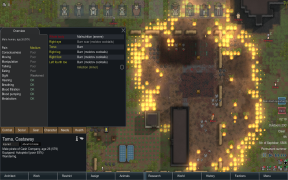
Krowden goes berserk, kills one, downs one. Two are sleeping and one of his comrades comes in with Molotovs...
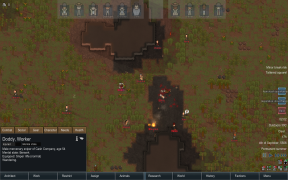
Krowden gets downed, but now Doddy goes berserk instead!
Aimi also goes nuts!
Aimi has no food nor rest.
Fire starts to consume one of their steel buildings.
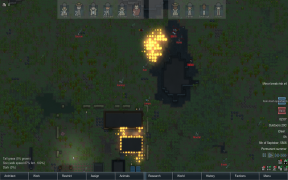
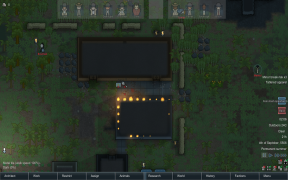
Fire starts to spred at midnight while they sleep.
Burn, burn, burn.
Their roofs start to collapse.

Now Lumpy joins the crazy train.
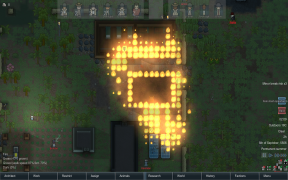
Their wounded start to get infections.
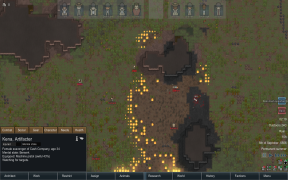
Now Kenwa goes berserk too.
Half the outpost is downed or dead, so the remaining flee in panic.
Countdown timer of 24hs start for you to pick any spoils of war.


Teleporting
Teleporting is a cheesy tactic. It consists of playing at the map borders without going into the center of it until you are clearly safe, and moving by leaving and re-entering the map. The game randomly chooses a new entry direction, and if you don't like it, just try again.
This brings you many advantages as:
- Choosing the best side of the map to set up defensive positions
- Picking out enemies one by one as the AI doesn't launch the enemy attack as a pack but rather in a single line. So while teleporting, those who were getting close will become the back-liners once you move to the opposite direction.
- Flank from all sides if your team has many colonists.
While doing this, you will be leaving your caravan animals behind but you will not lose any of them. This can be very useful too as they will have the natural tendency to rejoin your group by traversing the whole map just like the enemies, only that you will be on both sides while enemies will be at the center, even confusing their shots with unworthy targets. Be careful not to assign your pack animals for this unless necessary; instead, they should be kept in an animal zone far from danger so that they do not take part of the combat.
Mortars
If you aren't fighting tribals, sometimes you can find a manned mortar situated in the base.
They are a rather dangerous defense against your attacks; while they don't usually hit, when they do, they can cause some serious damage. Grouping your colonists too close together is risky as an unlucky shot from the mortar can hit many of your soldiers.
By some weird quirk enemies manning mortars aren't affected by panic fleeing so you will need to close in on them to finish them off. Choose brawlers with shields to rush them down as their shields can block bullets from the turrets, or snipers that can hit the mortar or gunner outside of turret range.
If you plan to down a mortar without snipers or brawlers, aim to stand somewhere outside the turrets' range, yet is within the mortar's blind spot.
Note that soldiers standing right inside the blind spot can still be hit through inaccuracy and area damage if someone else is standing close enough outside.
While fighting enemies with the mortars, you can extract the shells from the mortar, forcing them to reload the mortar. Repeatedly doing this allows you to shut down the mortar.
Rare Items
You can bring artifacts such as the psychic insanity lance, psychic shock lance or psychic animal pulser which are handy but somewhat costly and hard to find. You can get some for free by opening ancient shrines.
You can also bring in the orbital bombardment targeter and the orbital power beam targeter which makes base destruction an easy job.
Psychic insanity lance
Can be used to drive an enemy berserk. Good for distraction as the berserk enemy will proceed to lash out at their comrades, and in the process may also deal some damage.
It's best that you use it on a melee pawn with a shield belt.
Psychic shock lance
Not as useful in an offense situation, given that base defenders don't use mega weapons. Still useful for downing a person you want to capture, but expect brain damage and extensive burns.
Psychic animal pulser
The most dangerous of the artifacts, this drives all the animals in the map into a manhunter rage. The animals will quickly clear out the enemy defenders and turrets.
To use this, you will need to construct a room to lock all the animals out. Be quick or the enemy may attack before you finish. Afterwards, just hide in the room, and activate the pulser. Then, just watch the animals swarm and overwhelm the enemy defenses.
The 24 hours countdown starts when the outpost has been destroyed, and any rampaging animal will need to be put down before you can gather all precious items to your convoy. You may have to deal with a large pack of animals.
Orbital targeters
Both variety of targeter can destroy a base in a single use, if you aim it at the center.
It's best that you have shielded brawlers to distract fire so a colonist can get in and aim it there.
Since these weapons also destroy a large proportion of the loot it's perhaps best used only if you're desperate to complete a quest or just want to see pirates die horribly.
Offense team composition
Your attack team may be different depending on what you will be attacking, and the strategies you will be using against them.
Equipment
Your soldiers should all be well-armed regardless of strategy. This includes the following:
- All soldiers:
- Full armor (simple helmets or advanced helmets plus armor vests, power armor if available)
- Good weapons (Normal or above quality for everything)
- Snipers:
- High-shooting skill
- Bolt-action rifles or sniper rifles
- Brawlers:
- Shield belts plus spears or longswords
For example, a good armor set without costing any plasteel can be as follows:
- Simple helmet
- Armor vest
- Devilstrand clothing
This will net you at least 60% overall sharp protection, or even 80% with quality craftsmanship. It's also affordable, costing 190 steel, 185 devilstrand and 2 components in total- easy enough for a mid-game colony.
Without using power armor, your soldiers can be outnumbered 3 to 5, usually without serious loss (unless someone gets shot somewhere vital).
Base attack
As bases are the most well-defended of anything you can attack, you will need to bring your best forces to attack them.
A good base assault team should consist of:
- 11 - 15 soldiers in total
- 2-3 brawlers
- 3-5 snipers
An all-sniper composition is a bad idea against bases or outposts as they can't deal enough damage to shoot down the attackers.
Outpost attack
Outposts are smaller, hence you won't need that many people to attack it. Still, you should be geared to face some formidable enemies.
A good outpost assault team can comprise of:
- 8 - 12 soldiers in total
- 6 total is possible but extremely risky
- 1-2 brawlers
- 3-4 snipers
- Rest should be high-DPS gunners
Turret assault
Turreted outposts are generally a trivial threat, with only a couple lone enemies guarding it in addition to the turrets.
A good turret assault team should have:
- 3 - 4 soldiers in total
- 1 - 2 brawlers
- 1 - 2 snipers
- Rest may be high-DPS gunners, or left out completely
This composition is about getting enemies out then swarming them, with the sniper staying out of range while the brawlers down the enemy.
An all-sniper or brawler composition also works here.
Alternative strategies
Other team compositions if you don't think the regular way is fun and are looking for new ways to exact revenge against pirates.
Melee charge
The composition to use if you are angry at pirates for sending melee charges. Simply make everyone in your team be shielded melee brawlers, then charge at the enemy. Gank individual targets to weaken the enemy, before taking on the rest of them at once.
Once your brawlers hit someone, the rest will charge in to help out, so finish them quick.
It is also great for a drop pod attack right in the center.
You will need around:
- 8 - 14 brawlers for base attacks
- 6 - 8 for outposts
- 2 - 4 for turrets
If you like, you can have a sniper in the mix to lure the enemy out and pop shots at important targets.
Note that this strategy means that your colonists are much more likely to receive injury, so be prepared for such.
Drop pod attack
The tables have turned and it's your turn to drop pod right into the middle of your base.
For this tactic, you need everyone to be able to dish out great DPS up close as you're getting as close as you can get to them.
You will need around:
- 7 - 14 damage dealers for base attacks
- 4 - 8 for outposts
- 2 - 3 for turrets
Good choices include short-ranged gunners or brawlers. Snipers aren't a good choice here due to poor short range performance.
Kiting snipers
Since there's plenty of space in the map, you can conduct a kite by withering them down with deadly sniper fire while the enemy try and fail to chase you down. This is slower and harder than a direct assault but allows you to defeat the base with fewer people if done well.
All snipers should equip the bolt-action rifle or assault rifle due to its long-range and quick fire rate, or marginally the sniper rifle for its extreme range, and be boosted in some manner in speed, such as through bionic legs or go-juice. After firing 1 to 2 shots, run until you're outside the enemy's range, then fire again. Repeat until enemies flee.
You will need around:
- 4 - 6 snipers for bases
- 3 - 5 for outposts
- 1 - 2 for turrets
Medical support
Since you're very likely to receive injuries during an offensive assault, and you may also find desirable prisoners, you will need to bring at least 1 doctor (who is preferably a soldier as well), and plenty of medicine to patch up the wounded. You might find some at the enemy's side, but don't count on it.
Expect to use up to 20 medicine after a battle, if you need to treat several heavily wounded prisoners or if the battle went poorly and your soldiers have sustained many injuries.
Aftermath
Turret neutralization
Even when all enemies are defeated or fleeing, the turrets will still be loyal to their original masters, and cannot be claimed directly. This means that the turrets will still lay fire on you.
You can opt for the traditional way of shooting the turrets themselves. In this case, choose long-ranged snipers that can fire out of turret range, or combine gunners with shielded brawlers to draw fire.
Another way is to power down the turrets, allowing you to claim them while they are inactive. You can shoot power conduits or power sources (batteries, generators, etc) from a distance, or send a shielded builder, to disconnect the turrets from power.
Once turrets are powered down and claimed, you can deconstruct them for more resources than simply destroying them would.
Taking prisoners
You may convert one of the already-present structures into a makeshift prison barracks to hold prisoners in battle. Just put down some sleeping spots, and set them for prisoner use.
Treatment
As mentioned before, you need doctors to heal the injured or fallen. While you don't need medicine for treatment, it's obviously recommended you bring some.
If possible, bring the patient to rest in a clean room. Treatment there reduces the chance of infection. However if patients can't hold out until turrets are cleared out then patch them up on the spot.
In many places, wild healroot can be gathered. This can be used for proper treatment, or stretch out your quality medicine supply and save them for later use. If you're lucky you may also come across medicine stocks in the enemy base. Feel free to use them.
Stripping
You don't need to strip corpses as you can directly choose which clothes to take from them in the caravan reform menu. However, for downed enemies, it's best to strip them first so you can recover their clothing intact.
Most clothing you find is worthless due to the dead man's apparel modifier diminishing a large part of their value. You can still recover shield belts without this modifier, which you can take as your own without much issues.
Resource gathering
Berries and agave fruit may be harvested from the surroundings, while meat can be hunted from animals or found in enemy food stocks. These can be cooked over a campfire or a fueled stove if you have the steel, so you can extend your food stocks.
Components may be found in compacted machinery in the surrounding hills. Mining them is a good source of components for crafting or construction.
Dismantling the structures of the enemy may yield steel or components, or occasionally plasteel and uranium from turrets. It's not recommended to bring steel along with you due to its heavy weight and ease of obtaining outside scavenging.
Work prioritization
So far the game uses the same work tab to assign roles while within base and while invading too. This presents a few inconveniences, most :
- Firefight: This is an assignment useless for offense, mostly when given priority 1 as you don't want your pawns to start putting the fire out that was caused by incendiary weapons, it is not your base. It is however useful if you want to try and salvage items to sell.
- Clean: Again, while this assignment is one of the last, if given priority 1 over other tasks, it can become another inconvenience as we don't want them to remove wall rubble.
This can be countered by removing the Home area if any are added. Since you are invading, the home area shouldn't be present by default.
- Progression
- Quickstart Guides • Basics • Intermediate Midgame Guide • Advanced Endgame Guide • Ending the game
- Scenarios
- Lost Tribe Guide • Rich Explorer Guide • Naked Brutality Guide • The Mechanitor Guide

- Survival
- Extreme Heat Guide • Extreme Cold Guide • Extreme Desert Guide • Ice Sheet Guide • Sea Ice Guide • Events Guide
- Combat
- Defense tactics • Offense tactics • Weapon Guide
- Construction
- Colony Building Guide • Defense structures
- Production
- Food production • Money making guide
- Other
- Skill Training • Permadeath save conversion guide •
Ideology Min-Maxing