Difference between revisions of "Intermediate Midgame Guide"
PigeonGuru (talk | contribs) |
PigeonGuru (talk | contribs) |
||
| Line 72: | Line 72: | ||
For starters, a decent hospital should have [[sterile tile]]s as a floor instead of any other flooring. Sterile floors provide a slight cleanliness buff that can increase surgery success chance and reduce wound infection chance. | For starters, a decent hospital should have [[sterile tile]]s as a floor instead of any other flooring. Sterile floors provide a slight cleanliness buff that can increase surgery success chance and reduce wound infection chance. | ||
| − | + | Hospitals should be built somewhere where colonists can quickly bring their downed comrades to treat them. Keep doors open, or use [[autodoor]]s so they don't obstruct colonists' access. If you need to you can also build a mini-hospital or clinic elsewhere in the base. | |
| + | If you have [[hospital bed]]s researched, obviously you will want to use them instead of your regular beds. Being made specially for medical purposes, they provide a boost to treatment quality and immunity gain speed, meaning that your colonists will gain immunity to diseases faster and are less likely to die. Colonists resting in a hospital bed also heal faster than they do when on a normal bed. <br> | ||
The [[vitals monitor]] brings even better boosts to treatment and immunity gain, so once you've researched them it's recommended that you put them down near your hospital beds. | The [[vitals monitor]] brings even better boosts to treatment and immunity gain, so once you've researched them it's recommended that you put them down near your hospital beds. | ||
Revision as of 04:04, 28 May 2017
Template:UC Template:NeedsPictures
Overview
In some ways, Midgame is vastly different from early game in RimWorld. Sometimes the point comes that you have to use devious tactics when your colony is helplessly outnumbered, or drastically change the priorities of your colonists.
Construction
What you must have in a midgame base:
- Large-sized freezer with at least 5 days' worth of food
- Cover structures around the base
- Self-sufficient food supply + kitchens to cook food
- Sufficient power supply + Backup Power
- Medium-grade Hospital
- Warehouse
What you should have for a decent midgame base:
- Private bedrooms for your colonists
- Dining room
- Rec room
- Workshop
- Laboratory
- Prison with personal cells
Power
Geothermal power is an important source of power from mid-game onward, as it is constant and high-powered. You will need to research Geothermal Power first before you can unlock it, and the generator itself is quite costly (though affordable in midgame). However, once researched and built you can have a constant power supply; you can even have a lot of excess power until lategame.
Make sure your geothermal generators are well-protected as they often have to be placed far from base.
Dining room
Giving your colonists a table to eat on is an early game thing; now you should consider building something better for them.
A dining room should be built as close as possible near the freezer/ food storage so your colonists will actually use the dining room, instead of eating on the floor of the storage, giving them a -3 mood debuff. This is especially true for larger freezers, in which colonists retrieving food from the far end may simply give up searching for a table and eat on the floor.
Expect your dining room to be pretty crowded during meal times, so have enough chairs for at least half your colony. Colonists will also hang out in the dining room if you set them to do so, occupying seats.
For increased mood buffs, decorate your dining room using sculptures, plant pots or quality furniture.
Rec room
You should have a wide variety of joy sources so your colonists don't get bored repeatedly throwing horseshoes at a pin, or wandering around aimlessly. Putting all of them in a room also provides a mood bonus after a colonist uses the facilities inside, depending on the impressiveness of the room.
Now that you're in midgame, basic resources will not be that much of an issue. You can afford to build more joy facilities such as chess tables or billiards tables. In addition, you can also obtain telescopes or televisions (coming in tube, flatscreen or megascreen varieties, in order of effectiveness) from exotic traders, which provide different kinds of joy for additional variety.
Similarly to the dining room, decorating it can improve the mood bonus from using the room.
Temperature control
Each room should have its temperature regulated by some method or another.
Large rooms such as your dining room or rec room should have their own heaters and coolers. If they are interconnected rooms you may want to open doors for faster colonist access and temperature exchange. Though if you choose to do so, remember to close doors if a fire breaks out in the room.
Smaller rooms such as your bedrooms should be thermally connected to a larger central space through vents. Your heaters and coolers should be all placed outside the bedrooms. This reduces the number of heaters and coolers you need to build while keeping your bedrooms at a comfy temperature at the same time.
Keep in mind that you will also need to be prepared in case of a freak temperature event such as heat waves or cold snaps. Without enough temperature devices rooms can get uncomfortably cold or hot, and in severe cases begin to cause hypothermia or heatstroke.
Bedrooms

If you don't have personal bedrooms, or have awful bedrooms barely big enough for a bed, you should now upgrade to a decent bedroom at least.
Bedrooms should be at least be 3x5; this gives you enough space to squeeze in a bed and a table, without making the colonist feel cramped.
Obviously you will need a bed for your colonists to sleep in. For better comfort and rest effectiveness, make sure the beds are of Normal quality or above, otherwise deconstruct and try again until you get it. If you have lovers or couples you will need a double bed so they can sleep together and spend some... 'quality time'.
You should also have a table in the bedrooms, as colonists often carry food with them, and without a table, colonists will resort to eating their breakfast on the floor. Also turn off the 'Gather Spot' option otherwise colonists will go off into the bedrooms to chill off on their own, most likely in someone else's bedroom (though nobody seems to care).
Hospital

While in early game you can live on a rudimentary hospital, or even a spare room converted into a temporary infirmary, in midgame you should have something more dedicated than that.
For starters, a decent hospital should have sterile tiles as a floor instead of any other flooring. Sterile floors provide a slight cleanliness buff that can increase surgery success chance and reduce wound infection chance.
Hospitals should be built somewhere where colonists can quickly bring their downed comrades to treat them. Keep doors open, or use autodoors so they don't obstruct colonists' access. If you need to you can also build a mini-hospital or clinic elsewhere in the base.
If you have hospital beds researched, obviously you will want to use them instead of your regular beds. Being made specially for medical purposes, they provide a boost to treatment quality and immunity gain speed, meaning that your colonists will gain immunity to diseases faster and are less likely to die. Colonists resting in a hospital bed also heal faster than they do when on a normal bed.
The vitals monitor brings even better boosts to treatment and immunity gain, so once you've researched them it's recommended that you put them down near your hospital beds.
Store your medicine near (not in) your hospital so your doctors can quickly grab them to patch up colonists before they bleed to death. Sometimes just that little distance can already make a difference between life and death.
Decorating hospitals to make them beautiful can give colonists inside a great mood boost (max +15, plus impressive room stats). This is good, especially considering that some colonists will stay in the hospital for a long time (such as the severely injured, incapacitated or sick).
If you have even more resources you can build a separate room for each colonist. While they don't mind sleeping with others in a hospital, they do get disturbed by them walking around, and dirt can more easily affect cleanliness as well.
Workshop
Workshops are places where you put all your crafting stations and benches, probably including your cooking stoves as well. You should put them near your warehouse so your colonists can spend less time hauling the needed resources to the workshop for crafting. Also remember to put chairs of any sort at the interaction spot so your colonists won't have to keep standing while crafting.
Putting all the crafting stations inside the warehouse isn't recommended despite the convenience, as colonists do not enjoy the sight of random objects laying around. This lowers their beauty opinion of their surroundings, in turn giving mood penalties. You should however put crafting materials near the workshop for quicker retrieval.
Kitchen
You should build your kitchen near your cold storage, just as you build the workshop near your warehouse.
Kitchens should only have cooking stoves, and sterile tiles for flooring to reduce the chance of food poisoning. The butcher table is best put elsewhere due to the heavy cleanliness debuff.
Laboratory
You may want to have a room dedicated to research, with hi-tech research benches, multi-analyzers to increase research speed and unlock new research, as well as sterile tiles to keep the room clean, increasing research speed. For even better cleanliness, restrict the lab to your researchers and janitors only, reducing traffic and hence the amount of dirt in the room.
Prison cells

Like colonists, prisoners will also suffer from the mood penalties associated with being kept together in a prison barracks. In addition, prison breaks are also more serious should they happen, for every prisoner locked up in the same room will simultaneously break out, while prisoners in different cells may choose not to join. Thus, you should keep them separated.
Each prison should have a table with a chair, a bed, and a light source. This is the bare minimum you need for a prisoner to be decently kept. Decorating the cell and making bigger cells also increase mood bonuses for easier recruitment. They can't use any joy items put in the cell, but you can add them anyway for a better cell.
Prisons should have doors facing towards your base, but not outwards. When prisoners escape they will go towards your base instead of away, giving your wardens time to deal with the break.
Holding cell
Like your early-game prison barracks except it should be only be used when your prison cells are overflowing. Put your less important prisoners inside them while assigning your more valuable prisoners into the cells.
Failsafes
There are many types of ways you can set up buildings on your map to possibly save your colonists' lives in dire situations:
- Shelters: Building small rooms with an emergency food and wood supply can save your colonists from enraged animals.
- Backup power: Some events will cause you to lose power if you are unprepared. Some colonies rely on wind or solar power to power everything, and eventually every colony with electricity will suffer from a fault conduit explosion, also show as 'Zzzt...' Both cases will cause you to lose power, whether it's not enough wind or sun, or an explosion. Raider attacking and destroying power conduits connected to power generators can sever power from the colony, reducing the power available.
- Backup storage: Always have spare power sources and storages, including multiple battery systems with switches. Have a handful of batteries constantly connected to the main grid, and only connect extra when they are about to run out, or are charging.
- Backup generators: Have some fueled generators that you bring online only if there's not enough power in the colony. This can allow your backup batteries to discharge slower, or even recharge. If they are turned off they will not consume fuel.
Resources
Useful resources include:
- Medicine to heal wounded and sick colonists
- Glitterworld medicine for successful surgeries
- Stone Blocks to make your base
- Components and steel to make non-primitive things
- Plasteel for durable constructs and high-end equipment
- Silver to barter for nearly anything
Food
Besides plant-based foods, you should also have a source of animal products and meat so you can make better meals for your colonists.
Animal products
Some female animals produce milk. They can be milked regularly by a handler to produce their needed milk.
If you want meat you should raise some chickens. They rise in numbers extremely fast, laying eggs rapidly and growing in the span of a little more than 1 season. Thus, raising chickens does require some heavy population management.
Agriculture
At this stage you should have solved your food problems (mostly). You should have the space to grow more other crops to provide other resources.
Cash crops
Three good choices are devilstrand, psychoid plants and smokeleaf.
Devilstrand is an excellent choice as a mid-game fabric, providing good protection and can be farmed. It can net a large amount of silver for every harvest, but it's very slow-growing.
Psychoid can he harvested and made into drugs, which can sell for a lot. Be careful with drugs as colonists with the chemical interest or fascination traits will binge on drugs if given access to them.
Smokeleaf can be harvested and rolled into smokeleaf joints which can sell for quite some as well. It's also less dangerous than hard drugs which can cause immediate addiction, but smoking it carries quite some debuffs.
Mining
There's only so much metals on the surface, but there's much more beneath your colony.
You will need to research deep drilling and ground-penetrating scanner first to use drills effectively. After this, when you put down a deep drill, you can see where mineral deposits are.
Deep drilling should be the main source of steel and plasteel for your colony at this stage onward. You can also dig up any remaining steel found on the surface.
Components
You need a large supply of components for building and crafting.
The best way to obtain components is by trading. Call friendly factions to send bulk goods traders, which always sell components and also buy a lot of your raw materials. Some other traders also sell components at an increased price.
Even after you've researched it, making them at the component assembly bench is not a good source as it is cost and labor intensive (25 steel and 134 work required for just 1 component). It does train your craftsmen very fast though, so you can consider making some for practice, while solving your shortage at the same time.
Drugs & Chemicals
Once you've taken care of your food supply, you can spare some more land to grow plants to make drugs out of. They can provide a boost to colonists' mood, improve their performance at work, protect against disease or sell for a lot of silver.
Be careful with drugs, especially when you have colonists with the Chemical Interest or Fascination traits; you will have to keep drugs away from them, or they will binge on them and get addicted or die from overdose.
Beer
Beer is a social drug that improves mood and can provide joy.
To make beer, you need to have Brewing researched. Then, you will need to grow hops. Next, you will need to build a brewery and some fermenting barrels Your colonists will turn hops into wort, a precursor to beer. They will then haul wort into the fermenting barrels and wait for the beer to be made.
Colonists can enjoy a beer occasionally (every 2.5 days or so) without risk of addiction. They can also drink quite a lot in one go without addicted, but then they will need to wait longer before their next drink, and they risk getting a hangover.
Smokeleaf joint
A social drug smoked to provide joy, and provide a decent mood boost. However, colonists stoned on smokeleaf suffer from quite some debuffs so it's not a good idea to smoke it unless you need it.
All you need is some smokeleaf leaves and a crafting spot. The process of rolling leaves into joints is quick and easy.
Colonists can enjoy a joint every 2 days without risk of addiction.
Psychite
A type of hard drug refined from the leaves of the psychoid plant. Comes in 2 variants, flake and yayo.
While they provide a good buff to both mood and stats, they are extremely addictive.
Besides this, they are highly profitable. Being very light, you can carry lots on a single caravan trip, and net you a ton of silver in return.
Go-juice
A synthetic combat drug made at the drug lab. As its description says, it's suited for your soldiers to take a hit before combat to boost their effectiveness.
It's highly addictive however, and soldiers that frequently use it will quickly find that they are hooked to it and will need to regularly take a hit or suffer from its horrible withdrawal symptoms.
While high on it, your soldiers will move faster, shoot and fight better, and also be more durable than normal- they take a lot more damage without going down, because they don't even feel much pain at all. This also means your colonist will have a much higher risk of death as they don't go down safely unless they take serious brain damage or have their spine or leg destroyed.
Wake-up
Stimulant drug that improves consciousness and reduces the need for sleep.
It does not provide any mood buffs but it isn't as addictive as other hard drugs. Colonists can take 1 every 3 days without getting addicted so it's good for occasional use.
Penoxycyline
The only medical drug in the game so far. It provides resistance to the plague, malaria or Sleeping Sickness.
It can be used reactively to instantly boost immunity to 61%, or actively every 5 days to prevent diseases from progressing to a visible stage.
Luciferium
A performance-enhancing mechanite concoction. It provides good functional buffs, and given enough time can heal old scars (including dreaded brain injuries) but doesn't help at mood at all. It cannot be made and must be bought at traders or found occasionally.
One of its most significant features is that withdrawal from luciferium is fatal and incurable. Luciferium needs to be taken every 6.667 days in order to prevent withdrawal symptoms, and if the need is unmet the colonist will die in a mean of 10 days.
Due to its high price and constant need, at this stage you should only give it to colonists who need to recover from brain injuries or serious scars. Colonists with a destroyed part (e.g. a shot off leg) cannot recover without installing a new part.
Smelting
Once you've researched the electric smelter you can smelt weapons or steel slag chunks for metallic resources.
Steel slag chunks are an unreliable and rather uneconomical source of steel. Smelting should serve to get rid of them more than as a major source of steel, except if you're in extreme survival situations.
For melee weapons it's best that you smelt them as this returns more resources than if you sold them. Weapons don't sell well, at only 20% of base value.
Ranged weapons, on the other hand, are best sold. If you smelt them you'll gain less, especially if any components making up the weapon are destroyed.
The smelter allows you to destroy non-smeltable weapons but it's best to keep them as you can sell them, even for a paltry price.
Equipment
While in early game you may need to scavenge what equipment you could, or craft some very rudimentary equipment such as tribalwear or shivs. Now that you're in midgame, however, you should have the ability to manufacture your own equipment. Good equipment means that you stand a chance against raiders, even when outnumbered.
You should have a fueled smithy or an electric smithy to craft melee weapons, electric tailoring bench for sewing clothes (faster than a hand-tailoring bench), and a machining table for armor and guns.
Apparel
You should always craft button-down shirts over T-shirts, as they provide better insulation and coverage than simply T-shirts. It's always worth it spending a little more cloth than a replacement arm.
In addition, you can equip your colonists with dusters, jackets or parkas if you need to.
- Jackets provide additional protection against attacks or the cold.
- Dusters provide protection against both heat or cold, as well as additional protection. Has a larger coverage than the Jacket, protecting the neck and legs as well.
- Parkas provide very good insulation against cold, but are uncomfortable in hot areas, slow down work by 20% and provide minimal protection. It should only be worn when actually needed.
Devilstrand is the best for protection; though it isn't as protective as hyperweave (which is hard to find and very costly), it can be farmed and produced in mass amounts.
Wool is best for insulation.
For your soldiers, you should always have armor vests and advanced helmets. Just this can protect against a large part of the damage taken. If you're short on materials you can always use the simple helmet, which is significantly cheaper though providing less protection.
Melee fighters should have shield belts, though these may be harder to obtain as uranium is rare and raiders don't come with shields that often.
Power armor should wait until later as it costs a lot, either to buy or to make.
Apparel management
You can choose which kind of apparel your colonists will wear.
- 'Anything' isn't recommended as your apparel will not be allocated properly.
- 'Worker' allows colonists to wear casual clothes, but not armor. Best for your workers who don't engage in combat much.
- 'Soldier' allows colonist to wear armor and some clothes beneath them. By default, jackets and dusters aren't allowed; you should allow them as they can provide extra protection on top of your armor vests.
- 'Nudist' makes them wear nothing other than headgear, and obviously is intended for your nudist colonists only.
Weapons
Obviously, you should give your best fighters your best and most skill-based weapons.
For guns:
- Sniper rifles or bolt-action rifles are highly destructive in the hands of skilled marksmen. Perfect for long-ranged takedowns.
- Charge rifles dish out heavy damage at medium range, and is suitable for moderate-high skilled gunners.
- Assault rifles are suited for gunning down mid-long range targets, when handled by good soldiers.
- LMGs can mow down targets at medium range with a large burst of bullets. Best served in the hands of low-mid skilled colonists.
- CQB weaponry such as Heavy SMGs or Pump shotguns are optimal for regular workers for self-defense.
- Chain shotguns are not an effective weapon choice on its own due to their horribly short range. However, their high damage output makes them better at crowd control.
- Miniguns excel at point-blank destruction or crowd control. Accuracy is completely irrelevant for this weapon due to the forced miss radius, such that it's most effective when equipped by a trigger-happy colonist, disregarding shooting skill.
For melee:
- Longswords are the must-have weapon for melee colonists, being the highest damage dealing melee weapon in the game.
- Maces are cheaper and deal blunt damage, best used by wardens for taking down escaping prisoners or berserk colonists without killing them. It's also more effective at fighting armored enemies as most armor protect poorly against blunt trauma.
Prosthetics & Organ Replacements
By now you'll probably have colonists missing fingers, toes, arms, legs or other body parts (especially captured people, being more prone to have lost a leg which caused them to be downed and hence captured). If you have the money you should get a replacement for them if you can. All prostheses except the peg leg can only be bought from traders in the base game.
All prostheses heal like normal limbs, but do not bleed and never scar.
Peg leg
Your humble peg leg is for replacing a missing foot or leg. All you need is 1 log of wood, medicine and a doctor. At 60% efficiency, it's good for getting a colonist back up and running but not good for anything else. This should only be used if you can't afford better.
Simple prostheses
Simple prosthetic legs work at 85% efficiency, making it good for replacing a few missing toes.
Simple prosthetic arms, in comparison, work at 50% efficiency only; it should only be used to replace a missing hand or arm.
Bionics
Bionic legs are an enhanced leg replacement, granting +20% moving; two of them means a total of 140% moving. Good for caravaneers, kiters, first respondents or anyone who needs to move fast.
Bionic arms are strengthened arm attachments with a +20% bonus to manipulation; they are good at a large variety of tasks, from shooting to mining to crafting.
Bionic eyes are advanced eye replacements that gives +20% to sight: it's the only eye replacement so far, meaning you will have to depend on it to replace colonists' missing or damaged eyes. Sight isn't very important for most tasks, with bonuses from sight capping at 100% sight for moat tasks (except medicinal or combat tasks), meaning that enhanced sight is obsolete in many cases. Shooting however relies greatly on sight, so you may consider giving your gunners (especially snipers or marksmen) bionic eye replacements before they actually need an eye replacement. Melee also depends on sight but the impact isn't so large.
Combat hands
Power Claws are a relatively balanced hand replacement; it incurs a small manipulation penalty, but greatly increases unarmed damage, to the point where it can even rival a normal or good plasteel longsword.
Scyther blades can be removed from incapacitated scythers or occasionally found on traders. They are extremely specialized in fighting; 2 installed on a colonist gives the highest melee DPS of any pawn in-game. However, it is also atrocious in anything else, with only 20% manipulation, meaning that only your most dedicated combatants incapable of anything else should have them.
Organs
You can buy natural organ replacements from traders, or brutally harvest them from colonists and prisoners. Harvesting them gives a mood penalty for the whole colony (except your trusty psychopath colonists), a dire mood debuff of -30 to the victim, and also affects Factions relations between yours and the one the victim belongs to. So think twice before harvesting organs from anyone. Never harvest from colonists unless in the direst of situations.
As of Alpha 16 there are no bionic organ enhancements in the base game, though mods exist to add them in-game.
Combat & defense tactics
When you are outnumbered, thinking smart with your combat tactics is also key to not losing colonists. It's also worth checking out defense tactics with more in-depth detail in defensive strategy, and cover for how cover works.
Turret mounds
Sometimes sandbags and your colonists alone are just not enough. Building "turret mounds" around the map in strategic locations can decimate a good number of raiders before they even get to the colony. Turret mounds are built on a 3x3 block of land:
O#O
###
O#O
Where O is a turret and # is a stone wall. Remember, however, that turrets can be a bit expensive to build and repair. They also require a lot of electricity, so try hooking them up to a wire which is remotely turned on to save your batteries.
Note that you will have to sacrifice some turrets this way as raiders often target the turrets before your colonists due to proximity.
Diffusing your opponent
Don't be too arrogant when facing a bombardment of arrows and pila - each can deal almost an equivalent amount of damage as a survival rifle. Diffusing your opponent consists of separating the melee attackers from the ranged, and dealing with each of them with your melee and ranged colonists.
One way of diffusing your opponent is with a smaller version of an attention suppressor. This means that the majority of raiders will end up attacking the walls instead of your colonists. Those that come through can be easily dealt with using tactics from the next section. You can also use turret mounds as mentioned above surrounded by a nest of rock chunks to catch the raiders in the explosion radius.
Fighting in the small numbers
Once you have diffused your opponent's army, their forces will trickle towards you slowly so you can easily deal with each one alone.
Kiting
Kiting is the method of using a colonist as bait for an attacker to run towards, and a second colonist taking shots off while the attacker is focused on the first. It does not work if the raider has a personal shield that protects them from bullets. Note: Colonists incapable of violence can still act as bait.
         R
 C       |
         v
         C
Diagram of kiting. C is a colonist, R is a raider and -> is the direction the raider is going.
Splitting
When two of your colonists are being chased by one person and your weaponry is significantly poorer than the attacker's, you can conduct a split so that the enemy can only chase and down 1 colonist while the other escapes. If one of your colonists has ranged weapons, then you could split and then conduct a kite.
Rushing
Rushing is the tactic of sending your best melee attackers to finish off the ranged attackers at the back. The ranged attackers who do not succumb to the attention suppressor could be a pain for your own ranged forces, so it's best to send your melee colonists with personal shields to distract the ranged attackers. Before battle, hide your melee attackers behind a nearby hill outside your base so that they remain hidden until all enemy melee attackers are engaged with either the walls or your ranged.
New colonists
With more colonists in, the chance of you getting wanderers or escape pods become much rarer. From midgame onward, capturing and recruiting prisoners becomes the main source of new blood. Occasionally, you will still see slaves for sale, wanderers, escape pods or chased refugees, but don't count on them.
Attacking enemy bases
However, now that you have more colonists and better equipment, you have a new option to getting new blood: attacking enemy faction bases.
To do so, create a caravan with your soldiers, food for the journey and medicine to treat the wounded. Once the caravan is ready, set it to go attack an enemy.
Once you succeed in destroying the base, you will be given 24 hours to treat the wounded and rest before your caravan packs up and leaves.
The journey usually takes days so remember to bring enough food. There will also be people guarding the base so you should have enough soldiers. 10 well-equipped soldiers should be enough to take down any base without much problem, though sometimes you will still lose someone. The base also has food, drugs and medicine. They always have some food, but don't count on them having enough medicine to treat all your injuries.
Note that attacking enemies does not seem to make raids happen less often and you will still need defenders back at base.
Mobility
Sometimes you will need to move around the world for various reasons, such as attacking an enemy base, trading at a faction base or starting a new base.
Caravans
You can get a group of colonists to form a caravan to travel around the world.
Caravans have a weight capacity which determines how much each character can carry. Each colonist carries 35 kg at most; muffalos can carry up to 70 kg, while dromedaries carry 66.5.
Caravans are somewhat slow, taking days, or sometimes seasons to reach their destination; remember to pack enough food. Animals that can eat grass/ other plants do not need food, but all others do. You can speed it up by having faster colonists or animals in the caravan, this brings up the average speed of the caravan allowing it to travel faster.
Sometimes hostile random events can occur such as an ambush; remember to bring a suitable escort if needed.
Transport pods
This method is extremely fast; it takes up to 1 in-game hour at most to reach its destination.
However, it's also expensive; each pod costs 80 steel and 1 component, in addition to the chemfuel required to power it. It also requires research before it becomes buildable. Chemfuel can be produced by drilling at a deep drill, or researching Refining, this technology allows the construction of a Refinery, that needs wood logs to obtain the desired fuel.
Each pod carries 150 kg, just enough for 2 naked or barely clothed humans. If colonists land on an empty tile they will form a caravan. Remember to take into account the carrying capacity of its members as if you put too much inside the pods, the colonists will be unable to carry it all, and will be immobilized.
Crossing oceans
Unfortunately, there's no way to navigate over the deep sea. If you happened to have chosen your starting point on an island (intentionally or not), the only way to get to mainland is by launching transport pods. This case is vital for situations where obtaining the necessary materials to build a Multi-analyzer are lacking or the AI Storytellers of choice is Randy Random, who negates interaction with other Factions, blocking trade caravans from visiting you. As well as the player is still green in regards of settling other colonies, forming caravans and invading other settlements.
Trade
As of version 0.16.1393 (21 December 2016), players can form and travel around in caravans, as well as transport pods. This greatly opens trade opportunities and enables the player to command multiple colonies (options) at once. It also raises the importance of Silver and economics in the game, as well as, inevitably, drug trafficking.
For the average colony, earning money mainly relies on either cash crops like Smokeleaf, stone sculptures or the brutal treatment of prisoners. It is important for every colony to select at least one of these options as their main income source, to obtain important resources like Steel.
With the comms console you are able to call factions to send traders to visit your base. It's better to do so than wait for them to send traders on their own, as they rarely do so without being prompted.
You should also send your own caravans to friendly bases for trade, as they are considerably better-stocked than their traders, and also offer a small discount.
Factions
Each world has 5 major factions, which you may have already seen before starting (their bases are littered all over the world).
Dealing with them can constitute a large part of running a successful faction.
Diplomacy
The comms console also allows you to give gifts of silver to factions, improving goodwill.
To do so, call the faction, then select 'Offer gift'. As with trading, select your colonist best at Social to improve the goodwill increase.
Increasing goodwill allows you to call traders at a lower price and to call for immediate military assistance if you need help.
If tribals raid you should pacify them by capturing, healing and releasing their prisoners, as well as gift them. Turning them friendly will stop them from trying to raid your colony with their massive raider forces, which is helpful at long-term survival. You don't want to deal with 100+ angry tribals shooting arrows, throwing pila or clubbing your colonists all at once.
Pirates cannot be reasoned with; releasing their prisoners won't grant any goodwill, they refuse any kind of communication and they live just to make others' lives worse by raiding their bases and stealing their stuff. You can wipe them off the face of this rimworld by destroying ALL their bases but it'll take an immense amount of time.
Black Ops
Attacking members of other factions will degrade foreign affairs. However, foreigners attacked by enraged animals in your territory don't affect your relationships. You can attack a random animal and escape in-between visitors or a trade caravan so that the wild animal attacks them instead of you. If they die, all their belongings become available to you. If some survive, you can medically treat them which counts towards positive interaction between colonies so long as they can leave your map by their own in good health. They won't report any kind of awkward behavior by your people. Have in mind that angry animals due to manhunter will remain roaming until next day, so "saving" them might become difficult, and if there`s anybody who is downed but not dead yet, he/she may recover during the night and start moving again. In case the enraged animal is still around, another attack is likely to end the survivor's life for last.
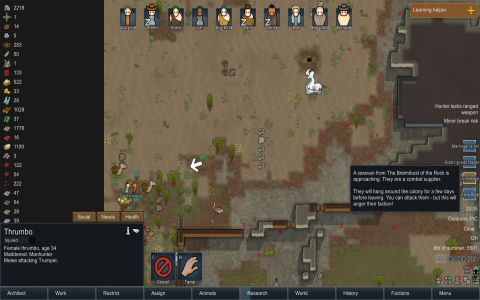
Thrumbo revenge aiming at foreign trade caravan, awesome timing
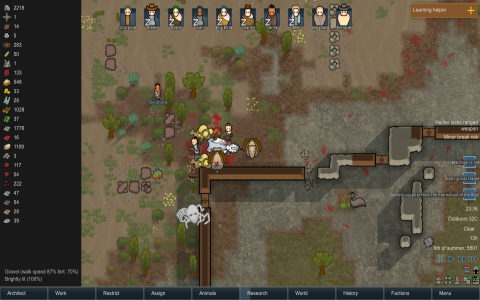
Black Ops success
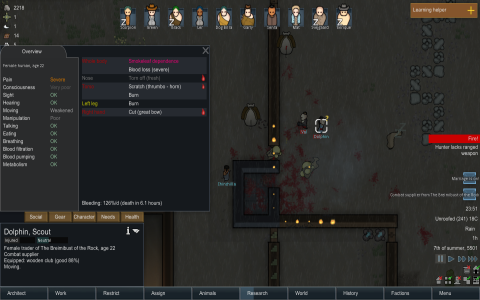
Foreign trade caravan with boomalopes, bad idea.


Other guides
Continuing guided play
- Advanced Endgame Guide: Ending your colony on YOUR terms