Difference between revisions of "Growing zone"
m (re-organize sentences into related topics) |
|||
| (10 intermediate revisions by 4 users not shown) | |||
| Line 1: | Line 1: | ||
| − | + | {{rewrite|reason= Format standardization, cleanup, and stub - growing zone options and their gizmo images, harvest yield factors (difficulty, skill, RNG, etc) }}{{infobox main|area| | |
|name = Growing zone | |name = Growing zone | ||
|image = zone4.png|Growing zone | |image = zone4.png|Growing zone | ||
| Line 6: | Line 6: | ||
|placeable = True | |placeable = True | ||
|size = 1 ˣ 1 + | |size = 1 ˣ 1 + | ||
| − | }} | + | }} |
| − | A '''growing zone''' designates where [[ | + | A '''growing zone''' designates where [[Work#Grow|growers]] will sow and/or harvest [[plants]], including [[trees]]. Growing zones are only allowed in soil, rich soil, or gravel, each with an effect on growth rate. They can't be placed on sand, mud, natural stone, water, or constructed [[floors]]. |
| − | When the mouse is over a tile, the fertility rate is shown at the bottom left of the screen | + | When the mouse is over a tile, the fertility rate is shown at the bottom left of the screen, along with some other related info. The fertility rate determines speed of growth, depending on the fertility sensitivity of the plant grown, with higher fertility resulting in faster growth rates. See [[Fertility]] for details. |
When a growing zone is selected, buttons appear to allow the player to change the plant to be grown or to allow the zone to be renamed, deleted, hidden, or to allow/disallow sowing. Only one type of plant can be selected for each individual zone. When sowing is disabled or the type of crop has been changed, colonists will still harvest crops currently growing in the zone when they mature. | When a growing zone is selected, buttons appear to allow the player to change the plant to be grown or to allow the zone to be renamed, deleted, hidden, or to allow/disallow sowing. Only one type of plant can be selected for each individual zone. When sowing is disabled or the type of crop has been changed, colonists will still harvest crops currently growing in the zone when they mature. | ||
| Line 15: | Line 15: | ||
Trees planted in zones need a 1 tile radius in all directions free of other crops or trees, even if planted in other zones. Planters will remove wild trees next to growing zones to accommodate this radius. | Trees planted in zones need a 1 tile radius in all directions free of other crops or trees, even if planted in other zones. Planters will remove wild trees next to growing zones to accommodate this radius. | ||
| − | + | * '''Note''': If a colonist is given an order to sow a crop, and that crop field's plant-type is then changed, the colonist will sow the ''original'' plant type, the one that existed ''when the order was given''. This is working as intended; you can change a productive growing zone's plant-type, and the new type will be automatically sown ''after'' the current crop is harvested so no current planting will be affected, only future planting. So if you change your mind ''before'' planting, make sure to cancel/renew any pre-existing sowing orders! | |
| + | |||
=== Tips and tricks === | === Tips and tricks === | ||
| + | Areas of fertile soil should generally be prioritized for growing zone placement, but as only growth rate is affected not yield, planting larger fields of is roughly as work efficient. It simply takes longer to get a return, with more time, and thus risk, for damage to occur to the crops, and more travel and hauling time. Thus, while fertile soil should be prioritized if convenient, it is not generally worth planting fields on the other side of the map just to exploit it. If the growing season is coming to an end soon, that might be an exception. | ||
| − | Guesstimating a correct size of a growing zone is not easy with so many [[Plants#Growth | + | Guesstimating a correct size of a growing zone is not easy with so many [[Plants#Growth rate factors|factors]] affecting [[Events#Generally Bad|potential]] harvest. A quick rule of thumb is to grow 10+ tiles of food crops per colonist in a biome with year-round growing. If the colony hunts as well, it will accumulate some, though not excessive, food reserves, which can be saved for winter, fed to prisoners, or sold. More should be planted if other factors reduce yields, such as in biomes and latitudes with shorter growable periods. |
| − | + | Leave 4 tile wide gaps between your crop fields to prevent the spread of [[blight]], and clear all wild plants and flammable items within 3 tiles to prevent the spread of [[fire]]. [[Floor]]ing to prevent wild plant growth allows for faster movement through your fields, while [[roof]]ed walkways for the same purpose can also come in handy during [[winter]] or [[Events_Guide#toxic fallout|toxic fallout]]. Both can be combined. It is also possible to place grow zones with sowing halted or use the [[chop wood]] order to clear the areas, however this becomes work intensive over time. | |
You can double-click an empty tile inside a growing zone to highlight all growing zones on the visible portion of the map. This can be handy in a biome with winter to forbid sowing as winter approaches - but be sure to turn sowing back on before spring! | You can double-click an empty tile inside a growing zone to highlight all growing zones on the visible portion of the map. This can be handy in a biome with winter to forbid sowing as winter approaches - but be sure to turn sowing back on before spring! | ||
You can also place growing zones over wild plants and forbid sowing. Your growers will not plant any new crops, but will instead harvest the wild plants when they are fully grown. This can be used for such plants as trees, berries, healroot or ambrosia. | You can also place growing zones over wild plants and forbid sowing. Your growers will not plant any new crops, but will instead harvest the wild plants when they are fully grown. This can be used for such plants as trees, berries, healroot or ambrosia. | ||
| + | |||
| + | [[Colonist]]s will clear growing zone from [[rock chunk]]s and place them around the edge of the zone without need for manual [[Orders#Haul_things|haul]] orders per item, and remove plants not of the type designated by the zone without the need to [[chop wood]], [[harvest]], or [[cut plants]]. | ||
| + | |||
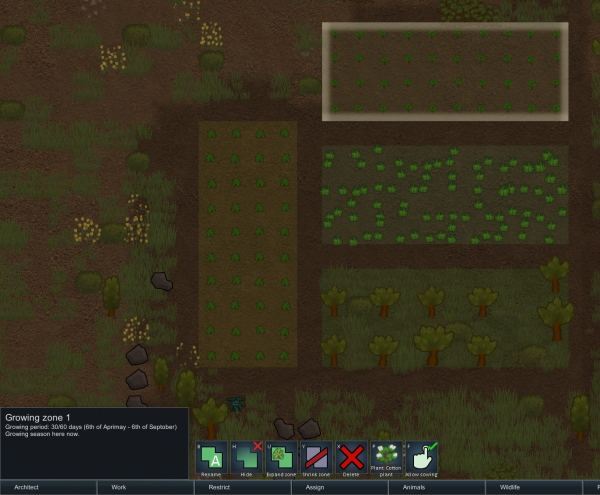
| + | [[File:Growing zones example.png|600px|thumb|center|An example of different growing zones, growing potatoes, cotton, rice, and trees]] | ||
{{nav|zone}} | {{nav|zone}} | ||
[[Category:Zones]] | [[Category:Zones]] | ||
Revision as of 13:22, 30 September 2022
| This article is suggested to be rewritten. Reason: Format standardization, cleanup, and stub - growing zone options and their gizmo images, harvest yield factors (difficulty, skill, RNG, etc). You can help the RimWorld Wiki by improving it. |
Growing zone
A zone where your colonists will try to grow a certain kind of plant.
Base Stats
- Type
- Zones
Building
- Size
- 1 × 1 +
- Placeable
- True
A growing zone designates where growers will sow and/or harvest plants, including trees. Growing zones are only allowed in soil, rich soil, or gravel, each with an effect on growth rate. They can't be placed on sand, mud, natural stone, water, or constructed floors.
When the mouse is over a tile, the fertility rate is shown at the bottom left of the screen, along with some other related info. The fertility rate determines speed of growth, depending on the fertility sensitivity of the plant grown, with higher fertility resulting in faster growth rates. See Fertility for details.
When a growing zone is selected, buttons appear to allow the player to change the plant to be grown or to allow the zone to be renamed, deleted, hidden, or to allow/disallow sowing. Only one type of plant can be selected for each individual zone. When sowing is disabled or the type of crop has been changed, colonists will still harvest crops currently growing in the zone when they mature.
Trees planted in zones need a 1 tile radius in all directions free of other crops or trees, even if planted in other zones. Planters will remove wild trees next to growing zones to accommodate this radius.
- Note: If a colonist is given an order to sow a crop, and that crop field's plant-type is then changed, the colonist will sow the original plant type, the one that existed when the order was given. This is working as intended; you can change a productive growing zone's plant-type, and the new type will be automatically sown after the current crop is harvested so no current planting will be affected, only future planting. So if you change your mind before planting, make sure to cancel/renew any pre-existing sowing orders!
Tips and tricks
Areas of fertile soil should generally be prioritized for growing zone placement, but as only growth rate is affected not yield, planting larger fields of is roughly as work efficient. It simply takes longer to get a return, with more time, and thus risk, for damage to occur to the crops, and more travel and hauling time. Thus, while fertile soil should be prioritized if convenient, it is not generally worth planting fields on the other side of the map just to exploit it. If the growing season is coming to an end soon, that might be an exception.
Guesstimating a correct size of a growing zone is not easy with so many factors affecting potential harvest. A quick rule of thumb is to grow 10+ tiles of food crops per colonist in a biome with year-round growing. If the colony hunts as well, it will accumulate some, though not excessive, food reserves, which can be saved for winter, fed to prisoners, or sold. More should be planted if other factors reduce yields, such as in biomes and latitudes with shorter growable periods.
Leave 4 tile wide gaps between your crop fields to prevent the spread of blight, and clear all wild plants and flammable items within 3 tiles to prevent the spread of fire. Flooring to prevent wild plant growth allows for faster movement through your fields, while roofed walkways for the same purpose can also come in handy during winter or toxic fallout. Both can be combined. It is also possible to place grow zones with sowing halted or use the chop wood order to clear the areas, however this becomes work intensive over time.
You can double-click an empty tile inside a growing zone to highlight all growing zones on the visible portion of the map. This can be handy in a biome with winter to forbid sowing as winter approaches - but be sure to turn sowing back on before spring!
You can also place growing zones over wild plants and forbid sowing. Your growers will not plant any new crops, but will instead harvest the wild plants when they are fully grown. This can be used for such plants as trees, berries, healroot or ambrosia.
Colonists will clear growing zone from rock chunks and place them around the edge of the zone without need for manual haul orders per item, and remove plants not of the type designated by the zone without the need to chop wood, harvest, or cut plants.

