Difference between revisions of "Extreme Desert Guide"
m (re-cat) |
|||
| (26 intermediate revisions by 3 users not shown) | |||
| Line 1: | Line 1: | ||
{{Tocright}} | {{Tocright}} | ||
| − | This guide details how to survive in one of the most hostile environments in Rimworld - an extreme desert | + | This guide details how to survive in one of the most hostile environments in Rimworld - an extreme desert. |
| − | == | + | == Brief == |
| + | Extreme deserts are even hotter than a regular desert. Temperatures can be high enough to cause heatstroke for colonists that are not dressed for hot weather. | ||
| − | + | In an extreme desert plants are scarce and there is a lack of fertile soil to grow plants in. Although in normal deserts there are still small parches of arable land, in an extreme desert there are only gravel patches available to farm on. | |
| − | + | == Starting area == | |
| + | It is important to consider the terrain of your extreme desert. The main two options are flat maps and hilly/mountainous maps. | ||
| + | * Flat maps will have growing zones scattered on the map randomly while high altitude maps will mostly have growing areas at the foot of the mountains. This means it is possible to centralize your colony on a flat map while on a high altitude map your growers will have to travel further. | ||
| + | * Flat maps will have more animals like Dromedaries, Fennel foxes and Iguanas. Foxes are the only threat present when hunting. There may also be some Megascarab on the map which while slow, can cause a lot of damage to your colonists so it is important to take care of them early on. | ||
| − | + | It is not recommended to pick flat maps near the sea since they have less area available for building and the water cannot be used for fishing. | |
| − | + | == Lost Tribe == | |
| + | : ''Main Article:'' [[Scenario system#Lost Tribe|Scenario system - Lost tribe]] | ||
| + | <gallery widths="400px" heights="400px" class="center" mode="nolines"> | ||
| + | File:Extreme desert mountainous growing zones.png|'''Extreme desert mountainous growing zones layout''' | ||
| + | File:Extreme desert flat growing zones.png|'''Extreme desert flat growing zones layout''' | ||
| + | </gallery> | ||
| − | + | * Find and claim an intact structure that can fit five characters. The starting wood should be reserved for doors and [[cooler]]s only. | |
| + | * Prioritize mining and crafting. It is important to conserve materials therefore place all production benches inside one large room. | ||
| + | * Hunting will be one of the main food sources at the beginning since the starter pemmican will run out quickly. Hunt everything on the map and build a butchers table. Harvest any agave and other resources on the map. Starter animals can also be a source of food. | ||
| + | * Immediately start growing rice at the beginning. | ||
| + | * Only build essential production benches such as a stonecutting bench and a butchering bench. Try to use steel that can be found on the map instead of the starter wood. | ||
| + | * At the beginning feed your colonists raw food until you research electricity. | ||
| + | * If there is a heatwave build passive coolers. This is the reason wood needs to conserved since a heatwave can easily wipe out your entire colony. | ||
| + | * Using a tailor bench, craft cowboy hats and dusters as soon as you can from leather, and later on once you have a good supply of food, from cotton you have planted. | ||
| + | * Research: If playing on a flat map, stonecutting will be important to allow you to build more walls. If playing on a mountainous maps, it is possible to build a colony inside the mountain and start researching electricity first. | ||
| + | *The very first [[Events#Visitors|visitor]] will be your savior as will be bringing some pemmican, but with just 200 starter silver, you can only buy like 55 units which isn't much or 60 if selling the spare weapon. | ||
| + | * Saguaro cactus can now be grown by characters with Plants skill level 6, those placed on gravel will reach maturity fast. The process is slow but rewarding with just above five to ten units. | ||
| − | [[File: | + | <center>[[File:Saguaro cactus can now be planted.png|400px]]</center> |
| − | + | == Food == | |
| + | Immediately start growing rice or you won't make it past a week. Rice is not a good choice of crop in poor soil, but they grow fast. Once you have decent food stocks, replace this with potatoes as they perform better in poor soil. | ||
| − | + | Somewhere around your fifth day, your colony will have no food available at all and your only chances for survival will be opening an [[ancient shrine]] and hope there is at least one hive that has a [[spelopede]] or [[megaspider]] to hunt. These creatures will chase any intruder up to some 30 tiles away from their hive so they won't chase you forever, but they are very fast. Since you only start with two short bows and a bundle of pila, it is still possible to hunt without harm but will require good concentration and familiar tactic knowledge of kitting. To kite, means having a fast bait run towards a direction where nobody else is, while at the same time, the others shoot at the chasing creature. Use the Plan grid to draw their attack range. | |
| − | |||
| − | |||
| − | |||
| − | |||
| − | |||
| − | |||
| − | + | <gallery widths="400px" heights="400px" class="center" mode="nolines"> | |
| + | File:Ancient structure opening purely for survival.png|'''Opening ancient structure purely for survival''' | ||
| + | File:Hive guardians persuit range 30 tiles plan grid.png|'''Hive guardians pursuit range of 30 tiles''' | ||
| + | </gallery> | ||
| − | + | If you are lucky, the same moment you need to open the ancient shrine will coincide with the timing of your first [[Event#Wanderer joins .2F .28relationship.29|newcomer]] who might be better equipped to hunt, most likely a pistol. Which means you can go to up a max of four hunters. One more mouth to feed but safer hunting. The newcomer may likely as well arrive with some packaged survival meal, but it won't be enough for more than a day. | |
| − | + | [[Insect jelly]] will start spawning, which will become another nutritional source, and this one never rots. But, hives will live so long as there is a guardian keeping maintenance, and if you kill them all, they will stop producing jelly. Soon after, by the time you might be picking them up. [[Glow pod]]s will appear too, replacing torch lamps. | |
| − | |||
| − | + | [[Events#Herd migration: .28Animal.29|Animal herds]] may also help you survive from starvation. | |
| − | |||
| − | + | Check your rice plantation periodically, as the plant can be harvested as early as 66% growth. While it may not yield much food, it's still better than nothing. | |
| − | + | Check on the few agaves, they may be ready for harvest by now. | |
| − | + | Check if any other life form has ventured to your territory. | |
| − | |||
| − | |||
| − | |||
| − | |||
| − | |||
| − | |||
| − | |||
| − | + | Reached your first 100% ready harvest? Congratulations, you made it! | |
| − | + | [[File:Managed to reach your first 100 percent harvest ready means you made it.png|800px|thumb|center|Managed to reach your first 100% harvest ready means you made it!!!]] | |
| − | + | == Gathering materials == | |
| − | + | [[File:Early defense.png|thumb|Stone lined up as primitive 1st line of defense]] | |
| + | Due to the lack of trees, instead of using wood (Saguaro cactus provide merely 13 wood), it is best to build with steel as there's abundance in comparison, so it is wise to start mining this resource before you need them. Later on after researching stonecutting, you can upgrade to stone. This also means that you can already start hauling stone chucks from before construction the stonecutting bench, so that once you can start producing stone blocks all the raws are gathered close and not still scattered across the map. While doing this, use the dumping zones to line them up as your most primitive line of defense. | ||
| − | + | Those in high elevation areas should start caving in. During this process you may likely strike other minerals, which are slower to mine. But their empty space will do better for laying out a proper cave system, otherwise you will find yourself mining too much when going after said minerals gaining more work afterwards with the increasing need to build walls where those minerals were located to avoid mountain roof collapse. | |
| − | + | Remember that ancient shrine? That room can also be used to build more facilities. | |
| − | + | == Continuing research == | |
| + | Did you notice winter temperature is around 30 Celsius? Imagine peak summer time. Double time on research to get electricity. Lucky if you have a night owl in the team. | ||
| − | |||
| − | + | == Summer == | |
| + | Summer is going to start soon, and while the season itself is not a threat, [[Events#Heat Wave|heat wave]] is as it rises temperature up to 60 degrees Celsius. You will need to build [[passive cooler]]s which require 50 wood each so that your colony doesn't die of heatstroke. Any temperature below 30 degrees Celsius will allow your people to recover at night. | ||
| + | == Base relocation or upgrade == | ||
| + | After you have gone past your first heatwave, it's time to make life more comfortable so that none of your people are psychologically nor emotionally disturbed. Try to make the most of the whole map with as less effort as possible. And the rest it's up to you. Good luck! | ||
| − | + | <gallery widths="400px" heights="400px" class="center" mode="nolines"> | |
| + | File:Ancient structure converted into primitive private rooms.png|'''Ancient structure converted into primitive private rooms.''' | ||
| + | File:Base relocation close to six geysers.png|'''Base relocation close to six geysers.''' | ||
| + | </gallery> | ||
| − | |||
| − | |||
| − | |||
| − | |||
| − | |||
| − | |||
| − | |||
| − | |||
| − | |||
| − | |||
| − | |||
| − | |||
| − | |||
| − | |||
| − | |||
| − | |||
| − | |||
| − | |||
| − | |||
| − | |||
| − | |||
| − | |||
| − | |||
| − | |||
| − | |||
| − | |||
| − | |||
| − | |||
| − | |||
| − | |||
| − | |||
| − | |||
| − | |||
| − | |||
| − | |||
| − | |||
| − | |||
| − | |||
| − | |||
| − | |||
| − | |||
| − | |||
| − | |||
| − | |||
| − | |||
{{nav/guides}} | {{nav/guides}} | ||
| − | [[Category: | + | [[Category:Guides]] |
Revision as of 17:38, 3 August 2019
Template:Tocright This guide details how to survive in one of the most hostile environments in Rimworld - an extreme desert.
Brief
Extreme deserts are even hotter than a regular desert. Temperatures can be high enough to cause heatstroke for colonists that are not dressed for hot weather.
In an extreme desert plants are scarce and there is a lack of fertile soil to grow plants in. Although in normal deserts there are still small parches of arable land, in an extreme desert there are only gravel patches available to farm on.
Starting area
It is important to consider the terrain of your extreme desert. The main two options are flat maps and hilly/mountainous maps.
- Flat maps will have growing zones scattered on the map randomly while high altitude maps will mostly have growing areas at the foot of the mountains. This means it is possible to centralize your colony on a flat map while on a high altitude map your growers will have to travel further.
- Flat maps will have more animals like Dromedaries, Fennel foxes and Iguanas. Foxes are the only threat present when hunting. There may also be some Megascarab on the map which while slow, can cause a lot of damage to your colonists so it is important to take care of them early on.
It is not recommended to pick flat maps near the sea since they have less area available for building and the water cannot be used for fishing.
Lost Tribe
- Main Article: Scenario system - Lost tribe
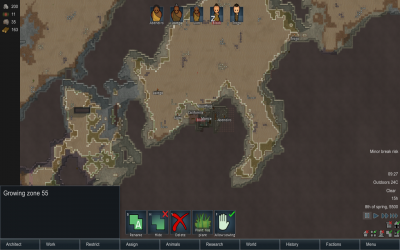
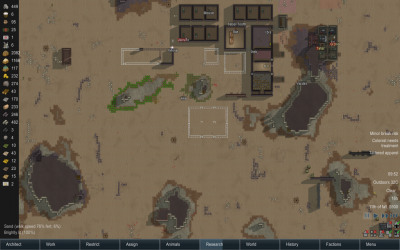
Extreme desert mountainous growing zones layout
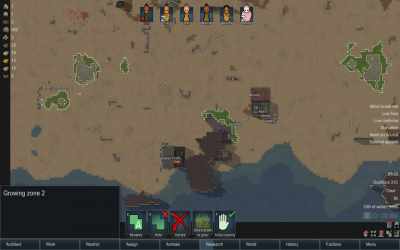
Extreme desert flat growing zones layout


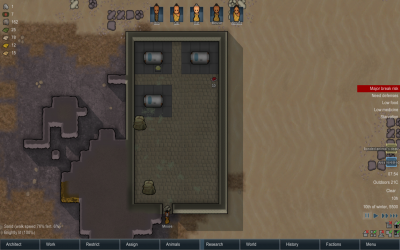
- Find and claim an intact structure that can fit five characters. The starting wood should be reserved for doors and coolers only.
- Prioritize mining and crafting. It is important to conserve materials therefore place all production benches inside one large room.
- Hunting will be one of the main food sources at the beginning since the starter pemmican will run out quickly. Hunt everything on the map and build a butchers table. Harvest any agave and other resources on the map. Starter animals can also be a source of food.
- Immediately start growing rice at the beginning.
- Only build essential production benches such as a stonecutting bench and a butchering bench. Try to use steel that can be found on the map instead of the starter wood.
- At the beginning feed your colonists raw food until you research electricity.
- If there is a heatwave build passive coolers. This is the reason wood needs to conserved since a heatwave can easily wipe out your entire colony.
- Using a tailor bench, craft cowboy hats and dusters as soon as you can from leather, and later on once you have a good supply of food, from cotton you have planted.
- Research: If playing on a flat map, stonecutting will be important to allow you to build more walls. If playing on a mountainous maps, it is possible to build a colony inside the mountain and start researching electricity first.
- The very first visitor will be your savior as will be bringing some pemmican, but with just 200 starter silver, you can only buy like 55 units which isn't much or 60 if selling the spare weapon.
- Saguaro cactus can now be grown by characters with Plants skill level 6, those placed on gravel will reach maturity fast. The process is slow but rewarding with just above five to ten units.

Food
Immediately start growing rice or you won't make it past a week. Rice is not a good choice of crop in poor soil, but they grow fast. Once you have decent food stocks, replace this with potatoes as they perform better in poor soil.
Somewhere around your fifth day, your colony will have no food available at all and your only chances for survival will be opening an ancient shrine and hope there is at least one hive that has a spelopede or megaspider to hunt. These creatures will chase any intruder up to some 30 tiles away from their hive so they won't chase you forever, but they are very fast. Since you only start with two short bows and a bundle of pila, it is still possible to hunt without harm but will require good concentration and familiar tactic knowledge of kitting. To kite, means having a fast bait run towards a direction where nobody else is, while at the same time, the others shoot at the chasing creature. Use the Plan grid to draw their attack range.
Opening ancient structure purely for survival

Hive guardians pursuit range of 30 tiles


If you are lucky, the same moment you need to open the ancient shrine will coincide with the timing of your first newcomer who might be better equipped to hunt, most likely a pistol. Which means you can go to up a max of four hunters. One more mouth to feed but safer hunting. The newcomer may likely as well arrive with some packaged survival meal, but it won't be enough for more than a day.
Insect jelly will start spawning, which will become another nutritional source, and this one never rots. But, hives will live so long as there is a guardian keeping maintenance, and if you kill them all, they will stop producing jelly. Soon after, by the time you might be picking them up. Glow pods will appear too, replacing torch lamps.
Animal herds may also help you survive from starvation.
Check your rice plantation periodically, as the plant can be harvested as early as 66% growth. While it may not yield much food, it's still better than nothing.
Check on the few agaves, they may be ready for harvest by now.
Check if any other life form has ventured to your territory.
Reached your first 100% ready harvest? Congratulations, you made it!

Gathering materials

Due to the lack of trees, instead of using wood (Saguaro cactus provide merely 13 wood), it is best to build with steel as there's abundance in comparison, so it is wise to start mining this resource before you need them. Later on after researching stonecutting, you can upgrade to stone. This also means that you can already start hauling stone chucks from before construction the stonecutting bench, so that once you can start producing stone blocks all the raws are gathered close and not still scattered across the map. While doing this, use the dumping zones to line them up as your most primitive line of defense.
Those in high elevation areas should start caving in. During this process you may likely strike other minerals, which are slower to mine. But their empty space will do better for laying out a proper cave system, otherwise you will find yourself mining too much when going after said minerals gaining more work afterwards with the increasing need to build walls where those minerals were located to avoid mountain roof collapse.
Remember that ancient shrine? That room can also be used to build more facilities.
Continuing research
Did you notice winter temperature is around 30 Celsius? Imagine peak summer time. Double time on research to get electricity. Lucky if you have a night owl in the team.
Summer
Summer is going to start soon, and while the season itself is not a threat, heat wave is as it rises temperature up to 60 degrees Celsius. You will need to build passive coolers which require 50 wood each so that your colony doesn't die of heatstroke. Any temperature below 30 degrees Celsius will allow your people to recover at night.
Base relocation or upgrade
After you have gone past your first heatwave, it's time to make life more comfortable so that none of your people are psychologically nor emotionally disturbed. Try to make the most of the whole map with as less effort as possible. And the rest it's up to you. Good luck!
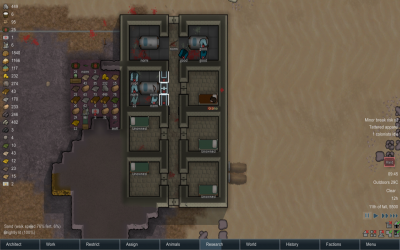
Ancient structure converted into primitive private rooms.
Base relocation close to six geysers.


- Progression
- Quickstart Guides • Basics • Intermediate Midgame Guide • Advanced Endgame Guide • Ending the game
- Scenarios
- Lost Tribe Guide • Rich Explorer Guide • Naked Brutality Guide • The Mechanitor Guide

- Survival
- Extreme Heat Guide • Extreme Cold Guide • Extreme Desert Guide • Ice Sheet Guide • Sea Ice Guide • Events Guide
- Combat
- Defense tactics • Offense tactics • Weapon Guide
- Construction
- Colony Building Guide • Defense structures
- Production
- Food production • Money making guide
- Other
- Skill Training • Permadeath save conversion guide •
Ideology Min-Maxing