Basics
|
This is the guide covering the gameplay Basics of RimWorld in detail. If you want a quick guide to the game, check out the quickstart guide.
Brand new players are encouraged to play the Tutorial first, if they haven't already. The tutorial will guide you through the RimWorld UI, help them set up a starter base, and defend against your first raid. Once you've completed the tutorial, you can set your storyteller and continue the game. The learning helper can also be a useful tool.
This guide is intended for players that are using the original Crashlanded scenario, and without any mods or DLC enabled. With DLC, things shouldn't be too different. Note that, for the Ideology DLC in particular, you'll want to use the "Ideology system inactive" option.
Colony Setup
- Scenario: Pick the standard Crashlanded scenario. This starts you off with 3 colonists, some decent weapons, and Electricity. Most tutorials, here and elsewhere, are geared towards this scenario.
- Storyteller: Select Cassandra Classic or Phoebe Chillax on any desired difficulty. The game's suggestions are fairly accurate; if you have trouble picking, then Adventure Story is a good start.
- World set-up: The default settings are just fine for gameplay purposes. Just select generate and continue on.
- Starting site: This consists of multiple factors.
- Biome: Pick Temperate Forest for now. It's not too hot, not too cold, has plenty of wood, wildlife, and buildable land, but less disease than a rainforest.
- Climate: You'll want a "year-round" growing period. This (almost) removes the pressures of winter.
- Terrain: Flat, Small Hills, or Large Hills will do. It doesn't really matter. The larger the hills, the more ores you'll have, but the less open space for building. Larger hills can also be used for natural defense.
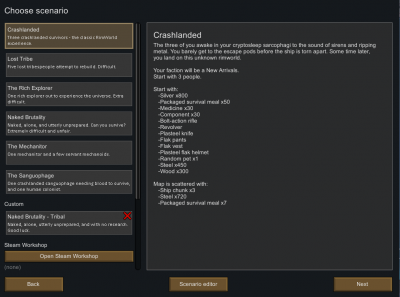
Crashlanded
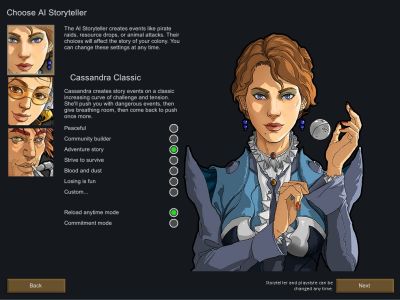
Cassandra on selected difficulty
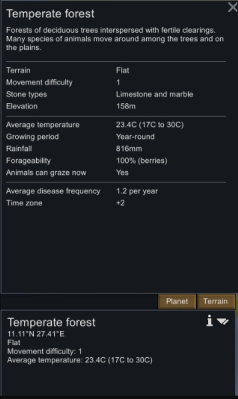
Temperate forest with year-round growing


Colonists
The Crashlanded scenario starts with three colonists. You can randomize them as much as you want, but you can't fully customize them without mods or dev tools. RimWorld is designed around a motley crew - you will not start with perfect colonists, nor should you try. But there are a few aspects worth taking into consideration.

Skills: Good at Plants and Intellectual, great at Mining and Social.
Traits: Undergrounder means that they like staying indoors. They'll dislike growing crops outdoors, but this isn't a dealbreaker - still a good planter.
Fast walker is an all-round good trait.
Health: Nothing bad right now, though on the older side. They may get detrimental conditions as they age. Again, not important right now, but a consideration.
- Skills:
Skills and passions in a skill are both important to colony wellbeing. Skill level determines proficiency in that skill. Passion determines how fast the skill is learned. Passionate pawns will also be happier when doing a job of that passion.
The most important skills for survival are Shooting, Construction, Plants, and Medical. Any 1 colony should have a colonist with both a minimum of 5 skill points and 1 "flame" of passion each skill. The other skills are useful - each skill will be covered in detail below.
- Shooting - Defense against raiders and other threats to your colony. Also helps with hunting. Increasing shooting skill increases accuracy, especially at long ranges.
- Melee - Defense against enemies up close. In RimWorld, you cannot fire any ranged weapon at an enemy in melee range (directly adjacent). This applies to both colonists and enemies. Increasing melee skill will increase the chance to hit and dodge... in melee.
- Construction - Creating structures, like walls, tables, and beds. A minimum construction (4-6) is required to build spike traps and electrical equipment. Increasing construction skill will increase its speed, the quality of furniture, and reduce the chance of construction failure ("botched" construction).
- Mining - Breaking rock and harvesting ore. Increasing mining skill will increase mining speed and ore yield.
- Cooking - Creating meals from raw food. Increasing cooking skill will increase cooking speed and decrease the food poisoning chance.
- Plants - Growing crops to eat and sell. Plants 8 lets you grow healroot, a source of medicine, right away. Increasing plants skill will increase planting speed and harvest yield.
- Animals - Taming and training animals. Many animals have a minimum skill to train them. Increasing animals skill will increase the chance of animal tame/train success. Also reduces the manhunter chance when hunting.
- Crafting - Smithing armor and weapons, and tailoring apparel. Higher crafting skill will increase quality of crafted items. Does not increase the speed of crafting.
Note that the work types in the "Craft" tab, such as stonecutting, smelting, and drug synthesis, do not use the crafting skill. Stonecutting is unrelated to any skill and can be done by any colonist capable of Skilled Labor. - Artistic - Creating sculptures. Increasing art skill will quality of sculptures, but not their speed of creation.
- Medical - Tending to injured and sick colonists. Increasing medical skill will increase tend quality, making injuries heal faster and diseases less deadly. Also increases success for surgery.
- Social - Trade, recruitment, etc. Increasing social skill will improve trade prices (both buy and sell) and make prisoners easier to recruit. Higher social also increases the impact of the daily chats your colonists will have.
- Intellectual - Research and drug synthesis. Increasing intellectual skill will make research faster, as well as drug production.

Of these skills, Animals and Artistic are easily the least important to start with. Crafting isn't needed for immediate survival, but can be very handy later on. That leaves 9 skills that are important to be at least competent at (4+ skill). Thankfully, the "Team Skills" area at the bottom shows every important skill, except Social.
There are certain skills that you can "skip" if you really wanted to:
- You can forgo melee for the entire game. However, melee can be very helpful, and one of your 3 weapons will be a knife, a melee weapon.
- Cooking can be ignored if you plan to use a nutrient paste dispenser.
Don't worry too much about starting skill levels, as characters will get more skilled with time (they are not fixed values) when they do relevant work. And other colonists will be joining soon! Being good in a few important skills and competent in others is all you need for now.

- Traits:
Some traits can be very bad...
- Pyromaniacs are liable to cause a fire starting spree at any time. This can be an issue if they're around especially flammable objects.
- Chemical interest and chemical fascination pawns will ignore the player's drug policy in order to get their fix. However, they no longer go on random drug binges.
- Depressive and Volatile pawns are more vulnerable to mental breaks. During a mental break, a pawn won't do work, and may cause damage to their surroundings or others.
Others can be very good...
- Industrious is +35% work speed, forever, for almost any task. Industrious (and hard worker) are one of the few ways to increase the speed of unskilled tasks, like stonecutting.
- Tough is 50% damage taken, for all damage. This is effectively x2 health forever. No longer will a short bow instantly kill your colonists. Great for both melee AND ranged fighters.
- Bloodlust gets an immense mood boost for witnessing a kill, and another one for doing the killing. They also don't mind war crimes. More likely to start social fights, however.
Others can be in the middle.
- Very Neurotic is essentially Industrious and Volatile at the same time. Stacks with both Industrious and Volatile. Neurotic is a less intense version, as the name suggests.
- Brawler improves many aspects of melee combat. However, a brawler hates ranged weapons. A brawler is more upset with holding a ranged weapon than having both of their parents die.
The main takeaway is that very bad traits are very bad and should generally be avoided, but you don't need very good traits in order to have a successful colony. If you have a pawn with a great set of traits, keep them. If a pawn has good and bad traits, then they can still be worth it.

- Health conditions:
- Watch out for addictions. Ambrosia addiction is tolerable, but a beer addict will end up going through a painful withdrawal.
- A colonist with a chronic condition like asthma, artery blockage, or frail will be much worse off. Some can be cured with artificial body parts, others like frail require luciferium or one of few other solutions.
- For similar reasons, try to avoid colonists with peg legs or wooden hands. A peg leg equates to 80% movement speed until replaced, which is not something you want.
A health condition can be tolerated if a colonist is great in other fields. For example, an Industrious Crafter + Researcher is still worth taking despite a peg leg; a researcher won't need to move often, anyways. Otherwise, try to avoid any negative condition as much as possible.
- Work (in)capabilities:
- Colonists who are incapable of violence will not be able to fight incoming threats.
- Colonists who are incapable of dumb labor cannot haul or clean, which are especially important early-game jobs.
- Colonists who are incapable of firefighting will not be able to extinguish fires, which can destroy your base.
At a bare minimum, you'll want 2 colonists capable of any work task. Being capable and being good are 2 separate things. But a colonist can't be any more skilled at Hauling, for instance.
The Very Beginning
Weapons
You start with 3 weapons:
 Bolt-action rifle - A gun with amazing range. Of all the weapons in RimWorld, it has the second best range - only beaten by the sniper rifle. However, it isn't much stronger than a pistol up close. Because Shooting skill is more important when shooting from far away, have the colonist best at Shooting wield the bolt-action rifle.
 Plasteel knife - A melee weapon. Knives are one of the weakest melee weapons, but it is made of plasteel, the strongest material in the game. The plasteel knife is roughly equivalent to a steel longsword or mace of normal quality. Have your best melee fighter wield the knife, unless they're also your best shooter.
 Revolver - A pistol, good up close. Better than the bolt-action at close range, though most other firearms are stronger. Remember that you can't fire any ranged weapon in melee. Have your remaining colonist wield the revolver.
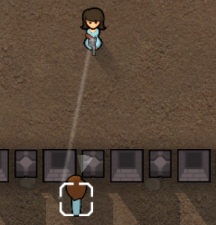
To summarize: best shooter should get the rifle, then best melee gets the knife, and then the other colonist (if capable of violence) gets the pistol. To equip a weapon, select a colonist and right click a weapon on the ground. To drop a weapon, go to the Gear tab and click the down arrow.
The tutorial forces you to pick weapons without being able to pick your character bios. If you are continuing play after the tutorial, just re-equip them in the desired order.
You don't have to worry about enemies just yet, since Cassandra gives you a few days to prepare. Enemies shouldn't arrive until you get the "Need Defenses" pop-up on the bottom-right. But since your colonists start near their weapons, you might as well pick them up, right?
Unpause the game, have your colonists equip their gear, and re-pause. There's still things to set up.
Base location

In the tutorial, players are taught to build their first home at the map's center to hasten the lecture. This makes sense, as it's where your colonists start off at.
When creating your base, there are a few things to consider, in rough order of importance:
- Location - somewhat near the center of the map
- Near rich soil
- Somewhat near steam geysers
- (OPTIONAL) Natural defenses and structures
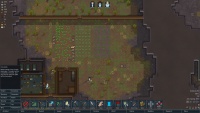
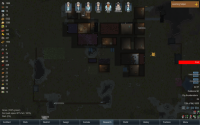
In the picture to the right:
- Not pictured: near the center of the map
- Red: Nearby rich soil
- Blue: Steam geysers somewhat nearby
- Yellow: Natural structure to build in

- Location
A central location will be further away from raiders. If you build near the edge on the map, then some raiders can spawn right next to you. No matter how big your walls are, some types of raiders will explicitly breach through them.

- Rich Soil
Rich soil increases plant growth speed by 140%. Rich soil is an irreplicable advantage until you can rely entirely on hydroponics. Even then, certain crops like corn and devilstrand cannot grow in hydroponics.
Rich soil is good to use, but not 100% necessary. 14 tiles of regular soil are almost exactly equal to 10 tiles of rich soil. You will get the same yield with regular soil and take the same amount of work for that yield. However, rich soil grows faster - growing faster means the first batch of crops will be ready faster. Since you won't start off with much food, this is important. If your crops are hit by a cold snap, it only takes 4 days rather than 5.5 days to regrow them. And if your climate has a winter, then rich soil lets you grow more before the frost hits.
Rich soil is a darker shade of soil. In order to see the soil more easily, you can use the fertility overlay, in the bottom right corner of the screen.
- Steam geysers
Steam geysers allow you to build geothermal generators on top of them. Geothermal is one of the best power sources of the game - it gives lots of power and it constantly gives power. You don't need to be right next to steam vents, but you don't want to be too far away.
If you build a room on a steam geyser, then it will create lots of heat. This will overheat your colonists in a temperate biome. But if you're playing in a tundra, the heat of a steam geyser can help.

- Natural defenses
Throughout your map, hills and ruined structures will be placed sporadically. Consider using these structures to form the foundation of your base, at least for the first few days. It saves having to build your own walls.
You can also use existing hills, rivers, marsh, etc. to your advantage, by slowing down enemy attackers.
Set up a basic stockpile

Once you've found a starting location, you'll want to create a stockpile zone. Colonists will haul items to a designated stockpile.
There are 2 types of stockpiles: the regular stockpile zone, and the dumping stockpile zone. The only differences between the zones are their default names and default configuration. Stockpile zones are set to store things that generally should be inside. Dumping stockpile zones are set to store things that generally should be outside.
All the items you'll start with will be stored by a default stockpile zone. Create a stockpile roughly where you want to settle in for the time being. It's better to first bring the items to you, then start constructing your base.
When left outdoors, most items will slowly deteriorate over time. It takes months before the items are finally destroyed, so you can leave them outside for a bit while you start building your base. Constructed buildings and structures never deteriorate. In addition, certain materials like steel and stone blocks do not ever deteriorate. You can view how fast items deteriorate when selecting the item in question.
Once you've set up a basic stockpile and unpaused the game, then any colonist capable of dumb labor should begin hauling. Once you have some wood available, then you can start the construction process.
The First Day
You'll need 3 things to survive on a rimworld: Food, Shelter, and Security.
Cassandra Classic gives you a short grace period before enemies start appearing, so we only need to worry about the first two. With an efficient work flow, we can knock out two of the three needs by day 1 or 2.
Base construction
Building a simple base helps with colonist mood and a few other things. You can move most buildings later on. Certain items like walls, doors, and power generators cannot be moved, and must be deconstructed for a loss in resources. Therefore, it is up to player preference whether you want to plan ahead or not.
Trees get in the way of buildings, so you'll want to assign the tree to be cut. Then prioritize your planter to cut the tree.
The following is a list of helpful buildings, in order of priority. Treat it like a checklist. You can use the handy searchbar (on the bottom of the Architect tab) to search for items you need.

Trees get in the way of buildings, so order a planter to cut them down.
Buildings less important right now are forbidden. Unforbid them later.

Priority #1
 /
/  Walls and doors are necessary for constructing a room. Rooms are considered indoors. When outdoors, items will deteriorate, and workshops like the hand tailor bench will functions at 90% speed. Heaters and coolers can only function with places considered indoors.
 Beds are used for sleeping. Not only do they avoid −4 Slept on the ground moodlet, but they also increase quality of rest. Compared to sleeping on the ground, a normal quality bed reduces sleep time by ~ 1 hour every day.
 Tables help avoid the −3 Ate without Table moodlet. Later on, tables also give a positive moodlet if they are in an impressive room. There are 4 types of table, the only differences being size and cost. 1x2 should do for right now. You need a seat to eat at a table.
 Stools are the cheapest form of seating. They take much less work than a dining chair to make, and allow your colonists to eat at a table.
- Roofs are free and will automatically be created after a room is created. You can order roof creation with a Build roof area and remove it with a remove roof area (both are in the Zones tab).
Priority #2
 Electricity. Used for a wide variety of appliances, essential for progress. You have 2 options:
 Build a wood-fired generator for now. These generators produce a steady supply of power, so long as they are fueled. A temperate forest is filled with lumber, so this shouldn't be an issue. A bigger issue is work - your colonists will have to cut trees and haul the wood to the generator. Later on, wood-fired generators can be replaced.
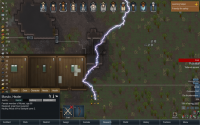
- Electric buildings, like standing lamps, can connect to a power generator or power conduit up to 6 tiles away. You'll see a purple line if a connection will be made. Power conduits can be used to transport electricity from a further distance. (The conduit has to connect directly to a generator).
 /
/  End tables and dressers increase comfort of nearby beds, which increases colonist mood.
 Light. In the dark, colonists work 80% as fast and move 80% as fast. There are no windows in the game; all roofed rooms are considered dark until lit. A torch lamp only costs 10 wood and lasts for 10 days before needing to be refueled. After you get electricity set up, you can build a standing lamp, which costs a trivial amount of electricity to maintain.
Priority #3
 The electric stove is used to cook food. Packaged meals won't last forever, and eating raw food directly gives the −7 Ate raw food moodlet. Cooking also reduces the chance for food poisoning (so long as you have a competent cook), and increases the nutrition you get for the same amount of food.
 A stonecutter's table allows you to create stone blocks. Stone is a great material for walls, as it does not burn and is more durable than steel. As opposed to steel, stone is extremely plentiful, though it takes a long time to work with. (This table works with stone chunks, which are ugly and take up a lot of space. It is often worth to take the -10% work speed penalty for the stonecutter's table to outside, closer to stone chunks.)
 Simple research benches allow you to research, which unlocks many vital technologies. If your colonists have nothing better to do, it's good to let them research. Multiple benches can be used at the same time with no penalties.
 Dining chairs are seats that are more comfortable than stools, but take longer to make. Place them on tables and anywhere colonists will sit for long periods of time (like stoves, stonecutter's tables, and research benches).
 Horseshoe pins are a form of Recreation. Colonists will play at the pin from time to time. They can be placed both indoors and outdoors.
- At the start, place your horseshoe pin outside. This helps increase the unrelated need for colonists to be Outdoors.
- Later on, place the pin indoors. This allows colonists to benefit from the Impressive recreation room mood buff. At the start, your rooms won't be impressive, so there isn't an impressive mood buff.
Planting crops

Plants are the primary and most consistent source of food in RimWorld. You start with 50 packaged survival meals, which are enough to tide colonists over for 8 days. It's best to start growing crops before you run out of food.
To grow crops, you'll want to go to Architect / Zones and select growing zone. Drag the growing zone around an area, preferably with rich soil. At first, you will want to grow rice plants. Rice grows the fastest and is the most stable food crop.
A growing zone of rice 25 tiles large, a 5x5 plot, is more than enough food for 1 colonist when...
- Cooked into simple meals.
- Harvested reasonably quickly (make sure your planter is doing their job!)
- You can grow crops year-round. (If you have a winter, grow more food before hand)
In rich soil, you only need 20 tiles of crop per colonist.
This amount of crop can sustain a colonist on Losing is Fun, the hardest difficulty. On any easier difficulty, 25 tiles of crop provides a healthy stockpile of food. So if a blight happens to destroy your harvest, you'll have plenty of extra food remaining.
Since you start with 3 colonists, make a growing zone 75 tiles (regular soil) or 60 tiles (rich soil) big, set it to rice, and have your grower sow. Well... building a shelter is more important. So have your grower cut the trees in the way of your shelter, then have them sow.
You will also have to feed your animal. Grazers like yaks and horses can eat grass. But a husky or yorkshire terrier will eat your meals if they have nothing left. For simplicity's' sake, release your starting animal if they can't graze. Otherwise you can forage from berry bushes or hunt animals to give food.
Specifically, each colonist will consume 2 simple meals per day. 2 simple meals are worth 20 units of raw food. So, for 3 colonists, 6 meals or 60 raw food in meals is a day's worth of food. Note that cooking "creates" food. If uncooked, each colonist would instead need 32 units of raw food per day. Pemmican is also a "small" ingredient; 32 units of pemmican will feed 1 colonist for 1 day. A colonist can survive just under 3 full days without food, however going without food incurs a massive mood penalty.
Crop choice
There are 4 food crops in RimWorld. Rice is suggested at first, since it is the fastest growing food crop, and you don't have any food beyond your packaged meals right now.
After your first harvest, you can grow a number of crops...
 Rice is the fastest growing crop, but it gives the least food per harvest.
- Since you need to harvest it multiple times, it requires the most colonist work to grow. However, rice has the advantage of stability. Each rice harvest is small. So if a blight happens, you won't lose as much. There are other uses for its fast grow speed. If winter is fast approaching, you can grow rice as a "last harvest". It trains the Plants skill the fastest, too.
 Corn is the opposite of rice. It grows slowly, but gives the most per harvest. Since it needs to be harvested much less frequently, it takes the least colonist work to grow corn. However, your corn harvest will be impacted more by disasters like blight and fire.
 Potatoes are the "inbetween" crop, growing at a medium pace and giving a medium yield/harvest. A more important fact is that potatoes are the least impacted by soil. They benefit the least from rich soil, but are hindered the least by poor/stony soil. So don't grow potatoes on rich soil.
 Strawberry plants' main niche is that berries can be eaten raw, without the −7 Ate raw food mood penalty. However, strawberries give much less yield per harvest than corn or even potatoes, and they aren't as stable as rice. Since you'll want to cook food into meals to avoid food poisoning anyways, berries aren't a great choice.
Rice, corn, and potatoes give about the same yield per day. Rice grows the fastest and gives the least per harvest, and the opposite for corn. Thus, the main difference is the colonist work : stability ratio of these three crops. Strawberries give less yield per day, so they are an inferior crop to the other 3.
Ultimately, the amount of growing work isn't that big, even when using rice. You can go the entire game just growing rice and be entirely fine.
Technical Things
With the first day sorted out, now we can get into the nitty-gritty of colonist settings.
Colonists have some default work settings and will mostly busy themselves. Eventually, they run out of chores to do and begin to wander or idle. This is because there's a need for adjustments within their tasks.
We can adjust how colonists work, using 2 tabs on the bottom of the screen:
- Work - What jobs colonists will do when they are assigned to work
- Schedule - How long colonists will work, sleep, etc.
This guide will explain, in detail, how both of these tabs function. You don't need to optimize these tabs, but if you're wondering "why is my colonist doing X and not Y", you may want to check these sections out.
Work
Click the Work tab. Colonists will do assigned tasks from left to right. For further control, most players will activate "Manual priorities", by clicking the red cross at the top left of the tab.

- How priorities work
Jobs are checked from 1 to 4 (if manual priority is on), then from left to right. For the first job with an available task, a colonist will do every possible task related to that job. Then, they will do every possible task in the next column of work. For the most part, colonists do not care about efficiency; they'll do as they're told.
Let's take Bild as an example:
- Bild will first check for any possible task of Firefight. The "Firefight" task will only check for fires in the home area. If there are any fires in the home area, then Bild will try to put them out. (If she's busy doing another task, then it might take some time to update.)
- Then, Bild will check for Patient, Bed rest, Basic, and Warden tasks, in this exact order. Ex. If she is sick or injured, then she will heal in bed as "Work" instead of working, due to both Patient and Bed rest being very high priority.
- Afterwards, Bild will check for Grow and Plant Cut, in that order. Bild will sow a field in 1 area, then sow a field halfway across the map, before cutting down a tree right next to the original field.
- Despite Mine being before Plant Cut, because it is 2, it will be done only after all Grow, Plant Cut, and Hauling tasks are done.
- If Bild has nothing better to do, then she will research at an available research bench. If there are no available places to research, she will become idle.
To optimize work time, you'll want to minimize work time. Setting work priorities in a smart way can help do so. You can always force-prioritize a colonist to do a specific task. Select the colonist, and right click an important task, like getting your beds built.
Only one colonist can work at 1 specific thing at any specific time. Only 1 doctor can operate on a patient, but 2 doctors can operate 2 patients at the same time. 2 growers cannot sow crops at the same tile, but they can sow 2 separate tiles together (even in the same growing zone).
- Job titles are not always descriptive
The job titles are not a full indication of what the job actually covers.
- The "Craft" job contains 4 tasks that do not rely on Crafting skill. If you are not using a crafting spot, then no tasks use the Crafting skill.
- The "Doctor" job, in addition to rescuing and tending pawns, includes feeding patients and visiting sick patients for Recreation.
- The "Haul" job contains many other dumb tasks, like rearming turrets and burying corpses in graves.
You can see every available task within a column by hovering over the job in question. Tasks are done from top to bottom, just like how work is done from left to right. But unlike work jobs, these cannot be adjusted. A colonist assigned to Construction will always build and remove roofs before deconstructing a wall, for instance.
- Work and skill
In the Work tab, there are two visual cues to determine the colonist's suitability for a particular task:
- The first is the box outline itself, for the number becomes brighter the more proficient a colonist is at the task.
- The second cue is the small fire marks in the bottom corner of a task box, which denote the colonist's passion for the task, or how quickly they will learn it. A colonist with no passion learns at 33%, with a single passion at 100%, and with a double passion at 150%. Consider making colonists with low skill but high passions work their preferred task. They will skill up quickly, and get a mood boost for doing work they enjoy.
This is nothing you can't see in their Bio tab, but looking at the work tab can be useful as a quick comparison.
- What does this all mean? - General guidelines
- Firefight, Patient, Bed rest, and Basic should be set to 1 for everybody. The former three can be extremely important to handle immediately. You want your colonists fighting fires all the time, so that your rice fields won't burn to ashes. You want colonists resting constantly when they get the plague. If a colonist is resting just because of a single bruise, then you can lower the priority of rest for a while. Just make sure to turn it back on soon.
- Set things you want first... higher priority. Your grower should be growing at the highest priority. At the very start of the game, set Hauling to 1 so that you can move everything to your base.
- Even if a colonist is not great at Intellectual, set Research at priority 4. You cannot fail research, and research is better than being idle. Multiple pawns can research at the same time, at no penalty, if you have multiple research benches.
- The same principle applies to Craft and the Crafting skill. Stonecutting is valuable work that can be done by (almost) anyone. It's better to have an otherwise idle colonist cut stone, than a colonist with other work to do.
Priorities are relative. Some player like to have every task set to 2 or lower, only raising something to 1 when it needs to happen immediately.
Schedule
Next to the Work tab is the Schedule tab.

It contains 4 different settings:
- Anything: If tired, go sleep. If bored, go recreate (relax). Otherwise work.
- Recreation: If tired, go sleep. Then recreate. Once recreation meter is full, work.
- Work: Work. Ignore all needs (except food).
- Sleep: Sleep. If not tired, go work.
The most important takeaway is that the default schedule is perfectly fine! When assigned to "Anything", colonists will work, and automatically take care of their needs when needed. Mood is very important in RimWorld, so let your colonists recreate. And they'll sleep at night. Colonists get a penalty for working in the darkness, so avoid working at night whenever possible.
If a colonist is sleeping, they will continue to sleep even if they are assigned to "Anything" or "Recreation" at the current time (i.e., assigning Recreation won't wake colonists up). "Work" immediately wakes colonists up.
Combat
Sooner or later, your colony will be attacked by enemies. With Cassandra Classic / Phoebe Chillax, your very first enemy will be a small, manhunter animal.
Combat basics

1. General
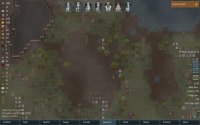
- Draft your colonists to enter combat mode. Select the colonist, hit the "Draft" gizmo or the R key, and they will enter the drafted state.
- Select a drafted colonist, and right click a tile to move them. You can select multiple colonists and order them to move to 1 place.
- Use the gizmos on the bottom of the screen to order your colonists to do other things.
- Colonists cannot be directed to stand on the same tile. However, colonists can pass through other colonists, if ordered to move past each other.
- Colonists cannot pass through enemies under usual circumstances. Enemies cannot pass through colonists under usual circumstances.
2. Melee
- Select a colonist and right click an enemy to order a melee attack. You can also use the "Melee attack" gizmo on the bottom of the screen.
- Pawns are in "melee range" if they are directly adjacent to each other.
- Enemies cannot fire their ranged weapon at all if they are engaged in melee. You cannot fire a ranged weapon at an enemy in melee range.
- Note that your colonists can fire at other enemies that aren't in melee range, even if they are being attacked in melee.

3. Ranged
- Pawns with a ranged weapon will automatically fire it, if there's an enemy in range (and if they aren't in melee combat).
- Pawns cannot fire through walls or other impassible objects. These objects block "line of sight".
- If a pawn is directly adjacent to cover, like sandbags, or barricades, they will use said cover. You can fire over sandbags and the like. Cover blocks ranged attacks (it's useless in a melee fight.)
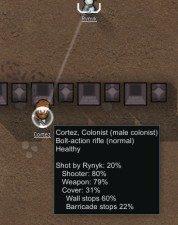
- Friendly fire can occur, ONLY IF a friendly colonist is more than 5 tiles away AND if they are in line of fire. The picture in the right shows the area in which colonists are "immune" to friendly fire. So long as pawns are in the 5-tile radius, friendly fire will not happen.
Defensive structures
If you're fighting a single manhunting rat, then 3 colonists should just clobber it, no matter how you fight it. But later on, you'll have to fight more and more enemies.
The trick with RimWorld's combat is defensive positioning. You are almost always the defender, so you can make enemies conform to you. For both melee and ranged combat, a good defensive setup can go a long way.

Ranged
For ranged combat, you'll want the best possible cover, and want enemies to have the least possible cover.
- The best possible cover is the wall (75% cover). However, pawns cannot shoot through walls. What happens is that a pawn "leans out" of a wall to fire from it. This limits the angle in which colonists can shoot (though it also limits the angle which enemies can shoot, too).
- Barricades and sandbags are the next best cover (55% cover), and they allow pawns to fire through just fine. Both items are identical other than the materials used to make them.
Thus, the best possible cover is a combination of walls and sandbags/barricades. Walls are your main source of cover. Gaps are necessary to allow colonists to shoot through, and you might as well fill them with other forms of cover.
Since colonists have to lean out of the wall to fire, angled shots can partially bypass the wall's cover. In this case, the barricade/sandbag will block some shots. If you don't ever fight enemies at an angle, then the barricades can technically be foregone. If you want a wider angle to fire at, then include larger barricade gaps between each wall segment.
Colonists "lean out" of a wall whenever they'd fire.
The barricades in-between walls can block shots at an angle.


Melee
For melee combat, you'll want to use walls and positioning to give the best advantage to your colonists.
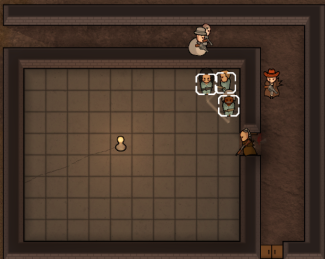
- The melee block (pictured right). Basically, a hallway. 3 melee fighters hit 1 melee enemy in a choke point. Your ranged fighters can shoot behind melee fighters. Melee block tactics are extremely effective against groups of melee enemies.
- Use structures to your advantage. The main disadvantage of melee is that you have to approach enemies. So why not have enemies approach you? Use walls to prevent enemy fire, and they'll walk right into you. The picture below demonstrates an example of an "ambush" - force enemies through corners, and force them into melee.

Putting it together
Here is an example of how you can use both melee and ranged structures to your advantage. This is by no means the only way to defend your colony. If you want more options, check out the defense structures article.
The same "ambush" picture as the above.
Can also be used as a melee block.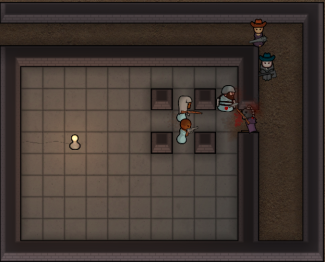
Now give your ranged pawns the best cover.
This also gives ranged enemies, cover, too;
melee them down.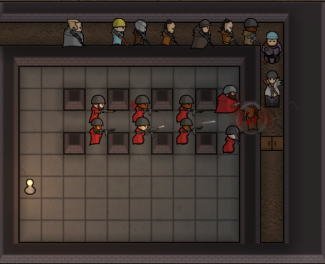
Barricades prevent enemies from standing on them, which prevents them using the wall as cover.
This is the foundation of a proper "killbox".


Tending
No matter how good your tactics are, your colonists will eventually get injured and need to rest.
A doctor will "tend" to a pawn when they are injured or sick. Tending makes injuries heal faster, stop wounds from bleeding, and slows the progression of a disease. Medicine does not heal injuries or disease on its own. Medicine just increases the quality of the tend, which makes the tend more effective (faster healing, etc.).

How / when to tend
- Tend on the field. Draft your doctor (if they aren't drafted already). Select the doctor, right click a pawn, and click "Tend" or "Tend (without medicine)". Tending on the field is less effective than in a bed. But if a colonist is rapidly bleeding out, it doesn't matter how effective the tend is.
If you want your doctors to be able to tend on the field with medicine, go to the Assign tab, and adjust the medicine selection on the right. (Medicine has the advantage of healing multiple bleeding wounds at a time). - Tend in a bed. If your colonists are assigned to "Bed rest" in the Work tab, they will automatically rest in bed. Then, a doctor will tend to them as a work task. You do not need a bed set to "Medical" for colonists to rest in it. You can force colonists to rest by selecting the colonist, and right clicking the bed (for this purpose, the bed must be set to medical).
- Rescue the colonist, and then tend to them. If a colonist is downed, then to tend in bend, you'll need to rescue them first. Select your doctor, right click a downed colonist, and click "Rescue". Afterwards, they can be tended normally.
Using medicine
Correct resource allocation is key. Using your best medicine for a few bruises is a waste.

In the colonist's Assign tab, you can assign what medicine a doctor will use on them. (See left)
 Doctor care, no medicine - You don't need any medicine for bruises, small cuts, and even large cuts. And you may need to tend w/o medicine in emergencies, where grabbing medicine from storage would take too long.
 Herbal medicine (or worse) - Herbal medicine is worse than regular medicine, but the advantage is that you can grow herbal medicine on your own. Healroot can be sown as soon as you have a colonist with Plants 8 or higher. Herbal medicine can be used against diseases. If you have enough, you can use herbal medicine for general injuries to reduce the risk of infection.
 Industrial medicine (or worse) - Industrial medicine (or just "medicine", the blue one) is a high quality medicine. As mentioned above, using regular medicine is a waste for regular injuries, unless a colonist is rapidly bleeding out. Use medicine against diseases and surgeries. Diseases can be fatal if untreated. Surgeries are likely to fail without great medicine.
 Best quality medicine - Glitterworld medicine is the best medicine in the game. The most expensive medicine, glitterworld should be used like industrial medicine, i.e. for disease and surgery.
You can also choose whenever to use medicine or not, if you draft your doctor. Doctors can only draft-tend with medicine if they were already carrying it (to set doctors to carry, also see the Assign tab).
Set your colonists to either "doctor care, no medicine" OR "herbal medicine" for now. If a disease pops up, set relevant colonists back to industrial medicine.
The Next Few Days
Cooking with the bill system
If you've played the tutorial, you've likely been introduced to the bill system already. If not, then cooking is a good start. Your rice will be ready to harvest soon, and you'll need to cook it.
Select the stove, and click "Add Bill" on the top of the menu. Then, select a meal you want. Simple meals are the fastest to cook and use the least food.
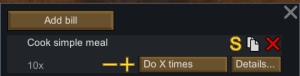
Do 'X' times means do <10> times, then stop forever. Not automated.

Click on the "Do 'X' Times" button in order to change the bill. There are 2 more options - "Do until you have X", and "Do Forever".
Since each colonist eats ~2 meals per day, you will want to set a bill that cooks 2 meals per colonist. Select "Do until you have X", and then you can change the number of meals to 6 (or whatever number you need). You may want to make a few more meals than needed, as a "buffer" in case your cook is injured.
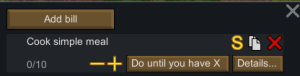
Do until you have 'X' means cook <10> meals, then stop, then start when there's less than 10.
This setting only checks for items inside stockpile zones.

If you actually set this in game, you might notice a few inefficiencies. Lets say you have 10 meals already. If a colonist eats 1, your meal count is now 9, which is obviously below 10. Your cook will run all the way back to the stove, cook the meal, then go back to what they were doing. They will walk back and forth each time a colonist eats a single meal.
It'd be better if they waited until there were only a few meals left, then cook all of them at once. Thankfully, there is a setting for this! Go into "Details" button, and you'll get this screen.
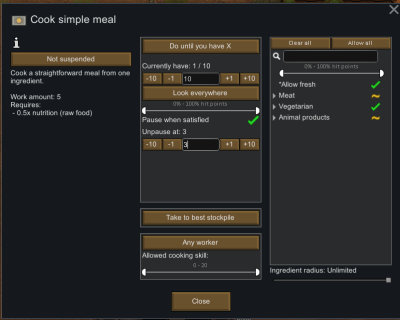
All the details. "Pause Until Satisfied" is the relevant setting here.


You can set the "pause until satisfied" meals to whatever number you want. Start cooking before you hit 0 meals, so that colonists won't eat raw food.
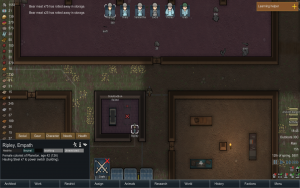
The most efficient cooking set-ups have their food near their stove. Otherwise, your cook will have to walk back and forth between each meal. Your cook will only haul the exact amount required to cook 1 meal, which is doubly inefficient. Ideally, we want food directly next to the stove. So you should do that. (See right)
But under the current bill settings, your cook still hauls each meal to the "best" stockpile zone, then go back to the stove. We want to eliminate this too. There is another setting. Click "Take to best stockpile ", and change it to "Drop on floor". Note that "Do until X" only counts stockpile zones. So place a stockpile under the cook's feet, as seen in the picture to the right. (To do this, make a stockpile, go to stockpile zone settings, turn off all items but raw food, and set the "priority" to Preferred or higher)
With all these settings in place, your cook will stand in place, cook all their meals at once, then leave until you've run out of meals. Cooking is now efficiently automated. There are many other items that use the bill system. With a little adjustment, you can get colonists to do roughly what you want.
Stonecutting
Right now, your base is using wooden walls. Wood burns. Steel also burns in this game (as a wall. Steel floor and steel items don't burn). So you will want to create stone - specifically, stone blocks - relatively quickly. Stone takes a long time to make, but it is worth starting when your colonists have nothing better to do.
To make workable stone blocks, you'll need a stonecutter's table. The stonecutter's table uses the same bill system as the stoves. See the above subsection for details on all that. Each stone chunk produces 20 stone blocks. The specific type of stone is mostly irrelevant at this stage of the game, so you can use any stone if you'd wish.
Stone is best for walls, as it is more durable than both wood and steel. Stone is not good for doors. This is because stone doors open slowly. When you have a wood door surrounded by stone walls, the fire risk is minimal. In this situation, only 1 tile can be set on fire, which is not a problem. Stone can also be used for furniture, though stone beds in particular get a penalty when made out of stone.
Note: When replacing your wood walls, watch out for roof collapses! Roof will collapse if there isn't a wall within 6 tiles in it. With this in mind, replace your walls in small sections at a time. You can also use a remove roof area to remove the roof, destroy your walls, then rebuild the roof (with a build roof area).
Note 2: Stone chunks, the precursor to stone blocks, cannot be placed on shelves.
Freezer
A freezer is a room brought below 0 °C (32 °F), using coolers. It is often recommended to build one. But you don't always need it. After all, Lost Tribes don't start with cooling technology at all. Let's go over all the reasons to (not) build a freezer, then show how to build one anyways.
Food, specifically, vegetable food, lasts for a surprisingly long time.
- You can rely entirely on vegetarian food for the entire game. (See Planting crops)
- Rice, when indoors, lasts for 40 days. Corn lasts for 60 days. Potatoes last for 30 days.
- In a year-round growing biome, you can harvest 5 batches of rice by the time the first one rots. You can harvest 3 batches of corn by the time the first one rots.
- In a biome with winter, you can let nature refrigerate for you. If you have a 40/60 growing season, rice lasts for 60 days (40 days spoiling, 20 days frozen). Unless you're in a tundra, you should get at least 1 harvest a season.
- If you let rice rot after 5 full harvests, then you still have 4 harvests of rice in reserve. You didn't need any of that spoiled rice in the first place. Even if one of your harvests is ruined by blight, you have 3 full harvests of surplus.
- You didn't need any of that spoiled rice in the first place. It's ok to let it rot.
Meals rot in ~4 days. But, there's a simple solution. Don't cook them yet. You only need to cook 1-2 days worth of food at a time. Minor mental breaks only last for a day or so, and injuries heal in a few days.
Building a Freezer
Some foods will quickly rot away in storage unless they are refrigerated. To prevent this food waste, the colony will need access to power to produce electricity and build coolers. There are a variety of original ideas when designing power grid planning. Constructing these devices require components that can be mined, traded, manufactured, and salvaged from ship chunks. In the early game, colonists have limited supplies, so treat them as delicate devices. Components are not easily replaceable and should be guarded with care.
Coolers are considered a wall tile. They are bi-directional; blue indicates cold and red means heat, so make sure to rotate blue towards the room you want cooled. Once constructed and powered on, the device is set up and operating automatically. The room must be enclosed completely and roofed in order to actually be cooled.
The default temperature is always 21 °C (69.8 °F), but that won't help, so use the buttons to adjust. The cooler will attempt to reach the designated value, but it all depends on leaving unroofed areas and the room's size. Often one cooler alone is not enough. Check the tooltips by hovering the mouse over to detect if the desired temperature has been achieved. The seasons will dictate the amount of cooling or heat that is necessary for a given room. Check with colonists to determine what adjustments are required.
Notification: Food has rotted away in storage
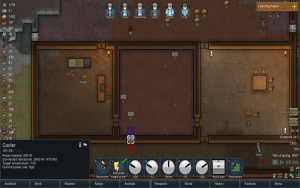
Cooler settings


Research
After your colonists have finished all their "establishing" tasks (construction, planting, etc.), they will be idle. What better way to pass the time than to research? If research is set to a priority in the Work tab, and if you have selected a project to research, then pawns will research.
Which research can depend a lot on playstyle and biome. Rough suggestions:
- A(nother) source of power. Your current sources of power work, but they aren't 100% ideal. Wind turbines aren't consistent power. Wood-fired generators require constant fueling.
- Solar Panels (600pts) + Batteries (400pts) - Solar generators are much more consistent than wind turbines; they work in the day, but not in night. Batteries allow you to store daytime power and use it during the night.
- Watermill generator (700pts) - Watermill generators provide constant power, and are cheaper than solar generators. However, they require a river or creek to function. Don't research this if you haven't settled on a river/creek tile. Ocean doesn't count.
- Geothermal Generator (3200pts) - Geothermal generators offer a lot of power, and it's 100% consistent. However, this research project takes a very long time to complete, so it isn't recommended for newcomers.
- Machining and Weaponsmithing. Allows you to create your own weapons, armor, and more.
- Smithing (700pts) -> Machining (1000pts): Smithing allows you to create melee weapons, and is required in order to research Machining. Machining allows you to create all sorts of advanced items.
- Gunsmithing (500pts) -> Blowback Operation (500pts) -> Gas Operation (1000pts): The gunmaking tree, unlocked after Smithing. Guns are guns, they help defend. You can loot guns from raiders, but they will often be poor quality. The guns from Gas Operation are generally an upgrade from previous guns, so it is recommended to wait until you get to Gas Operation.
- Microelectronics (3000pts). Microelectronics is required to unlock more advanced technology, including the hi-tech research bench, allowing you to research faster. However, it is a very long project, so you should research other (more immediately useful) projects first.
Intermediate Early Stage
At this stage, you should have:
- Food stored to feed your colonists.
- A barracks, kitchen, and dining room (tables and chairs).
- Mood managed so that colonists won't go on mental breaks.
- You got to a point where life threat is external rather than internal.
Basic Defense
For a more in-depth guide see Defense structures.
For strategies on defeating the enemy, see Defense tactics.
Always consider your defenses BEFORE you need them. Nothing is instant in Rimworld, so trying to scramble something last minute will be difficult if you aren't dead already from lack of preparation.
Simple Wall
In the easiest difficulty games, such as Community Builder, raids will be mostly single enemies attacking your colony. At this point, predator attacks may be a greater threat than human raiders. Rival factions will announce themselves and arrive at the edge of the map. Predators can come at any moment.
Enemies will not try and bust down doors. Enemy pathfinding works as follows: If an enemy can path to a colonist, without breaking a wall or door, they will do so. If an enemy cannot path to a colonist, they will attack "vulnerable" furniture that they can access. If they can't access anything without breaking a wall or door, they will attack random walls. Enemies do not target doors unless they see somebody come inside one.
Therefore, by creating openings in your wall, you can funnel enemies into one place. So it's easy to trick the hostile AI pawns by laying spike traps where areas walls are not built (either because it wasn't worth it or you just can't rise them over water).

It's easier to build walls by filling in the gaps between mountain and old ruins. Walls will be of better use to protect your plantations from herbivorous animals and any other locations where your pawns tend to walk around the limits of your colony to avoid said predator attacks.
Make sure you clear your Home zone (the blue one) so that pawns do not go beyond the wall by selecting Architect > Zone/Area > Clear allowed area > Home.
Hunting
You may need meat for food or fur for apparel. Consider your current situation and pick a target accordingly. Don't go against a thrumbo with just 3 poorly equipped dudes. Of course, the smaller the target, the lesser the gain, but it's still best to play it safe.
When you select animals to be hunted, the game will assign one pawn to go after it, and considering your character may be unskilled, it's best if more than one can go hunt for the needed items. Instead of just assigning targets to hunt, use the alternative method of drafting multiple characters and then right-click, the red cross equals the hunting task. This also allows you to use melee weapons, which have a much better chance at hitting and killing smaller animals (though more of a death wish against large ones).
Once you have hunted your prey, you will need a butcher table to process the corpse into edible meat and leather as well. Make sure to get the prey back home, as leaving it there too long may cause it to deteriorate and start rotting (at which point it's wasted) or be eaten by opportunistic predators.
On the other hand, predators like bears, for example, feed on deer. Since the body mass is large, it's often left without getting completely eaten, you can pick the leftovers for yourself without risking manhunter revenge.

Meat can be cooked into fine meals in conjunction with plant-based foods. They provide +5 mood for a day, which is good for lifting colonists' spirits, even well into the mid-game.
Leather provides better protection than cloth and almost the same as synthread, making it a decent replacement for your Synthread starter clothes, which can only be obtained through trading.
Apparel

The Crashlanded scenario starts with characters wearing synthread gear, which is resistant enough to last a year before deteriorating. So making new clothes isn't a high priority. But it can be done. If you don't plan on hunting animals, it's best if you grow cotton.
For a pawn assigned to Tailor work swiftly, it's convenient if both the fabric storage is somewhat close and with a next room designated to store finished wear. Characters react faster to available clothing if the product is listed in the items column instead of just lying by the bench.
Fire Handling
Fire can cause severe damage to your colony, especially if built mainly of wood, it can quickly spread through your base. Be watchful when Dry thunderstorms or flashstorms start to hit the ground. Rainy thunderstorms are less dangerous as the fires quickly get put out by the rain.
- One way to prevent a major catastrophe is by cutting the grass surrounding your structures. Note that this will take some time and you will have to redo it. You can also install stone floors if you want to prevent plant growth.
- Lightning strikes will continue as long as the storm lasts, and the first fires may hit far from home but not all of them, and since they will be hitting several spots. Regardless of how far they may be, it's still best to take care of them all as fire tends to expand very fast and by the time you realize, it may be very close already and so expansive that it may be harder to deal with than when it started small. Contain the fire, by fighting the other fire extensions and aim to close towards the center rather than just putting it out from one side. As you combat this hazard, always keep watch at the rest of the map, it could very well be that another area was lit and it's more threatening than your current spot. Rain may or not come afterward, if it does, it will handle the rest for you but don't rely on luck, keep taking care of fire anyways. While fire fighting-assigned colonists will try to do their tasks, the AI isn't wise enough to handle it and you will have to draft your pawns and manually assign their place. Do not wait until they wake up, interrupt their sleep or it will be too late.
Grass cutting to hold spree.
Dry thunderstorm.
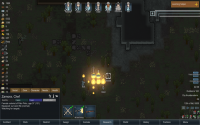
Fire control.
3 different spots on map.
Rain putting off fire.


Mining
While you won't mine at the very beginning of a game, it's wise to take a look at the map for exposed ore. Steel, compacted machinery, and plasteel can all be very useful throughout the game. When you want to mine: click on the ores, and then press on Mine.

Compacted steel

Compacted machinery

Compacted plasteel

Gold ore

Silver ore

Jade


Temperature control
Only rooms that are both enclosed by walls and have more than 75% of the un-walled, internal tiles roofed can be temperature controlled.
Campfires provide heat as long as they are lit and can be used as an early or emergency heat source. Electrical heater from will be your primary heating method once a consistent supply of electricity is available. Additionally, several other objects, including torch lamps, generators, and electric smelters also put out heat but these can typically only provide supplementary heating.
You can use coolers to keep cool in hot biomes and for your freezer (blue side faces in). Remember to set the target temperature below 0 °C (32 °F) for freezers. Before electricity or in rooms where the temperature need to be lowered but have no easy access to unroofed tiles to vent heat, such as under a mountain, you can use the passive cooler. Although not as powerful as the Cooler and unable to cool rooms below 20 °C (68 °F), it does not require power nor components to maintain.
Performing an operation
Normally you won't need to operate on someone that early in-game, but you should always get prepared in case you do.
You will need a healthy high-skill surgeon, a clean room for your surgeons to operate, and decent-quality medicine. Herbal medicine won't do any kind of surgery except if your surgeon has received mid-late game bionic enhancement.
Quality Furniture

Quality is a feature that can impact the function of the building:
- Higher quality beds are more comfortable, and colonists in a high quality bed will require less sleep.
- Higher quality dining chairs and armchairs are also more comfortable.
- Higher quality chess tables, poker tables, etc. give more Recreation at a time, meaning your colonists need less time to recreate.
- All furniture is more beautiful at higher qualities.
The beauty of non-sculpture furniture is almost negligible. For example, there isn't much point to a high quality table, as it is doesn't function any better than a regular table. However, it may be worthwhile to "farm" for high quality beds or other impactful items. To do this, construct and deconstruct a desired furniture until you get the quality you want.
Decoration
Beauty is a stat that all pawns desire. The more beautiful the room is, the more impressive it is. In addition, pawns have their own beauty requirements. Raising beauty of a common area can make a big impact on overall colonist mood.
For example, if you can reach 85 impressiveness in 1 room, you can get:
- +5 Very impressive dining room
- +5 Very impressive recreation room (place horseshoes pin in your dining room)
- Extra mood for colonists while they are in the area.
Beauty can be increased by the following ways:
- Furniture: Plant pots, can be placed anywhere and requires a gardener to fill the pot. Watch out for plant pots in bedrooms, as the gardener can interrupt the occupant's sleep.
- Flooring: can be laid on any ground except water. Gives a movement bonus and most are non-flammable (except wood floors and carpets). Requires a considerable amount of material, except when smoothing rough stone areas. A player can access carpets after researching carpet making and harvesting cotton, which demands plantation wait. There's also stone flooring by using bricks cut at the stonecutter's table meaning a prior step and hauling pick-ups.
- Sculptures crafted at a art bench. The artist's crafting skill will determine the resulting outcome of beauty, not always providing a positive effect, the used material will also factor in. Since sculptures attract viewers, they are convenient when installed in public spaces rather than bedrooms.
Other Guides
- Colony Building Guide - building a successful base at any stage
- Intermediate Midgame Guide - continuing expansion of your base
- War crimes - the different war crimes you may commit
- Progression
- Quickstart Guides • Basics • Intermediate Midgame Guide • Advanced Endgame Guide • Ending the game
- Scenarios
- Lost Tribe Guide • Rich Explorer Guide • Naked Brutality Guide • The Mechanitor Guide

- Survival
- Extreme Heat Guide • Extreme Cold Guide • Extreme Desert Guide • Ice Sheet Guide • Sea Ice Guide • Events Guide
- Combat
- Defense tactics • Offense tactics • Weapon Guide
- Construction
- Colony Building Guide • Defense structures
- Production
- Food production • Money making guide
- Other
- Skill Training • Permadeath save conversion guide •
Ideology Min-Maxing