Difference between revisions of "Defense tactics"
PigeonGuru (talk | contribs) |
PigeonGuru (talk | contribs) |
||
| Line 454: | Line 454: | ||
==== Weapons ==== | ==== Weapons ==== | ||
| − | Due to the mechanoids spawning very close together after spawning, | + | High-DPS weapons are optimal at destroying both the ship part and its defending mechanoids. Range does not matter that much as you can simply build sandbags close to the ship for effective cover. |
| + | |||
| + | Due to the mechanoids spawning very close together after spawning, the [[minigun]] are extremely effective. The minigun can also be used to quickly demolish the ship part with its unparalleled DPS. Aim at the ship part and the minigun can hit a lot of the mechanoids near it as well. | ||
Explosive weapons are useful, but keep in mind that the ship part will block the explosion, so a single explosion cannot wipe out all the mechanoids. Like the minigun, they do heavy damage to the ship part. | Explosive weapons are useful, but keep in mind that the ship part will block the explosion, so a single explosion cannot wipe out all the mechanoids. Like the minigun, they do heavy damage to the ship part. | ||
Revision as of 04:02, 24 June 2017
Getting attacked, whether by tribals, pirates or hordes of angry animals is a common event in the rimworlds. Defense against these attacks is one of the keys to having a successful colony.
This page details different tactics for defense and visualizations of them, from all stages of the game.
With Alpha 17, raiders have become smarter. You will need better tactics to defend against raider threats.
Humanlike Raiders
Raiders will attack randomly chosen constructed objects and colonists. They will not attack natural rock walls (not the case for sappers), animals (unless hostile or tamed) or unpowered turrets. They will also attack prisoners if they are captured from their enemy factions.
Raiders will usually set fire to crops in growing zones, power generation or conduits, walls, nutrient paste dispensers, equipment racks, orbital trade beacons; they will melee-attack lamps, beds, stools, short tables, long tables, and doors; they also use molotovs and frag grenades on turrets, sandbags, or other targets, and some use EMP grenades to stun your turrets.
Raiders will prioritize firing on colonists or turrets when those colonists or turrets are firing on them, but will otherwise prioritize random objects, meaning you can put doors or walls near your defenses to temporarily distract them.
Raider Preparation
Raiders will sometimes start by standing around in a group where they spawned and will continue this until they see a colonist nearby or they hit a certain preparation time limit, at which point they begin the assault. Because a colonist can set them off early, you can plan out the time you want them to attack. It is generally best to set them off early if you're well-prepared, to avoid potentially troublesome scenarios such as having no power when their timer runs out. Conversely, you should not set them off early if your defense is not prepared. Note that raiders usually take less than one day to begin, meaning that if there is an eclipse and you rely on Solar generators, you should not wait for them and should instead set them off early while you still have some power left.
Raider Equipment
Raiders spawn with randomized equipment depending on their weapon and clothing budget and their raider type.
Apparel
They can range from only wearing a tattered pair of pants to armor vests with power armor helmets. Mercenary slashers are special in that they are the only raider type to spawn with shield belts. Tribals always come in tribalwear, with tuques and parkas only if necessary.
In cold environments, they will come in wearing parkas or tuques, protecting them from temperatures up to -70°C. They don't usually come in wearing dusters or cowboy hats in hot areas, making them vulnerable to the heat.
Their apparel is often damaged to some degree, making them less protective against attacks. They tend to use leather or cloth clothes, which don't provide very good protection, only occasionally using the more protective devilstrand or hyperweave.
While mid-late game pirates can come with 50% or above sharp protection, with quality apparel you can push yours to have more than 70% easily. This gives you the upper hand against the not-so-well protected pirates by allowing to take more hits in battle.
Weapons
They spawn with whatever weapons their faction is willing to provide them. They can charge at your colonists with mid-class spears and longswords, or basic clubs or shivs.
They often come equipped with a variety of ranged weapons too- a broken pistol, a decent slugthrower, a long ranged sniper rifle, an advanced charge rifle, high damage miniguns or even explosive weapons are all part of their arsenal. Tribals however always come equipped with bows or pila.
Weapons are assigned at random, meaning that more often than not raiders don't get to use a weapon appropriate for their skills; brawlers can often be seen charging into battle with a gun and a -20 mood penalty, supported by their novice snipers that learnt their skills in FPS shooters (hence barely able to hit at any range) and skilled shooters wielding a melee weapon that they're more inclined to try to fire with than bash with.
If you have your colonists equip suitable weapons according to their skills, you already have a great advantage over the raiders. You can have gunners actually capable of properly connecting shots, and melee brawlers that rarely ever miss and more likely to dodge enemy attacks.
Defensive Tactics
Siege defense
During a siege, raiders go to a location outside your base, receive materials via drop pod and will proceed to build a simple mortar camp. The mortar camp will generally have 2 mortars (incendiary or regular varieties) and sandbags surrounding the mortars facing your base.
Siege camp under construction.
Finished siege camp with 2 incendiary mortars.


When faced with a siege, there are a few coping strategies you can use.
You can choose to either to assault the mortar camp or wait it out and repair the damage as best as you can. The choice mainly depends on the surroundings of the mortar camp and your base's position. If your base is located under a mountain (your base tiles will read Overhead Mountain when you hover your cursor over them), the mortar shells won't be able to hit those tiles at all! This makes deep mining a very effective strategy against heavy bombardment. If you don't build your base into a mountain, you should at least consider digging out at least one panic room for your colonists to hide within from the shells.
Camp assault
If you assault their camp, one possibility is sniping either the shells or the mortars, hoping an explosion kills many of the raiders. If you want to leave those intact, you can snipe the raiders themselves. Keep in mind that killing enough of them prompts them to assault your colony directly instead of continuing their siege. Killing them early enough will result in most of their items intact, which you can take for your own possession.
Unlike most defensive situations, this time they will have the advantage of good cover on their side. You will have to find suitable cover, such as rock chunks, which you can fire from.
If you really need to, you can wait for them to sleep, then steal their supplies and wait for them to send more. Free food and mortar shells.
Early interception
The best time to attack them is when they've just started building up their camp. At this time their resources would have arrived, and they will be busy loading them up into the blueprints to build their rudimentary base.
Attacking them at this time means that they will be forced to use rock chunks just like you do, instead of having the superior sandbags on their side. They also don't have any mortars set up yet that can fire on you.
Do not attack them too early otherwise they will flee before they receive their supply drops, which you could've stolen.
Countering with mortars
If you have your own mortars, you can use them to fire back at the raiders.
Regular mortars are not very good at countering sieges, given the inaccuracy; however, if you're lucky, you can always take out some of the raiders, or even the mortars.
Incendiary mortars are an effective way of distracting sieges as the raiders will be preoccupied with extinguishing the resultant flames. This way, 2 mortars are enough to keep them from doing any activity other than firefighting, unless it is raining or there are no flammables nearby.
EMP mortars are extremely efficient siege-breakers; they can easily detonate the mortar shells, killing nearby raiders, as well as stun the mortars, preventing them from firing. Sometimes only 1-2 shells are enough to prompt them to attack.
Melee charges
Pirates or Outlanders can come with all melee charges complete with shield belts. This can prove an extreme threat to colonies, especially as they charge towards the colonists directly with their shield belts blocking large amounts of gunfire or trap damage.
However, they are often poorly equipped, aside from the shields; they aren't particularly well-clothed or armored, and their weapons are often of low quality. They are also highly vulnerable when their shields are down.
Ideally you will want to have a few brawlers on your own, preferably with better equipment, such as full armor and quality weapons to fight the incoming charge. Let them hold off the melee rush in the front while the shooters fire at them from behind.
If you happen to not have enough brawlers to handle the charge, attempt to concentrate fire to break individual shields, then kill any unshielded raiders. If they do come close, get your colonists to fire point-blank at them if it deals more damage than unarmed, otherwise assign 2 colonists to beat up each attacker.
Weapons
Sniper rifles are capable of breaking a weaker shield with a single shot. Combined with their long range, this makes them a good supporting weapon to weaken an incoming charge.
When they close in, use high-DPS single-target weapons to break down their shields.
Explosive weapons are useful at breaking their shields, though the shields block the entire explosion so a single explosion won't hurt them much.
Incendiary weapons penetrate the shield and set the raider on fire, distracting them. While their shields block gunfire, the distraction makes it easier for it to be broken, and makes there be fewer enemies engaging your colonists at a time.
EMP weapons can be used to devastating effect by downing their shields, leaving them to the mercy of your colonists' gunfire or mortar barrages. A lucky hit with an EMP mortar can take out most of the shields in a melee raid.
Full melee charge at the edge of the map, with everyone shielded and equipped with melee weapons.

Dealing with Explosives
Raiders wielding explosives can be a serious threat to colonists, especially those equipped with the Doomsday rocket launcher or triple rocket launcher. Rocket-wielding Pirates often spawn in mid-game raids, and having a coping strategy is crucial to safeguarding your colonists.
An important thing to note is that explosives are not blocked by cover, but are stopped by walls. This means your colonists covering behind sandbags will be hurt by the explosion, but not those hiding behind a wall.
Thrown explosives
Raiders with thrown explosives are horribly short-ranged, giving your colonists a chance to shoot them down before they can even throw a single grenade.
As frag grenades have a fuse and small radius, evacuating colonists can safely avoid the damage. Remember to keep watch on your colonists all times when fighting so you can evacuate colonists in time if you see a grenade flying in.
Molotov cocktails explode instantly, and can set your colonists on fire; while they do not cause as much direct damage as frags, they can cause your colonists to exit cover and run around erratically, exposing them to gunfire. Downed colonists will certainly die from fire unless extinguished or rescued. The fires started can also be damaging to your base and can burn down vital structures such as power conduits and generators.
Drafted colonists will automatically extinguish fires near them, though you may still need to manually have them extinguish fires to ahve them under control. It is possible for other colonists to put out a flaming colonist; do so to prevent them from taking more damage and leaving cover.
Incendiary launchers are functionally the same, however they have a longer range, making them harder to deal with.
EMP grenades are less dangerous overall, as they do no physical damage; still, they pose some threat to melee brawlers by downing their shields, as well as stun turrets. Thus, turrets should be backed by colonists who cannot be stunned by EMP, and melee colonists wearing shields should be evacuated.
Rocket launchers
Raiders with rocket launchers are arguably more dangerous, due to their long range and high damage explosive attacks that can easily down, maim or kill several colonists at once. The Doomsday rocket launcher has the ability to set large areas on fire, devastating any flammables in your colony while injuring a large group, while the triple rocket launcher can kill colonists outright with its 3-round burst.
However, they are not good shooters; they get distracted quite easily, wasting their rocket launcher on animals or lone colonists. This can be exploited simply by making a colonist equipped with a shield belt run towards them. They will often hit their allies, especially when using the Doomsday rocket launcher, while the shield will block the damage from the explosion.
This is somewhat risky as your colonist's shield is likely to be broken from the resulting concentrated gunfire even if it did survive the blast; afterwards, your colonist may be injured, downed or even killed. Still better than having many colonists die from a rocket launcher though. If they have a better target with less possible friendly fire, they will also attack them instead. You have to make that colonist the only available target for them to consider attacking.
Alternatively, you can use one of your more expendable battle animals to charge the attackers; this has the same effect except your animal will most likely die from the rockets.
Sappers
Sappers will mine and blast their way through any obstacles, such as natural or constructed walls, though avoiding high-health ore veins. They will also try to circumvent your defenses to attack from another direction. In an open base, sappers can usually be treated as a normal bunch of raiders. However, they are a great threat to killbox-dependent, mountain or walled bases, or any form of defense that doesn't rely on colonists.
Their grenadiers and miners deal heavy damage to structures; even the toughest plasteel walls will not stop them for long. Thus, do not rely on perimeter walls to hold them off. They will also persistently try to tunnel into your base, continuing even if their digger is killed or the raiding party is under attack.
With enough manpower, you can also choose to intercept them while they're tunneling into your base. They tend not to use cover when tunneling., so you can catch them by surprise. Concentrated fire is devastating in a tunnel, and you can quickly dispatch any diggers- provided you don't get noticed.
If you're in a mountain base you can draft a few melee pawns to wait at the entrance, as well as a few ranged pawns facing the entrance to fire down the tunnel. When they do break in you will already have prepared to face the raiders and can pour a stream of lead right into their face or cut them into pieces.
Remember to cover up any tunnels they dig, as they open up another entrance for raiders to come straight into your base. Or you can fortify it and turn it into a booby-trapped chokepoint to catch unsuspecting raiders seeking direct entry.
You can 'funnel' sappers by using turrets placed inside your base; sappers will avoid these, and will go to an area without the turrets. Keep in mind that you will have to kill them by drafting colonists instead of relying on your turrets.
Drop pod attacks
Sometimes pirates or mechanoids will come in drop pods. If they land at the edges, they can be treated as a normal raid party, unless you have expanded to the edges with your walls, in which they will land inside your base. To defend against this, have a second line of defenses inside your base so you can deny the drop-podders easy entry into your base.
Once they choose to land in the center, however, things will get ugly. By landing in the middle, they bypass most of your conventional defenses, and you can't use your cover advantage against them. Trying to bombard them with mortars or use other explosive weapons also causes great collateral damage to your structures, assuming they didn't land within the mortar blind spot.
Fortunately for you, they have a short delay before they open and all hell breaks loose. They also comes in smaller numbers than regular raids.
Once you see them land, you should immediately draft any nearby armed colonists to the site, whether they are your designated soldiers or not. Let them hold off the attackers for a while before your soldiers arrive to help.
Any non-fighting colonists should immediately be evacuated to a nearby area. They may still stay close to help in rescue efforts, pulling out any downed colonists. Make sure it's safe to rescue them- as in rescuers not walking right through the crossfire and back again to get a colonist to the hospital.
Like other raids, raiders will attempt to flee; however, if they land inside enclosed areas of your base they will be trapped allowing your colonists to beat them up and capture them at leisure. You simply need any blunt weapons or even bare fists; in their panic, they won't try to fight back until you're well into beating them up.
Cover
You should use your furniture as cover and fire from behind them. Most of the time they serve as the only source of cover. Be careful as pirates will also utilize the furniture as cover as well; to combat this, attack from multiple sides or use melee fighters. You can also have 2 colonists hiding behind each doorway; they enjoy full cover while firing into the room. Hold the doors open otherwise they can't fire.
It's not practical to build sandbags inside your rooms as they reduce the Beauty of the room, drop pod attacks are rarer than normal raids and the enclosed space makes cover less effective.
You can also use any shielded or heavily armored colonists as meat shields to soak some damage. Send them right in front of your regular ranged units to block damage, while the ranged units fire over their shoulders.
Fire management
As most furniture is flammable, you will need to extinguish any fires if you want to prevent damage.
If you prioritize the defeat of the raiders over the loss of your property, and the walls of the room are fireproof, you can simply let fires burn, or even start some more, while you evacuate the room and close the doors, cooking the raiders alive.
Not effective against mechanoids as they aren't affected by temperature and cannot be set on fire. Incendiary weapons need to score direct hits on them to deal damage.
Equipment
CQB weaponry such as heavy SMGs, pump shotguns, chain shotguns or melee weapons work best to deal with drop pod attacks.
Mid-range high-DPS weapons like the charge rifle or the LMG are also good for clearing out larger rooms.
Long-ranged weapons are less effective due to the confined nature of indoor spaces giving them less space to work effectively, and their lower damage output compared to other weapons.
Explosive or incendiary weapons are not recommended due to the heavy collateral damage when using them indoors, though if you don't care about that, they make excellent room-clearing weapons.
Tribal raids

Tribal raiders come in large numbers, but with relatively poor equipment; as such, it may require different strategy compared to pirate or outlander raids.
Overall, they can deal heavy damage to your colonists; despite not carrying guns or advanced melee weapons, their neolithic weapons can still dish out heavy damage, especially when combined with their sheer numbers. Tribals also tend to be better at combat, with most tribals being acquainted to some combat skill or another.
However, as tribalwear is awful at protection (depending on the material it may even be none) and they do not wear any form of armor, they are easier to kill individually than other raiders.
Their archers are dangerous; their bows can be fired from a somewhat long distance, their pila can easily kill or incapacitate a colonist, and they always come in a large volley. As with most defensive strategies, cover is essential when fighting them.
Warriors are less of a threat as they don't use shields (unlike their pirate counterpart, the mercenary slasher), making them vulnerable to your gunfire.
Removing rock chunks helps in dealing with tribal raiders hiding behind them, making them much easier to hit.
Weapons
You will need sufficient mid-long range firepower to take down tribal archers from a distance, for getting close to them in order to fire your guns is pretty much suicide. Use sniper rifles, bolt-action rifles or assault rifles, as these are the only 3 weapons that can effectively hit archers at maximum range. Tribal archers can fire arrows at up to 32 tiles away, which only these weapons can reach.
Their melee units are best taken down with close-mid ranged weapons that have high stopping power. Charge rifles and chain shotguns work wonders at this range, as well as the pump shotgun and the heavy SMG. Save your long-ranged weapons for taking out archers.
Crowd control is an important aspect in defeating tribal raids. The Minigun or LMG is an effective weapon to use as it can easily mow down groups of raiders from a moderate distance.
Explosive weapons are also useful in crowd control, when used correctly.
- Rocket launchers are single-use, but devastating on crowds. A single hit can easily kill or cripple the unprotected tribals.
- Explosive mortars, while inaccurate, can easily destroy a sizable group of tribals at once if they hit.
- Grenades can hit archers hiding behind cover, taking out a few of them, though you have to risk a colonist or two in order to even get close enough to throw them.
- Incendiary weapons are good at getting pesky archers out of cover for your colonists to hit.
Pacification
If you don't want tribes to send their warriors in the hundreds you should capture, heal and release all incapacitated tribals (though if you see any good potential colonists you should keep them). Later on, when the relations warm a little, you can give them silver to pacify them, and even turn them to your side.
Utilizing animals
The animals on the map, whether tamed or not, can be used to your advantage.
Raiders never come using tamed animals so the advantage of animals on your side is solely yours.
Tamed animal release
With your handlers, you can amass a huge army of animals to charge the enemy. Simply find a good combat-capable animal, tame it, and train it to learn Release.
There are many animals that are good for this purpose. Wild boars are an excellent choice as they can graze, reproduce quickly, move fast and pack a punch for its size. If you like bigger animals, you can also tame elephants or rhinos.
If you want an army of suicide bombers then boomrats are a suitable choice of animal. Boomalopes have a much bigger explosion radius and deal higher melee damage but are much slower and easier to hit, hence being less effective.
Meat shield
The animals surrounding a handler can be used as a convenient meat shield as they take bullets, arrows and other range attacks (but not explosives) for their master. Provided they don't stray too far, they won't receive friendly fire as the shooters simply fire over them. All you need is to train Obedience, instead of Release.
You can also position your colonists behind animals if you're desperate for cover. This works with any animal, even non-tamed, but is less effective as the animal will wander around on its own, while trained animals will surround their master. You also risk having the animals go manhunter and turn on your colonists, especially if the animal is prone to aggression (such as bears, if you're foolhardy enough to use them as cover).
Strategic zoning
Raiders take their sweet time to exterminate any trace of your tamed animals on the map. This can be exploited to your advantage, as long as you're willing to have a few animals valiantly sacrifice themselves.
- Distraction: If you let your animals run all over the place, the raiders may be tied up trying to wipe out the animals. This can give your colonists time to prepare, such as entering defensive positions or running to your mortars to fire a few rounds, as well as scatter the raiders making them much easier to deal with. Raiders wielding rocket launchers also tend to waste them on your animals, leaving your colonists and structures mostly unharmed. However if they see better targets they will come at them instead.
- Animal chokepoint: You can have a chokepoint in your base, combined with a small animal area covering the chokepoint. Raiders will notice the animals and will start attacking, making them fight back and injure or even down the attackers. This method works for any animal, even those that cannot be trained.
Aggravating animals
If you have any easily enraged animals such as timber wolves, cougars, grizzlies, rhinos or others, as well as a very fast colonist (>130% moving; Go-juice, or 2 bionic legs), you can shoot the animals then have the fast colonist lead them right into the raiders. Some of them will stop and engage the animal, causing the animal to switch targets.
It is best that you equip the fast colonist with a shield belt due to the high risk of walking near the enemy- you can even consider it as a suicide mission, given the task at hand.
For this, larger animals are best, as the smaller ones often get killed before they can enter melee range(unless you can enrage multiple at a time, or the enemy is pure melee). The chaos ensued means that the pirates will receive a significant portion of damage from friendly fire in addition to the damage from the animal itself.
A thrumbo can be considered a godsend in a raid; just send 1 straight into the raider hordes, and let 'em rip.
If you have a manhunter pack coincide with a raid, then even better.
Remember, if you can down the animal easily with our colonists, so can the raiders. Try to send just 1 small animal and it will die pretty soon, doing little other than being an annoyance.
Emergency treatment & evacuation
When a colonist is downed or severely injured, you should drag them immediately to the hospital or somewhere outside an active fight, where doctors can patch them up. Don't leave downed colonists in the fight otherwise they risk being hit by a stray bullet and die.
You should always have a few rescue members (preferably doctors) stand near a fight. They can pull out any colonists when they are downed. If possible, give them better protection, and if they need to venture out into the crossfire, try to have colonists shoot at another direction to avoid friendly fire.
If a colonist cannot reach the hospital in time, have them immediately lie down at a temporary sleeping spot safely outside the battlefield. Have the doctor closest to the medicine storage go and treat the colonist ASAP. You will have a higher infection chance this way, but it's faster than having the doctor carry the colonist into the hospital.
Battle tactics
You can face off your opponents in a variety of methods. These methods are more aggressive, and focus more on defeating enemies than holding off against them.
Diffusion & Distraction
Diffusing your opponent consists of separating the melee attackers from the ranged, and dealing with each of them with your melee and ranged colonists.
Distraction makes your opponents attack other less vital targets, slowing their progression in their invasion.
Distraction turrets
Singleton turrets do not deal much damage, but can provide distraction. If you use chunks or sandbags to slow down approaching raiders, you can catch some melee attackers in the explosion as well.
Animal distraction
As said above, letting your tamed animals wander all over the map can seriously hamper enemy progression and spread out the enemies over a large area. They often take so much time that they won't reach firing range so you may have to use your melee colonists instead.
Hit and run
Against slow or static targets you can employ a hit-and-run strategy to weaken them.
You will need several fast-moving long-ranged colonists. Draft them and have them move within range to fire. Once the enemy returns fire, quickly have them leave the enemy's firing range. Repeat until conditions are no longer safe to conduct this attack, such as enemies entering full aggression and charging.
Effective against siege camps and preparing raiders for they tend to stay put at their location until they are aggravated into attacking.
Kiting
This specialized tactic works effectively in some situations, but if you don't use it correctly it's basically a suicide mission.
It involves the use of a fast colonist (depending on the situation, they should have 120-140% or more Moving) running near the enemy to gain their attention. Then, the kiting colonist will proceed to outrun them, while always staying within their attention range. This way, the kiter can distract a group of enemies by leading them around the map. Other colonists can fire on them from a distance.
The kiting colonist should be armored, preferably equipped with shield belts, to guard against the risks involved. The kiter should always stay near the enemy so to grab their attention. If the kiter strays too far away, the enemy will decide to engage other targets instead.
Kiting is extremely high risk. As long as your colonist safely outruns hostiles, you're fine. However, once the enemy catches up, your colonist will be brutally beaten up, shot and cut apart while being unable to escape, unless you are very lucky.
Splitting
When two of your colonists are being chased, you can conduct a split so that the enemy can only chase and down 1 colonist while the other escapes. If one of your colonists has ranged weapons, then you could split and then conduct a kite.
Peeling
If a vulnerable gunner is under attack by melee attackers, you can 'peel' them away using your brawlers. Have them engage the melee attackers, then get the gunner to run away from the enemy. The melee attackers will then focus on your brawlers, allowing your gunner to put some distance between them and the attackers.
Trained animals also automatically peel for their assigned masters, if 'Release animals' is Off. The animals will attack any hostiles coming close rather than straying off to attack distant targets.
Setting 'Release animals' to On right when a colonist in distress near the trainer allows the animals to swarm the attacker, effectively peeling them away from that colonist.
Peeling is often required against enemy melee rushes or manhunter packs, as the gunners are liable to getting swarmed before they can take down enough enemies to lessen the threat visibly.
Note that peeling is a relatively high-risk activity, as you are trying to put a pawn at risk in return for allowing a pawn at greater risk to escape. Peeling pawns should be expendable or decently armored.
Flanking
To flank enemies, have defenders approach the attackers from the sides or the back instead of concentrating fire on the front.
Enemy ranged units often stay in the same spot when engaging your colonists, and they tend to have effective cover facing one direction only, making them vulnerable to flanking. Flanking enemy ranged units can distract them and cause them to lose their cover advantage with attacks coming from multiple sides. Rounding up any survivors fleeing after the attack also becomes easier. However, this also makes you lose the advantage of having high-quality cover such as sandbags on your side.
This works best against entrenched ranged enemies attacking you from one side. They should be occupied with attacking frontal targets so you can creep up to them to unload lead on them from another angle.
Surrounding
If you have enough soldiers and suitable cover you can surround them completely, so they will not be able to escape. Firing from all sides also makes cover ineffective at protecting the raiders, while still allowing you to enjoy the benefit of partial cover if you can find it.
Spaced forces
This tactic involves putting space between each defending member of the colony. Each colonist should ideally stand 1 tile away from another colonist. This reduces the chance of enemy bullets hitting somebody else after missing the original target, and also makes explosive weapons hit fewer colonists.
If you have the space, you can arrange colonists to stand 3 tiles away from each other. That way, crowd control weapons such as miniguns or heavy charge blasters will not be able to hit at all, and explosive weapons have greatly reduced anti-infantry effectiveness.
Tanking
This tactic simply requires you put your shielded or heavily armored colonists before your static gunners to partially soak up gunfire.
As with any tactic that involves putting a colonist as meat shields, this poses a great risk to colonists' lives. If the colonists' shields are downed and they are not well-armored, you will have to get them to retreat behind cover until their shields come back online, otherwise your colonist will be exposed to ruthless gunfire.
Firing at cover
While cover works best against attacks coming straight, it's usually better to fire straight at the target instead of from an angle. If you fire straight at it, only 1 unit of cover will be effective, but if you shoot at a diagonal angle, 2 units of cover will be effective, both being capable of blocking shots, in total contributing to a higher cover effectiveness.
However, if you can get to the point where you're almost firing horizontally at the raiders, then cover becomes nearly ineffective at protecting the raider, allowing many more shots to connect. This often requires you get out of your own cover, so it's not recommended unless you can find suitable cover nearby.
For skilled medium-long range shooters it's best to shoot from a great angle to hit them from the sides.
However for not-so-good or short ranged shooters it's better to directly fire at them instead as the extra distance will make it harder to land hits, or cause the raider to exit firing range.
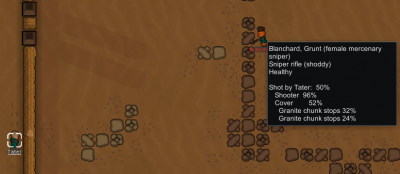
The below shows the difference firing angle makes on the hit chance of a pawn hiding behind cover. All values from Alpha 16.
Firing straight at a raider in cover; 1 stone chunk blocks 40%.
Firing at an angle; 2 stone chunks block 48% total.


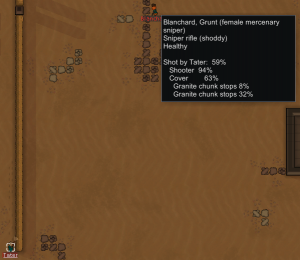
Firing at a greater angle; 2 stone chunks block 37% total.

Firing almost horizontally; 1 granite chunk blocks 8% only.


Melee sortie
Sending groups of melee attackers against enemy shooters can cause great disruption against them.
Charging at entrenched ranged attackers with melee colonists will divert their attention from your own entrenched forces to your charging brawlers. Melee attacking also shuts down ranged attackers by forcing them into melee combat, where they deal significantly less damage.
It can be used to take down annoying long-ranged snipers or small gunner groups as well.
Your colonists must be shielded and preferably heavily armored, otherwise the sheer firepower from both sides can easily overwhelm them. Friendly fire is a serious issue when deploying brawlers, so if you can you should direct fire away from your brawlers.
Note that this isn't a full-on melee assault; in this case you will still have gunners shooting from behind.
Melee Rush
Melee rushing is the tactic of sending your melee attackers to engage hostiles all at once, rather than focusing on shooting them down or sending small parties to take down troublesome enemies. Ranged attackers shooting behind cover from a distance could be a pain to deal with for your own ranged forces, while melee attackers may get close enough to deal heavy damage to the ranged defenders.
It's best to equip your melee colonists with shield belts to protect against heavy fire and distract the ranged attackers. Melee attackers without the protection of shields are highly vulnerable to gunfire, even if heavily armored. Before battle, hide your melee attackers so that they remain hidden until all enemy melee attackers are engaged with either the walls or your ranged, or put them in line with/in front of your gunners for quick deployment and damage absorption.
Melee rushes can work alone, especially with quality equipment; well-equipped melee rushes can hold off an attack and cause raiders to flee despite being slightly outnumbered. They can also attract a great deal of friendly fire from the pirates, as they try to shoot down your brawlers, hitting their allies in the process.
If you aren't afraid of friendly fire, it can be combined with a firing squad from a distance for devastating effects. The brawlers cause chaos within the raiding party while the firing squad lays fire to destroy them while the raiders are trying to cope with your brawlers.
Against all-melee charges, your own melee rush is a good coping strategy, though be prepared to see someone downed or killed in the chaos.
Ghost Town
Stick all your melee colonists in the building closest to the raider path. When any enemy draws close, pop out on them, swarming the 1-2 biggest or closest threats first.
Pros:
- Nullifies range advantages and most of the risk from sitting behind sandbags.
- Most enemies will bring either low tech melee weapons like clubs, or use guns. Once you get a smithy you can outdamage both of these with longswords.
- No concerns about friendly fire
- Enemies tend to split up once they reach your settlement allowing you to divide and conquer.
- No special prep required, just pick any building in the enemies path.
Cons:
- Late-game groups of enemies and manhunter packs can overpower your melee fighters
- Needs a moderate population of melee fighters to work
- Sappers can destroy structures, making this strategy ineffective
Mortar Tactics
A mortar attack on siege and raids can be effective while the attackers are still preparing. It's fun and most times raiders would flee before begin their assault due to huge losses of men during preparation.
It also allows you to effectively utilize your colonists who are poor at combat, as mortar accuracy is unaffected by colonist skill, however colonists incapable of violence will outright refuse to man a mortar.
Always to remember to manually unassign colonists from mortars; if you don't, they will continue standing there until they eventually collapse from exhaustion, starvation, or have a mental break.
An important point to remember is that while your colonists are better at dealing with single or spread-out enemies, mortars are designed for heavily grouped enemies. If you diffuse your enemies, the mortars will not be able to hit the enemies easily.
Mortar emplacements
Mortars need to be placed outdoors, so have shelves to hold the mortar shells. Set them to accept mortar shells only otherwise your colonists will haul random objects to the shelves.
Mortars also explode when damaged. Most of the time this isn't an issue, but if you're facing against a siege, an enemy mortar shell that scores a hit on your mortars can cause a chain reaction to rip apart your entire mortar emplacement, killing any crew manning it. To fix this, separate the mortars with high-HP walls that can survive at least 1 hit from an exploding mortar. Building mortars with plasteel also allows the mortar to survive a mortar hit, provided that the mortar shells don't explode.
Mortars can't fire at anyone within 30 tiles of it, so you will need to place the mortars deep inside your base for maximum coverage. It needs to be well-protected against intruders, for enemies that survive to come close to the mortars can wreck havoc on the helpless mortar crew, so you should pay attention and unassign the mortar crew to fight if necessary. It's best that you have your colonists standing guard outside, but if you need to you can always have a few pillboxes to defend the mortar base.
Explosive mortar battery
You can build a mortar battery to bombard incoming enemies.
Due to inaccuracy, it takes at least 4 mortars to be effective, and around 8 mortars will be enough for most attacks. If you really want to overpower the enemy, 12-20 is good enough for a dense hail of mortar shells for dealing with endgame-level swarms. Any more is generally overkill unless you're facing up some really slow and tough enemies (such as centipedes).
If you are short on manpower, you can automatically assign a colonist to fire 1 shot from each mortar. However mortars will not cool down unless there is someone manning it.
Note that shield belts can easily mitigate the damage from the mortars, so be careful when facing enemies equipped with these.
Incendiary mortars
Incendiary mortars deal low damage, penetrate shields and set areas on fire. The fire can cause disruption among the enemy ranks, as they frantically run trying to put out flames.
Be careful with incendiary mortars as the fires can spread across wide areas causing extensive collateral damage.
EMP mortars
EMP mortars are more of a niche weapon. It doesn't deal any physical damage whatsoever, but are useful against some specific enemies. It's recommended that you have around 4 in each base.
EMP mortars are a must-have in case of a mechanoid raid. They stun them for a long time, allowing your colonists to close in on them and concentrate fire, or even engage in melee safely. You can simply keep the mortars firing when engaging the mechanoids, even if you're using melee; you don't need to worry about the mortars injuring your soldiers.
They also excel at dealing with shields, instantly downing many at once with its large blast radius and high EMP damage.
EMP mortars will keep shooting at enemies even though they cannot be affected by EMP damage. Thus, do not assign anyone to man EMP mortars unless necessary.
Mechanoids
Mechanoids are only come in 2 types, Scythers and Centipedes. They have much differing stats and weapons, meaning different tactics may be used.
In many raids where they come/ drop in at the edges, the Scythers will outrun the Centipedes by a great margin, giving plenty of time to deal with them before the centipedes.
Unlike humanlike raiders, they do not flee, meaning that all of them have to be taken out to neutralize the threat.
They are highly vulnerable to EMP damage, as it will stun them, rending them completely unable to fight back. This can open a window of opportunity where you safely engage it at close range, or even with melee.
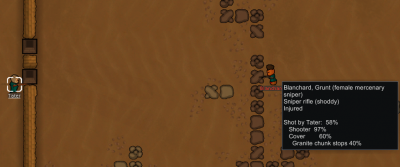
Scythers
Scythers are capable of long-range sniping attacks, and are extremely deadly with melee. However, they never use cover or actively engage in melee.
If fighting it from a distance, cover along with long-ranged weapons such as sniper rifles or bolt-action rifles are vital. Since scythers aren't particularly good shooters (97% accuracy, corresponding to level 10 shooter), you can outperform them at range with higher-skilled snipers, especially when using the sniper rifle, which deals a higher damage per shot, outranges the charge lance and is slightly more accurate.
Despite its high melee damage, sometimes melee fighting it may be better, as long as you have good armor and weapons. A one-on-one melee brawl with a scyther can usually be won by a well-equipped colonist.
Be prepared to lose a limb or two when fighting scythers, for they are capable of dealing high damage blows.
Centipedes
Centipedes, on the other hand, specialize in crowd control and area denial; the Minigun and Heavy charge blaster can annihilate groups of colonists, while the Inferno cannon sets your colonists ablaze and burns down your base if not careful. They are incredibly durable, sporting thick armor and high health, and can take many hits before they can be downed.
Centipedes wielding the Minigun and Heavy Charge Baster can be cheesed simply by spreading out your colonists widely enough, with 3-tile gaps between each colonist. The centipede will attempt to target your colonists, but be unable to hit due to the forced miss radii.
The Inferno cannon is not as destructive towards your fighters, but is annoying to deal with. Keep watch on your colonists at all times, and remember to send them back into cover when needed. As a precaution, build your base out of non-flammable materials to prevent large-scale fires erupting all over your colony. Spacing apart colonists can limit the number of colonists hit at once making it easier to manage.
There isn't much choice when dealing with a centipede except to shoot it with your guns, despite their high resistance against sharp damage. One good
thing is that its large size makes it easier to hit with ranged.
Engaging it in melee is not recommended due to its armor, high health and heavy damage. A centipede deals enough damage per hit to blow off an unprotected hand or foot, and if it has a minigun or heavy charge blaster it can eviscerate your colonist at point-blank before you can get the victim to escape.
Its slow speed and relatively poor blunt armor makes it an excellent target for explosive mortars. Often you can pull off a few blows before it even reaches firing range, severely weakening it.
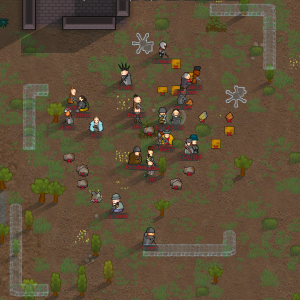
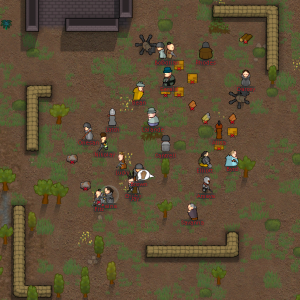
Crashed ships
Sometimes a crashed ship part will land on the map. They can have harmful effects such as reducing colonists' mood, killing any nearby plants or occasionally driving nearby animals mad. You cannot deconstruct the part, so you will need to shoot/ hit it until it is destroyed. When you damage the part, mechanoids will swarm out to 'defend' the ship.
As the mechanoids don't come out until you damage the ship or try to build right next to it, you have plenty of time to prepare. However, you don't have infinite time, either- poison ships can spread toxic material across the map, killing all plants in reach (wild or not), causing serious losses to pastures or crops, and psychic ships are able to project powerful psychic waves driving animals mad and sending colonists' mood plummeting.
Weapons
High-DPS weapons are optimal at destroying both the ship part and its defending mechanoids. Range does not matter that much as you can simply build sandbags close to the ship for effective cover.
Due to the mechanoids spawning very close together after spawning, the minigun are extremely effective. The minigun can also be used to quickly demolish the ship part with its unparalleled DPS. Aim at the ship part and the minigun can hit a lot of the mechanoids near it as well.
Explosive weapons are useful, but keep in mind that the ship part will block the explosion, so a single explosion cannot wipe out all the mechanoids. Like the minigun, they do heavy damage to the ship part.
Constructing around the ship part
If you plan on shooting them, build sandbags around the ship part to block bullets.
You should build EMP mortars to stun the mechanoids, making them helpless hunks of metal. As they tend to spawn very tightly packed, the EMP mortar blasts are extremely effective against them, being able to stun a large number at once.
Building IED traps right next to the ship does not work as attempting to build it will instantly trigger the ship's mechanoids to swarm out. However, you can build the traps a little further away from the ship. When the mechanoids come out, you can fire at the trap to trigger it.
Luring to base
If you want to use existing defenses, you should have a kiting colonist shoot the ship once with long-ranged weaponry, then instantly make a break for it back to your base. You can usually treat it as a normal mechanoid raid against your base, especially if the ship part is far enough away.
After the mechanoids are dealt with, simply draft a few leisurely fighters to use the ship as target practice. No more mechanoids will spawn afterwards.
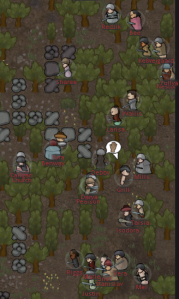
Manhunter packs
Animals in a manhunter pack can arrive in massive numbers, or include a few large but deadly animals.
They are not sophisticated in their attacks; they come in a tight pack, will not actively attack structures without being provoked, and are only capable of using melee (though some can explode upon death for destructive results).
While some animals can be outrun, they can still cause great disruption in outdoor activities as your colonists constantly run and cower to avoid the incoming horde.
Animals
In Alpha 17 any animal can be part of a manhunter pack. Each kind has its own statistics, and can be roughly grouped as follows:
- Small: Small-sized animals that don't pack a punch on their own. However, they tend to come in massive numbers and their small size makes it harder to hit. Some of them also run faster than regular humans.
- Medium: Medium-sized animals. They do moderate damage, and some can run fairly fast.
- Medium and fast: Medium-sized animals that can run fast enough to easily outpace humans. Some deal heavy damage for their size.
- Predatory: Medium to large-sized animals that specialize in hunting prey. They run fast, and pack a punch. Very dangerous.
- Large and scary: Large-sized animals that have high melee DPS up close. Most of them are slow so they can be outran and kited.
- Explosive: Animals that explode on death such as boomalopes or boomrats.
Optimal Weapons
Guns with high damage output such as the LMG, Heavy SMG, Pump shotgun and Charge rifle are good at taking down packs at close to medium range.
The bolt-action rifle, Sniper Rifle and marginally the Assault Rifle work better at longer ranges, but they require high DPS weapons to support them.
The Minigun is an excellent weapon against manhunter packs. At a distance, it can destroy the tightly packed groups of incoming animals, while at point-blank, it can easily rip large animals to shreds, often with just a single barrage of bullets. It does not fare well against loosely distributed packs though.
Chain shotguns are also a good choice at defeating manhunter packs at close to point-blank range, though its short range makes it risky to use against faster enemies.
Longswords are a must-have to fight off animals at melee range, which often happens with fast-moving animals.
Rocket launchers are a good one-use solution to manhunter packs, wiping out large crowds at once. Be careful when using them near your base though.
Explosive weapons are best used only when large packs are incoming. Mortars aren't very useful as animals generally run faster than the animals can hit, but if you have a kiting colonist or trained animals distracting them and you manually aim your mortars you can still achieve great effectiveness.
Kiting
Being unsophisticated in their tactics, they can be lured easily.
If you have good shooters that are fast (moving >140%; 2 bionic legs, or 1 bionic leg + go-juice, or whatever mods you're using), you can easily kite the faster animals.
The larger animals are usually much slower and any colonist that has normal Moving will do fine against them.
This is best combined with a long-range firing squad and turrets laying fire from a distance while they are chasing the colonist. Be sure that the animals do not lose track of your kiters otherwise they will switch targets and go for somebody else.
Animals vs Animals
One good way to fight off mad animals is with... more animals! Just draft anyone with animals assigned, set the animals to Release, and set them out. Your colonists can watch safely from a distance, or take a potshot or two while watching the animals tear each other apart. Just remember to have someone mop up the bloodstains, haul the corpses of the fallen as well as finish off any survivors.
Bleeding them out
Another strategy is to draft a colonist, place it in a door to shoot a maddened animal until it starts to bleed, then move the colonist back to safety and wait until the animal dies from blood loss, be careful thought since this will draw the attention of surrounding maddened animals making them attack the door where the colonist came from so be ready to repair it immediately.
If you hit their legs they will be crippled making it easier to outrun.
This method is slow and requires time before blood loss kills the animals. It's best that you use it to kill large animals, or soften them before moving in to finish them. The lowered consciousness from blood loss can help reduce damage taken by making the animal miss its blows more often.
Turret Distraction
While turrets aren't good at fighting manhunter packs, they can distract them for your colonists, giving your colonists more time to shoot them while they are occupied by the turret.
They also explode when destroyed, potentially taking out a sizable group of animals. They won't run away from exploding turrets; only when the turret is destroyed will they switch to another target.
However, given the price of turrets, this method isn't worth it except in desperate conditions, or you happen to forget to turn off your turrets.
Waiting it out
Alternatively, if you have a perimeter wall or a superstructure base with decent food stocks, you can simply wait it out inside while they relentlessly swarm outside the walls. Some of them will exit manhunter mode once they fall asleep, and will act normally afterwards.
Remember not to let anyone outside unless your intent is to kill the animals.
They will actively attack doors if a colonist hides behind them; as a precaution, build it out of a sturdier material such as plasteel so they don't get destroyed during a manhunter attack. They will give up after a while if the doors are not destroyed.
Scavenging dead animals
Manhunter packs are a good source of meat for your colony, especially if you're low on food. If there are still maddened animals, wait until the other animals from the pack go to sleep or walk away far enough to haul the dead one(s), or get a fast colonist to try and haul the dead ones away.
Infestations
While infestations aren't much threat in open areas, they can be a serious hazard in mountain bases.
Insects are lightly armored, and exclusively use melee. This gives them some protection against attacks, but also makes them vulnerable from a distance. None of them run faster than a colonist so they can be outran or kited.
If you don't destroy them fast enough, they can reproduce giving rise to even more insects. This is especially true if you happen to have forgotten about a hive, which given time can build itself into a giant mega-hive.
Spawning
Infestations will spawn under Overhead Mountains within 30 tiles of a colony structure. For more, see Infestation.
For mountain bases, however, things get get much harder; they can spawn in practically any room, right inside your base, causing mayhem as your colonists try to battle the insects.
Behavior
Insects have a hive mentality; they will remain tending to their hive cluster, until they see a target, in which they begin to engage your pawns all at once. They may also attack random furniture and structures in your building.
Fighting infestations
The enclosed nature of mountain bases gives colonists little distance to shoot from; thus, you may want some melee fighters to pair up with any ranged colonists.
Individual fighters will quickly get overwhelmed by the insects, so you shouldn't trickle your defensive forces in; rather, you should send them all at once to overpower the insects.
If you want your threat gone, you should destroy the hives before they reproduce, spawning more hives and insects.
Using fire
Fire is an effective way to clear infestations during early-mid stage infestations.
If they spawn in an enclosed area with a door and plenty of flammables, all you need to do is toss a molotov or an incendiary launcher bolt into the room. The room will quickly catch fire, causing the temperature to quickly rise, roasting the insects in it along with the hives.
If there aren't flammables you can still keep shooting the hives. They can catch fire, along with the fuel puddles created on the ground.
As any items inside the room are likely to catch fire and be destroyed, it is not recommended to use in a place with many valuable buildings or your warehouses. Also be careful with the heat spreading to nearby rooms through walls.
Though in Alpha 17 insects trapped in uncomfortable temperatures will quickly attempt to dig out to escape. If they don't fall unconscious fast enough they may survive to break out and attack.
Explosives
Explosives can be used to clear up large infestations that are hard to tackle normally.
Rocket launchers can clear up infestations in no time. A single use Doomsday rocket launcher will deal massive damage over a large area, destroying the smaller insects, damaging the hives and softening up the tougher insects. Grenades work if you have the courage to get someone to go close-up to throw them; 1 blast can get several insects, and they are reusable.
An army of explosive animals are also effective at clearing out infestations. Have them march straight into the hive by zoning them, when the insects attack, the animals will be injured and explode, setting the insects and hives on fire.
Mortars are useless against the hives, though they can be used to bombard insects going out of their hives to assault your colony.
Late-stage infestations
If you've accidentally left a hive or two behind or totally ignored an infestation, after a few seasons you will have a giant hive community sprawling. This is extremely hard to treat, especially if you're low on colonists.
If you're still on early to early-midgame, it's generally recommended that you pack up and run. If not, however, you will have to deal with them slowly.
Their slower speed makes kiting possible even to unmodified colonists. Draft a few ranged colonists to kite the insects, shooting from a distance to wear them down. You will need to constantly keep a distance when unloading fire on them. When most insects are taken down or distracted, quickly destroy hives while you can. Draft every colonist possible to destroy the hives by shooting them, bashing them or setting them on fire.
Explosives are recommended as they can destroy the hives and hit the massive groups of insects easily. A doomsday rocket launcher can serve quick retribution to giant hive clusters with its massive incendiary explosions. You can also send an army of suicide boomrats or boomalopes straight into the hives, and detonate them for great fire damage.
To deal with such a threat requires you partially ignore colonists' needs. Be careful as you risk mental breaks, especially considering the hideous environment left behind by infestations.
Passive prevention
If you only have a few tiles of Overhead Mountain then it's best that you fill it up with walls to prevent any infestations from happening. If you are in a mountain base, then you will need to do more than that.
Baiting
You can mine out rooms a distance away from your colony to attract insects to nest there, instead of right in the middle of your base. Put some cheap furniture inside to confuse the insects into thinking it's a prospective nesting spot, as well as to light on fire for a quick solution to an infestation problem.
A well-lit base discourages insects from nesting, though it can still happen. If you bait insects to spawn elsewhere the chance of an infestation spawning inside is greatly reduced.
If you want the insect trap to automatically kill insects, put an IED incendiary trap inside the room, and fill it with flammables. Once an infestation spawns the insects will trigger the trap, lighting the flammables on fire and broiling the insects.
Alternatively, fill it with a few deadfall traps to weaken them before they strike your base, giving you the advantage. It also preserves the hives, which can be either good or bad.
Ambushes
Defensive battles don't always happen at base. Sometimes it may happen far away from it, striking one of your caravans, perhaps loaded with plenty of silver. Or maybe they creep to your traders and demand ransom, which you don't feel like paying. You always need to be prepared for ambushes when you send out caravans.
Escort
Sending just one or two colonists in any caravan is poorly advised except in very short-distance and light trips as they will not be able to fend off an ambush. In this case it's best that you have a combat-capable escort member which can carry some items and can fight.
If you have lots of attack animals, you can also send just 1 colonist skilled in handling, and a lot of animals. They can swarm any incoming attackers, and you can leave colonists back at base for work.
Ambush site
The ambush site is very small, restricting the space where you can conduct your battle. This renders many tactics obsolete, such as long-ranged sniping or kiting. You will often have to face off the enemy in a gunfight.
Both the pirates and you should be hiding behind rock chunks for cover. If you can, you should space out your defenders to reduce the amount of collateral damage the pirates deal.
Melee sorties or rushes work well if you have brawlers for they can traverse the short distances.
Items
You will need to bring some items so you can be prepared for a surprise attack.
Weapons
You can't switch weapons easily in a caravan unless you're bringing more than you need with you, so choosing the right weapons for your escort party is important.
- High-DPS weapons are optimal for dealing with ambushes.
- Sniper rifles don't work well as the small space restricts the rifle's long-range capability.
- (Bolt-action rifles work better for they are good for taking down targets at medium range.
- Miniguns are extremely good against tightly-packed raiders hiding behind cover in an ambush. However, their heavy weight and movement speed reduction means you may want to reconsider bringing one.
- Melee weapons can help fight off enemy brawlers, or used to disrupt enemies behind cover. You should have at least 1 melee fighter in each escort.
Medicine
You should have some medicine handy so your colonists can patch themselves up after the battle. Bring a doctor along with you as well, or two, just in case one of them goes down.
Herbal medicine will do for most cases, but if you want to improve treatment quality to reduce infection chances you can use regular medicine.
Aftermath
Most of the time you should see a few of your colonists are downed. If you were facing up against incendiary weapons you may also see fires starting to spread.
Immediately put down medical sleeping spots a short distance away from the battlefield, if there is fire. Afterwards, direct your doctors to treat the wounded.
If there is a downed enemy that you want to capture, you will have to quickly build a small hut using whatever materials are at hand. A 3x4 hut with a 1x2 interior, along with a door but without 2 of the corners, requires 60 materials to build.
Artifacts
These one-use items can be useful in turning the tide of a raid, provided you can use them correctly.
Psychic insanity lance
This artifact instantly drives a humanlike or animal berserk, causing them to attack any nearby pawns.
You can use this to cause great disruption within the enemy's ranks as enemies will switch targets to engage the berserk pawn, distracting them.
It can also be used to enrage animals from a distance, unleashing them upon the enemy attackers. Choose a tough animal with high damage output to make the most out of the lance.
While berserk pawns may not deal much damage on their own, the resulting fire directed in panic at the berserker can greatly weaken an incoming attack.
Psychic shock lance
This artifact instantly downs a humanlike or animal, with a chance of causing brain damage.
Not as useful as a psychic insanity lance against raids, but can still be used to great effect, by downing an attacker that might cause huge damage such as a rocketeer.
It's also somewhat useful if you want to capture a specific raider with good stats, though you need to get him before the effect wears off and you risk brain damage which can ruin a previously good potential colonist.
Psychic animal pulser
This artifact instantly drives all animals, including your tamed ones, into a manhunter state.
In an animal-rich area such as a temperate forest or arid shrubland, nearly any humanlike/ mechanoid raid can quickly get devastated.
Before you even consider using this, you should be very careful; the animals will also turn on your colonists. You will need to keep the animals out, and your colonists in. Make sure you get all your tamed animals out first, restrict your colonists to indoors areas only, and have a stock of food handy. Once the animals fall asleep they will exit their rage.
Defensive Construction
The below shows ways you can build a base to repel attacks.
Perimeter Wall
An straightforward and effective but material-expensive way for defending bases, this simply requires erecting a wall surrounding your base. You can use the surrounding hills/ mountains to your advantage by incorporating them into the wall. The wall can delay attackers, or gaps can be introduced to funnel raiders, giving your colonists the upper hand in dealing with raids.
Enemies equipped with most weapons will attempt to break down the wall using melee attacks, even though firing point-blank at it with practically any ranged weapon may destroy it faster. This greatly slows down progress, or even stop it entirely if you have enough repairmen.
They also spread out greatly while doing so, giving your colonists a chance to destroy them one by one.
When they do break through, they will have essentially created a chokepoint for themselves, giving your colonists a chance to concentrate overwhelming fire on them while they get through. They can use the walls as cover, though, so be careful.
On the other hand, enemies with frag grenades will continuously throw them at the walls; they deal heavy damage against structures, meaning that even with the best of constructors and highly durable plasteel walls, they will not hold against constant explosive attacks for long.
Manhunter packs stay outside the walls and won't attempt to break down doors unless a colonist passes through them, so a wall can keep you completely safe in such events.
Always plan ahead when building walls. Take into account base expansion and future plans so you won't have to go though the hassle of deconstructing and rebuilding the walls frequently (unless you want to train your builders).
Multilayer walls
Having 2 layers of wall is more expensive but slows down the raiders even more.
You should not put the 2 layers of wall right next to each other; the outside layer will be inaccessible to your repairmen during a raid. Instead, consider putting a gap between the 2 walls. This allows repairmen to repair both layers of wall from the inside.
You can have even more walls surrounding vital structures, either for defense or insulation, but remember having too many walls can take up precious space which you can use for better purposes.
Having another layer of wall deeper inside base also helps defend against drop podding raiders landing at the edges of the map, if you have expanded to the buildable edges of the map already.
Cover management
Effective cover is an essential part in any defense, being able to negate a large part of any potential damage that can be dealt to your colonists. Enemies can also use cover to their advantage, so you should be careful of that as well.
Low cover do not seem to stack when placed in a double layer.
Sandbag emplacements
If you're short on materials, such as during the start, you probably won't need to surround the whole settlement with sandbags yet. Just have short walls of sandbags facing the enemy to block any incoming bullets.
You may want to put them near your base to make it harder for enemies to take advantage of them.
If you have perimeter walls you should also have sandbag emplacements in some places behind the walls. Once the raiders break through and storm in, you can still have cover to shoot them from.
Perimeter sandbags
An essential defense in a base if you don't want to build killboxes (see below) or the like, this simply involves surrounding your base with sandbags. This provides great cover from gunfire, stopping 65% of the bullets that will otherwise hit your colonists. However this does not protect against explosive weapons.
Pros
- More flexible in terms of positioning
- More complete coverage
Cons
- No protection against explosives
- More expensive than partial coverage, especially in larger bases
Pillboxes & Bunkers
If you prefer prolonged firefights instead of taking your enemies out with cheap tricks, then this is for you. This is an early game strategy because all you need for it is walls. First, build a room in an area where you expect enemies to approach from. This room doesn't have to be box-like -- all you need is a place for your colonists to stand inside while they shoot out. Simply build a structure in any shape and then deconstruct a few walls to make some holes -- these will be firing holes for your shooters, where they can use the walls as cover.
Additionally, build a roof for your bunker so that every cell is protected from bad weather like rain and lightning strikes. So, when a raider attack comes and your shooters head to the bunker, they now enjoy not only the full cover bonus from having thick walls between them and the enemy.
To truly finish the bunker, add flooring so your colonists don't have to worry so much about fires while inside.
Pros
- Cheap -- all it takes is whatever materials you use for the walls
- Simple, easy and fun to build -- just make a room and knock out holes for your shooters
- Makes it very hard for your enemies to hit your colonists since they are behind full cover
- You can easily extend this into a full bunker system just by adding more walls and knocking out more holes
Cons
- Should enemies overrun your bunker(s), they can turn the defenses on you to devastating effect
- May require Stonecutting research to get walls that are good enough to withstand sustained fire -- wood and steel just don't cut it
Alternating sandbags
Alternating walls with sandbags can provide even better cover, is slightly cheaper (assuming use of Steel or cheaper materials) and has a chance of blocking explosives. However, depending on the material, the walls may be flammable and also have less health than the sandbags.
The "Fire Wall"
An effective cover design is to alternate 2 walls and 1 sand bag, by doing this you have 3 colonists shooting out of the same hole, 2 behind full cover and one behind low cover. This method can be expanded as long as there is room.

Pros
- Gives excellent cover
- Allows defenders to attack a wide range of targets while remaining behind cover
- Prevents colonists from ganging up on enemies
- Stops some explosives
Cons
- Narrows the attack area, so the attackers must come straight at the defenders
Cover removal
While sandbags already give you an advantage over raiders in terns of cover (65% vs 50%), removing all sources of cover near your base is still very useful when dealing with ranged enemies as they will then have nowhere to hide. For better effectiveness, remove all nearby trees, which can provide a little cover.
Cover baiting
Once there's no suitable cover nearby, ranged attackers will scramble to find any suitable cover. You can exploit this by placing any form of low cover- stools work best- to attract them to a place where they can be dealt with more easily.
Damage minimization
The below shows ways to minimize the damage done to your base.
Firebreaks
4-tile wide strips of any kind of artificial floor is capable of stopping the spread of fires. This can negate many fires from reaching your base and burning it down.
You can build one surrounding your base, and divide the map into sections in order to control fires.
Keep in mind that building such amounts of floors usually requires huge amounts of building materials.
Walling structures
If you don't plan on building an entire perimeter wall, you can simply build a wall around your important structures, such as generators, power conduits or crops. Raiders will prioritize other targets over these, averting destruction.
For geothermal generators, remember to have some exposed roof areas so the heat from the generator can vent out instead of being trapped inside.
Armament racks
Ideally colonists should be equipped with weapons 24/7 so in case of threats you can instantly draft them to fight or defend themselves.
However, armor may slow down colonists and may cause them to have reduced work speed.
You can put shelves in convenient areas which hold armor. When anticipating a fight you can have colonists go to the shelves to grab an armor vest to protect themselves from gunfire. Afterwards you can have them remove the vest and return them to the shelf.
Chokepoints
Chokepoints allow your colonists to concentrate firepower, killing incoming attackers effectively, as well as utilize traps to their maximum potential.
At its simplest, it involves the use of a single opening in a wall, coupled with a location for colonists or turrets to fire and beat them, sometimes with traps to catch some of the unaware attackers.
If the chokepoint is straight, remove all potential source of cover nearby, such as trees or rubble, so raiders can't shoot into the chokepoint. They can still use the walls of the choke as cover though.
If the chokepoint entrance does not have direct line-of-sight with the exit, another strategy is to litter the choke with sandbags or rubble, greatly slowing down the raiders and giving you time to deal with them.
You can concentrate fire on a crafting spot or animal sleeping spot placed right in the entrance with miniguns to rip incoming raiders apart.
Retarding tunnel

One early-mid game tactic to slow down your enemies is by (possibly using mountains to help) creating a narrow strip between your colony and potential areas where raiders could attack from, then alternating sandbags or debris with unoccupied space, close to the exit of the strip (the end closer to your colony obviously).
To stop them from using the chunks or sandbags to their advantage, build a turn to break their line of sight.
Don't put sandbags or chunks right next to each other, otherwise they will simply vault over multiple bags at once, reducing their slowing efficiency. An excessively long tunnel also prompts them to break in instead of entering through it.
Pros
- Fairly cheap
- Easy to build
Cons
- Does not deal damage on its own
- Short slowing time
Turrets
With the low firepower of the improvised turret in vanilla, it is not a good idea to extensively rely on them, especially in mid-late game. However they do provide decent additional fire to lay on the enemy combining with gunners, and also serve as a distraction from your more valuable colonists.
Turret-reliant perimeter defenses are generally only viable for the first several raids (in Tough Cassandra Classic, after which the areas will quickly get overwhelmed each raid due to not being able to focus fire on the numerous raiders.
While protecting the outside starting area, you may want to rapidly pause the game during raids and give orders to repair damaged turrets.
Turrets should each get their own sandbags to reduce incoming fire both to the turret and colonists behind the turret repairing/shooting. This has the added advantage of making it harder for raiders to run from an exploding turret.
They should be spaced out to prevent a turret explosion from damaging other turrets, potentially causing a chain reaction.
Remember that raiders will run from exploding turrets, and to get your colonists to run from an exploding turret as well.
Turret chokepoint
Putting a turreted defense in a chokepoint with a narrow entrance and wide turreted area is best because it forces the raiders to take a single-file approach to where all the turrets will be able to fire on them.
There should be more than one line of turrets so that the innermost line or lines can be used to position colonists where they are not immediately under threat from grenades (grenadiers will target the closest turrets first) or if colonists are positioned closer so they can repair, to retreat colonists further back when turrets are about to be or have been destroyed. Every line of turrets should have a line of sandbags directly in front and every supporting wall/rock should also have sandbags to lessen the likelihood of collapse due to collateral damage.
Turrets should not be placed directly (within three tiles) next to other turrets for the same reason, as they have a chance to explode when critically damaged. Placing walls between the turrets can lessen the impact of explosions, allowing you to put them tighter, but remember walls can block line-of-sight and bullets.
Traps
You can lay different kinds of traps to provide a nasty surprise for any incoming raiders.
Trap memory
Raiders will remember where you put traps, and they have to walk over the trap to trigger it, so once a trap is triggered it is unlikely that it will be triggered again (without the help of funneling). Trap memory is per faction, and doesn't apply to other factions -- if, say, the Vipers of Power come in and sets off your traps, then they would remember that. But, if the Rippers of Fire later attack, they won't have that knowledge and will still set off the same traps. It also only applies to humanlike raiders.
Trap memory activates if a raider survives to escape the map. It lasts for 1 quadrum, and is recorded per tile trapped- that is, they remember where you put traps and will avoid those places if possible, even if they are no longer trapped.
IED traps
Early on, you may want to focus on armed colonist defense with turrets, but as the raiders grow in number, it becomes more efficient to use a bit of metal to kill several at once than to invest a lot of metal in a turret that costs nothing to fire, but will explode rapidly due to large raider groups.
IED traps are extremely effective when used correctly, however in open areas they are mostly useless as the raiders are highly unlikely to step in any of the traps, and even if they do they're not tightly packed enough for the trap to cause serious damage. Thus, it is better if you combine traps with funneling to force the raiders together.
1 IED trap can trigger other IED traps in its explosion radius. This may or may not be desirable depending on the situation; you can easily set of a chain reaction to destroy a whole incoming raider horde, but also use up much more resources.
IED traps have a delay before exploding, allowing some raiders to escape. Raiders will attempt to run from an exploding trap, though the fuse is short enough to catch some of them.
Deadfall traps
A reusable trap that deals heavy damage on a single target. It can severely injure, maim or kill incoming raiders with ease, especially if you use a better material like steel or plasteel.
Where the trap hits is dependent on luck; if you're lucky the trap will slice off an unlucky raider's head in 1 clean blow, while if you aren't the raider will have its ears, eyes, nose and limbs chopped off, before finally taking the fatal blow. Even when made with plasteel, it usually takes 2 or more traps to kill a raider. Shields block damage from the trap, so shielded raiders will need more traps to kill or down.
The trap takes time to rearm, and if you have a lot of these traps, it will take ages to rearm without enough colonists. You will have to prioritize rearming traps so they will be ready for the next raid, especially if they come very often.
Placement
The trap is useless in open space, being only able to hit 1 target and requires being walked over to trigger.
Combine with funneling, and it becomes a scary trap to face up against. Despite knowing where the traps are, they are still inclined to walk over them to get to you, meaning that the trap is effective even when its position is known.
Materials
Steel is the best material if you are looking for damage. Plasteel deals higher damage, but that is usually overkill, and plasteel is significantly more expensive and harder to come by.
Wood, on the other hand, is extremely cheap, however it does not hurt much, especially against shielded enemies which can trigger 2-3 of these before their shields are broken.
Roof trap
This clever trap is simple to set up and hard-hitting when triggered. It can be considered a giant single-use deadfall trap.
All you need to do is to erect 1 pillar made of a low-HP material, optimally wood, then build a roof over it. When raiders walk near the pillar, demolish it from a distance. You can shoot it with a few long-range guns or throw a grenade at it if you are reckless.
After the pillar is destroyed, the roof will fall, crushing the raiders on the head, neck or torso and dealing up to 20 damage (though armor will negate part of it).
You can even put down some form of low cover such as stools to bait the enemy into going under the roof trap for 'cover'.
Triggering an IED trap near it is also very effective, with the advantage of being automatically triggered and dealing even more damage with its explosion.
Pros
- Large radius; easily injures a sizable group of raiders at once
- Penetrates shields
- Low cost; only 5 wood each
- No risk of friendly activation
- Undetectable by raiders, and position will not be remembered
Cons
- Hard to trigger; you may need to lead your targets
- Low damage compared to other traps
- Rarely kills or incapacitates
- Cannot be used with killboxes easily
It is optimal for softening a group of raiders so it's easier to defeat them.

Roof trap before triggering.
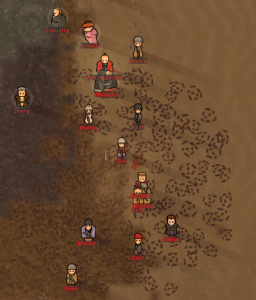
Roof trap after triggering, having injured some raiders (some through shields) and left a large pile of rubble.

More refined roof trap design with stools to lure the enemy into using them as cover, along with an IED trap to automatically trigger the trap. Significantly more expensive.


Mountain trap
An extreme version of the roof trap using overhead mountains instead of constructed roofs.
To use it, you mine out a whole mountain except a pillar in the center. Then you damage that pillar until it has just a sliver of health left.
It is triggered the same way as the regular roof trap, and has the same effect radius except victims are instantly killed and buried. The collapsed rocks spawned after this trap is triggered can be useful or harmful depending on the situation.
Rearming it is a lengthy process; you will have to mine out lots of rocks, replace the center pillar (or severely weaken it) , then mine out the rest of the rocks. Mining out all the rocks at once will result in your colonists getting crushed by the trap.
Pros
- Instantly kills any enemy
- Leaves no corpses
Cons
- Takes much longer and is more dangerous to re-arm
- You have to mine out everything then support the mountain roof with low-HP wall; compare with regular roof trap which simply requires building the wall
- Colonists risk death if you aren't careful
- No loot or capturable downed raiders
Trap chokepoints
Deadfall traps are available to you from the start of the game even if you start off as a tribe. Though they can be costly to make in large numbers, if you have lots of wood or steel on your map you can start producing them early.
The main point of this defense is that you build a perimeter wall. Leave an empty tile or two on the wall as exits as needed and then you build a second wall segment 7-11 tiles long just in front of the empty tiles. These segments will have a door at the same spot as the hole behind them. Then, you fill up the space in-between with traps like so:
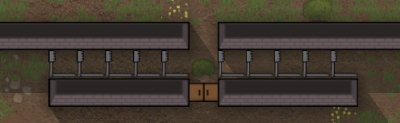
Trapped entrance with colonists and attackers entering from below.

Due to how the AI works, your colonists will prefer to move through the door, thereby always avoiding your own traps, whereas any enemies will prefer to go around the wall segment straight towards the open entrance, leading them into your line of traps. 5-6 traps, even if made from wood,- are usually enough to kill or severely wound an enemy. If you can afford to make them out of steel or better, you can expect an assaulting enemy force to take heavy losses by the time they make it through your traps.
Pros
- Can often single-handedly rout early raiders without your colonists ever being in danger
- Traps can be rearmed any number of times, making this method economical in the long run
- Can be expanded to include even more traps if needed
Cons
- High resource cost can make it unfeasible on resource poor maps
- If the entrances are very far from where the enemies approach from, they might choose to attack your wall instead
- Not good at dealing with large crowds or shielded enemies
- Cannot delay enemies very long
"Attention Suppressor"

Once you have lots of bulk materials, but don't have enough industry to build proper defenses, you can build an attention suppressor out front of your basic defensive line. This is usually out of wood, although the flammability of wood is a problem.
Start like you're making a 29-wide room, but instead of doors, just leave one-tile openings at opposite ends. That way it doesn't get a roof. If needed, use a no roof area. Down the middle of the attention suppressor leave an open path, which will actually be traveled by your colonists. Pack the sides with alternating walls, leaving numerous blind alleys branching off the open path. The attention suppressor should look like two giant combs facing each other across the path, or perhaps like a cutaway of an especially-blocky sound suppressor.
A raider entering through an attention suppressor is presented with numerous blind alleys, each one of which could hold something important (in their perspective). Raiders will typically only resist the lure of a dozen or so blind alleys, after which they'll turn off into a blind alley to look for something to attack. In many cases they'll attack the walls, but the general effect is that a raiding force will spend a long time milling around in the attention suppressor, deeply distracted, and slowly trickle out of it toward your base alone, or (for a large raid) in twos and threes. This slow trickle of raiders is easily handled by a few colonists with basic weapons, or later a few turrets and a repairer.
Colonists and visitors with specific business on one side or the other of the attention suppressor will go quickly down the middle without being distracted. However, colonists pursuing joy activities like going for a walk will usually be diverted to do so in the blind alleys of the attention suppressor. As a result, it's not safe to fill with deathtraps.
Pros
- Effectively distracts and delays raiders
Cons
- Does not deal damage
- Takes up large amounts of space
- Expensive and time-consuming to build a lot of walls
- Makes it harder to eliminate all raiders at once
Overall, this can be a decent solution to delaying raids in early-mid game if you have the effort and materials, but as you enter mid-late game it's better that you replace the suppressor with something else (such as a killbox) which can actually bring the hurt.
Killboxes
Killboxes are in general heavily trapped, armed areas where enemies are funneled to so they can be destroyed easily.
They almost consist of a funnel which directs raiders into it, like a wall with a single opening.
Raiders will then trickle in, allowing colonists or turrets to concentrate fire on them, or traps to destroy them while they try to move in to attack.
This is an extremely effective way to defeat most raids, as the enemies will often be overwhelmed by the sheer firepower raining on them. It also allows effective use of traps, as funneling enemies greatly increases the chance one's going to trigger them.
Note that sappers will attempt to mine into the base away from the killboxes, so make sure you have an effective coping strategy.
Building
You should double wall your killboxes as the sheer firepower raining on your enemies will inevitably destroy some of your own walls by accident, allowing raiders to flood into the killbox from another direction, bypassing traps and overwhelming your defenders.
Any entryways of the killbox should not be straight, otherwise raiders will simply fire using the entryway as cover. Instead, you should have a turn to prompt the raiders to enter an area where you can get them easily.
Don't make your entrance too long, otherwise raiders will think it's not worth it going such a distance and will decide to go for something else instead. Manhunters however will still chase colonists down a long corridor or over extreme distances, so you can have some dedicated anti-manhunter killboxes with extra-long corridors for this purpose.
For better effectiveness fill the entryway with deadfall traps, some IED traps (not too close otherwise they will set off a chain reaction) to soften the raiders before you fire on them, and chunks or sandbags to greatly slow them down. Make sure that the walls are durable enough to withstand explosions if you
The below shows the results of different killbox entryways.
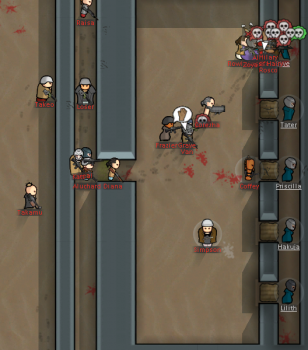
Right design of a killbox entryway. Raiders are prompted to move into the killbox, sometimes so close that they prefer to melee attack instead of shoot.
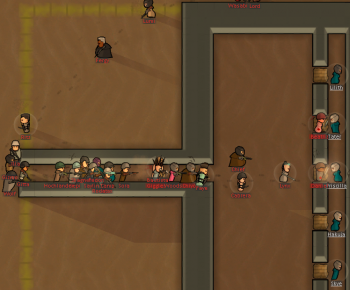
Wrong design of a killbox entryway. Raiders are bunching up in the entryway, using its walls as cover.


Equipment
Colonists defending in a killbox will be shooting at a large number of targets no more than a few tiles away (usually). Thus, defenders should use close ranged high damage weaponry for firing at raiders.
- Charge rifles, Heavy SMGs or Pump shotguns work good in killboxes, being able to dish out hurt at close-mid ranges.
- Chain shotguns inflict extreme pain at killbox range, even surpassing the charge rifle in DPS as long as the targets are closely grouped.
- Miniguns are excellent at attacking the bunched-up raiders inside a killbox. While it won't hit its intended target, it will hit everything right next to it, inflicting heavy damage.
- Don't bother with long-ranged weapons such as the bolt-action rifle or sniper rifle as they can't deal enough hurt to be effective at close ranges.
- Grenades are good if you can time them right. Throw them at the entrance where each explosion to hit a tight group of raiders, especially if they're slowed down with obstacles. Don't throw too many otherwise you'll demolish the walls of the killbox.
- Have melee colonists with longswords standing nearby as raiders who enter your killbox may decide to melee charge you instead.
Explosive or crowd control weapons can be focused at a crafting spot or animal sleeping spot at the entrance for maximum effectiveness.