Difference between revisions of "Defense structures"
PigeonGuru (talk | contribs) |
PigeonGuru (talk | contribs) |
||
| Line 357: | Line 357: | ||
==== Incendiary mortars ==== | ==== Incendiary mortars ==== | ||
| − | [[Incendiary mortar]]s deal low damage, penetrate shields and set areas on fire. The fire can cause disruption among the enemy ranks, as they frantically run trying to put out flames. | + | [[Incendiary mortar]]s deal low damage, penetrate shields and set areas on fire. The fire can cause disruption among the enemy ranks, as they frantically run trying to put out flames. That is if they can hit, as they suffer from poor accuracy as well. |
It can be paired with brawlers, which allows them to close in with less firepower on them, and force the enemy into melee combat, preventing them from extinguishing the flames on them. Be careful not to hit your colonists though. | It can be paired with brawlers, which allows them to close in with less firepower on them, and force the enemy into melee combat, preventing them from extinguishing the flames on them. Be careful not to hit your colonists though. | ||
| Line 366: | Line 366: | ||
[[EMP mortar]]s are a highly situational weapon, yet are useful enough to warrant their placement in every well-built defense. It doesn't deal any physical damage whatsoever, but are useful against some specific enemies. It's recommended that you have around 4 in each base. | [[EMP mortar]]s are a highly situational weapon, yet are useful enough to warrant their placement in every well-built defense. It doesn't deal any physical damage whatsoever, but are useful against some specific enemies. It's recommended that you have around 4 in each base. | ||
| − | + | They have a large blast radius, meaning that their inaccuracy is less of a problem compared with the others. | |
| − | They also excel at dealing with shields, instantly downing many at once | + | EMP mortars are a must-have in case of a mechanoid raid. They stun them for a whole 90 seconds (much longer than the reload time of the mortars), allowing your colonists to close in on them and concentrate fire, or even engage in melee safely. You can keep on firing when engaging the mechanoids, even if you're using melee; you don't need to worry about the mortars injuring your soldiers. |
| + | |||
| + | They also excel at dealing with shields, instantly downing many at once, making them an excellent weapon against full melee charges. | ||
=== Traps === | === Traps === | ||
Revision as of 02:13, 14 October 2017
Raids are frequent and numerous as enemies don't journey towards your base from their "camp" but just spawn on your map nor need to maintain their base like players do. So players must wisely consider protective measures while still taking every thing else into account, whereas hostiles only attack.
Basically, players have to fight the same enemy AI programming for each type of hostile but the approach to it may differ according to gameplay preferences, either face to face for a more combative experience or behind killboxes for a less threatening measure, or both combined.
Terrain features
Before laying blueprints, first inspect the natural features that can work as defenses, such as marshes, mountains and rivers.
Moats
Water or marsh tiles can be used as moat which will considerably slow down enemy advance, giving you some time to shoot and soften the clash.

Mountains
Mountains (in Small hills or Large hills maps) that align with each other can become part of your defensive walls by filling the gap in-between. Mountainous maps, however, are better used by digging in tunnels and caves.
Early-game defense
At the very beginning your most primitive security choices are deadfall traps, sandbags and stone chunks. You will need to find a balance between these three to make the most out of the available materiald without costing too much time. Analyze the terrain to find choke points, natural walls, and other features you can use to defend your colony.

From start, it's very likely you will have to move stone chunks either to build rooms, production structures or to open a growing zone, while gathering raw materials into a stockpile zone. As you move stone chunks to open space, you might as well use that action to create the Dumping stockpile zone on the outer side of your wall, covering its width and expanding it further three tiles away. This is very helpful mostly as a fire prevention. Despite not building anything, it still counts as a security measure, as the stone chunks will stop wildfires from burning your newly built wooden walls.
Performing this action can be time consuming, so for a short period of work, instead of expanding three tiles away, just a single line covering your entire wall width would be a good start. Your speed in this matter will be greatly affected by the number of haulers available. It becomes incredibly fast if you can tame and train intelligent animals to do the hauling for you. Then you will be able to actually build defensive structures while the animals do this chunks line for you. Taming hauling animals is also time consuming so you will need to balance your colony's overall and not go out to get 20 pets right away.
Walls
The most essential building to keep threats away, so long as the base is self-sustainable inside. Walls alone can fend off early game raids if enough repairmen can keep the walls standing while enemies start to starve and become tired. Walls protect from Predator attacks and Manhunter packs, which cannot reach colonists safely inside unless a colonist is seen passing through doors at which point they will attempt to break them down.
Many layers can be raised as you grow expansively, making the first the innermost and the latest the outermost. While the innermost may be faster to build with wood, the outermost layers should be made of stone. Placing several doors separated by each other by 15 to 20 tiles allows multiple exits and also a tactical benefit of flanking the target. There's not much need to deconstruct walls in order to upgrade them, just refill them with better materials as their segments get destroyed by attacks. Double layer walls may seem more resistant protection but is discouraged as colonists cannot may go out to repair the side that is being attacked, placing themselves in harm's way. Pay attention when expanding towards the edges of the map, as there's a boundary you can't build beyond that is only visible when the "Structure" tab is selected.
Wooden walls are weak and flammable, while all walls are weak against frag grenades. Grenadiers can easily breach them (sometimes killing their own comrades who are bashing down the same spot), so target those with explosive weapons first to prevent the wall from falling. When your efforts are not enough, this shall signal the time to retreat backwards to your inner walls or any other defensive structure inside.
Walls do not hold forever, so prepare additional defenses behind them. If raising additional walls, instead of putting the second layer right next to the first, consider leaving a gap between both. Wide gaps give long-range shooters enough distance to pick off targets, while 1-tile gaps allow repairs without being exposed to enemy fire.
When segments are broken through, they will become chokepoints which allow your colonists to concentrate fire on. Hostiles will use your walls for cover too, so make sure the inner side is well-defended.
Cover
Cover is vital for firefights as it can block projectiles, reducing the amount of damage received by your colonists. This is an essential defense as long as colonists or turrets are directly engaging.
However, static defenders behind cover are vulnerable to explosives, so be careful.
Sandbags
Sandbags are very efficient when placed wisely. Their protection is inferior to walls (65% vs 75% from walls), but are more effective against diagonal fire. Sandbags are faster to build but require steel instead. Some scenarios start with steel, but it is usually better used for other things.
Sandbags are a quick security measure when an extended wall would take many days to complete, as well as a fallback secondary defense when the perimeter is breached. It all depends in each game.
The most common usages are in shape of a square's corners or a U shape with the opening towards fast retreat.
Walls
Walls are the most effective cover, providing up to 75% cover. However, this restricts your colonist's effective attack area, and single pillars are greatly affected by direction, making them unable to protect against projectiles fired diagonally.
Stone chunks
Stone chunks are natural resources with 50% cover efficiency, the weakest protection but still worth it. Their placing is similar to sandbags only that it requires hauling to previously set dumping zone lines, instead of construction. Helpful if you have no one well skilled in construction.
Deadfall traps
The only initially available defense that deals damage, can be rearmed but needs careful placement. Common locations are in the corners of your base where enemies will likely make turns as well as narrow areas even outside your base that receive frequent traffic. If it doesn't seem obvious to you at first, one way to find out is by carefully studying raids pathing from the map borders as they close in towards your base. Watch where they go through and starting laying blueprints but forbidding them (as you are currently being attacked).
When building deadfall traps, you must also leave free areas so that your colonists and friendlies can pass harmlessly or else they are greatly slowed while trying to tiptoe through them, and may accidentally trigger one in the process (a good example is a checkerboard pattern).
Traps made of wood are highly flammable so its best to place them on rock or soil far from grass or trees, where wildfires won't waste them. Stone traps can't get burnt. Either can be destroyed by explosions so they shouldn't be placed right in front of your walls as grenadiers will blow them away altogether.

Clearing the area
Once your basics had been covered, it's time to make improvements. On maps where flora is dense, it's best to clear the surroundings so that enemies won't have cover to fight, totally exposed to your fire. Use the "Cut plants" order to remove trees and "Haul" to haul stone chunks away, gaining berries and wood in the process, and make your stonecutters walk around less.
Clearing the area also prevents fires from reaching your base.
Mid-game defense
Cover
The "Fire Wall"

An effective cover design is to alternate 2 walls and 1 sand bag, by doing this you have 3 colonists shooting out of the same hole, 2 behind full cover and one behind low cover. This method can be expanded as long as there is room. For an added bonus, build a constructed roof over your colonists' heads to shield them from rain.
This structure narrows the effective attack area, forcing both sides to fire straight at each other.
Pros
- Gives excellent cover
- The walls stop some explosives
Cons
- May prevent colonists from ganging up on enemies
Cover removal

While sandbags already give you an advantage over raiders in terms of cover (65% vs 50% for stone chunks), removing all sources of cover near your base is still very useful when dealing with ranged enemies as they will then have nowhere to hide.
Haul all stone chunks towards a dump behind your defensive lines so enemies can't use them. Enemy snipers can shoot from up to 45 tiles away, though most raiders can't shoot that far, so removing chunks around 30 tiles away from your defenses can deprive many enemies of suitable cover.
Watch out for your crop fields, as colonists tend to move and lay out chunks in straight lines when planting on growing zone tiles, suitable for raiders to take cover behind.
Cover baiting

Once there's no suitable cover nearby, ranged attackers will scramble to find any objects usable as cover. You can exploit this by placing any form of low cover to attract them to a place where they can be dealt with more easily. Stools work good, though you should expect them to wear out quite fast under constant fire.
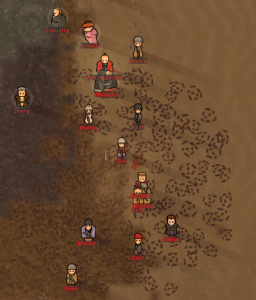
If the cover is hard to remove (such as plants and trees constantly regrowing in plant-rich biomes), you can manipulate stone chunks in ways that give them a disadvantage. For example, putting gaps between each chunk exposes the enemy behind to fire directed diagonally. And if your defense line is big enough, you can bait enemies into taking cover in such a way that leaves them flanked (see picture).
You can put traps behind the bait cover, which makes it slightly easier to trigger, though still less effective than chokepoints (see below).
Bunkers

A simple early game construct, effective across all stages. First, build a room in an area where you expect enemies to approach from, or convert one from the various ruins laying around. Simply build a structure in any shape and then deconstruct a few walls to make some holes -- these will be firing holes for your shooters, where they can use the walls as cover for 75% protection from enemy fire.
Bunkers should be built out of stone, as they are much more durable than wood or steel and are non-flammable.
Additionally, build a roof for your bunker to protect defenders from bad weather like rain and lightning strikes. So, when a raid comes and your shooters head to the bunker, they now enjoy the full cover bonus from having thick walls between them and the enemy, without an aim malus when it rains, and the floor they're on can remain free of movement-slowing snow.
To truly finish the bunker, add flooring so your colonists don't have to worry so much about fires while inside, and sandbags in the holes between walls to prevent enemies from gaining a diagonal angle shot bonus against your defenders.
Pros
- Cheap -- all it takes is whatever materials you use for the walls
- Simple -- just make a room and knock out holes for your shooters
- Upgrade-able -- can add turrets and extend or fortify the bunker
- Makes it hard for enemies to hit your colonists since they are behind full cover
- Full cover also stops explosive damage if the explosion happened outside the wall -- additional walls can be built behind your shooters to take advantage of this
Cons
- Should enemies overrun your bunker(s), they can turn the defenses on you to devastating effect
Pillboxes can be incorporated into perimeter walls, but make sure that there is no direct entry from there, such as by building a durable door.
Chokepoints

Chokepoints allow your colonists to concentrate firepower, killing incoming attackers effectively, as well as utilize traps to their maximum potential. They also allow you to seal off raiders' escape routes by physically blocking them off using your soldiers.
At its simplest, it involves the use of a single opening in a wall, coupled with a location for colonists or turrets to fire and beat them, sometimes with traps to catch some of the unaware attackers.
Chokepoints should be built with a turn to break line of sight, prevent enemies from firing into the chokepoint from the outside.
A strategy is to litter the choke with sandbags or rubble, greatly slowing down the raiders and giving you time to deal with them. They also prevent raiders from standing on them, forcing them into your defenses.
You can concentrate fire on a crafting spot or animal sleeping spot placed right in the entrance with miniguns to rip incoming raiders apart.
Slowing tunnel
One early-mid game tactic to slow down your enemies is by creating a narrow strip between your colony and potential areas where raiders could attack from, then alternating sandbags or debris with unoccupied space, close to the exit of the strip.
To stop them from using the chunks or sandbags to their advantage, build a turn to break their line of sight.
Don't put sandbags or chunks right next to each other, otherwise they will simply vault over multiple bags at once, reducing their slowing efficiency. An excessively long tunnel also prompts them to break in instead of entering through it.
Pros
- Fairly cheap
- Easy to build
Cons
- Does not deal damage
It is not necessary if you don't need extra time to set up defenses.
Traps
Understanding A.I.
Friendly AI will always prefer to move through doors and avoid traps, while enemies will prefer to go around structures by entering open spaces and are unable to see traps.

Because of that, trap chokepoints like this one are effective. Enemies will prefer to use the corridors rather than attempting to destroy doors as it would be more time consuming, and being unable to see the traps, they will trip them hopelessly. On the other hand, your colonists can safely pass using the door instead. Enemies cannot open doors unless they destroy them first.
Trap memory
Hostile factions can remember the tile location of your traps for a single quadrum, so long as any survivor manages to tell the tale by escaping the map. Factions keep this information to themselves and do not share with others. This is of course, once a trap has been triggered by someone walking over it only, causing them to attempt to avoid the tile in future attacks.
They will still walk over known trapped tiles in order to get to you, if there are no other routes available.
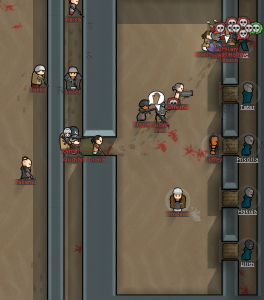
Roof trap
This clever trap is simple to set up and hard-hitting when triggered. It can be considered a giant single-use deadfall trap.
All you need to do is to erect 1 pillar made of a low-HP material, optimally wood, then build a roof over it. When raiders walk near the pillar, demolish it from a distance with a few long-range guns (or grenades if you're reckless). You can remove the home area near the pillar to prevent colonists from repairing it, then damage it until it can be destroyed in 1 hit.
After the pillar is destroyed, the roof will fall, crushing the raiders on the head, neck or torso and dealing up to 20 damage (though armor will negate part of it).
You can even put down some form of low cover such as stools to bait the enemy into going under the roof trap for 'cover'.
Triggering an IED trap near it is also very effective, with the advantage of being automatically triggered and dealing even more damage with its explosion.
This is technically more of a clever use of game mechanics than an actual trap, so raiders won't detect it, nor will they treat it as a trap.
Pros
- Large radius; easily injures a sizable group of raiders at once
- Penetrates shields
- Low cost; only 5 wood each for a single use
- No risk of friendly activation
- Undetectable by raiders, and position will not be remembered
Cons
- Hard to trigger; you may need to lead your targets
- Requires lots of space
- Low damage
- Rarely kills or incapacitates
- Cannot be used with killboxes easily
It is optimal for softening a group of raiders so it's easier to defeat them. You can also put them in multiple layers, but placing the traps too close will result in the trap not triggering properly.

Roof trap before triggering.
Roof trap after triggering, having injured some raiders (some through shields) and left a large pile of rubble.

More refined roof trap design with stools to lure the enemy into using them as cover, along with an IED trap to automatically trigger the trap. Significantly more expensive.


Damage minimization
These are ways to minimize damage done to your base.

Firebreaks
4-tile wide strips of metal or stone tiles is capable of stopping the spread of fires. This can negate many fires from reaching your base and burning it down.
You can build one surrounding your base, and divide the map into sections in order to control fires.
Keep in mind that building such amounts of floors usually requires huge amounts of building materials.
Walling structures
You should build an additional wall around your important structures, such as generators, power conduits or cash crops, even if you do have a perimeter wall in place. This causes raiders to prioritize other targets over these, averting destruction.
For geothermal generators, remember to have some exposed roof areas so the heat from the generator can vent out instead of being trapped inside.
Power network
It's not a good idea to have only 1 wire connect everything in your base, as one broken-down conduit can easily cause a blackout. Instead, create a backup power storage by building batteries hooked to the grid, but run through a power switch that is turned off once the batteries are charged. As a supplement, run power conduits through more than just one wall on your grid so that if you have a break in one line, you may still have power flow in another without needing to immediately build a new conduit.
Panic room

You can dig out a panic room deep into the mountains or build one out of very thick walls. This provides a good escape if you know that you can't defeat an incoming group of raiders, or you are losing and need retreat, provided you manage to get to the room in time.
- If you dig one out of the mountains, you gain immunity against mortar shells and innate temperature control. You will need to make many layers of doors (at least 6 layers) as the raiders will focus down the doors.
- If you build one using thick walls you have more flexibility in its positioning, and you don't need that many layers of wall - 4 layers are OK, since raiders will divert their attention to the walls as well instead of focusing down the doors.
You don't need to make the panic room big enough to accommodate the whole colony, as the point of a panic room is to preserve colonists in a dire situation so you can rebuild later on. Choose the colonists most important to you when it's time to escape to these rooms.
Panic rooms also need the following:
- Enough food to last 1-2 days at full capacity
- Medicine for the wounded, for injury is likely during the retreat
- Joy objects (otherwise colonists may face a huge -20 mood penalty)
If you want, you can put beds and tables to make sure your colonists don't feel too bad while cooped up inside. You can also choose to put building materials to seal up the entrance with cheaper and more durable walls. Putting resources inside also helps with rebuilding, though they take up space.
While inside the room, if you're down on your last door or layer of wall, assign your best builder to hold the door by repairing it, and make sure the others don't go out. Disabling firefighting for covering colonists or restricting them to the panic room can help stop them from leaving.
Consider building multiple panic rooms so your colonists have another panic room within reach if a raid blocks off access to one. You can also choose to build another exit so you can flee to another room should the original be overrun.
Mid-late game defense
Turrets
With the low firepower and high power usage of the improvised turret in vanilla, it is not a good idea to extensively rely on them, especially in mid-late game. However they do provide decent additional fire to lay on the enemy combining with gunners, and also serve as a distraction from your more valuable colonists.
Turret-reliant perimeter defenses are generally only viable for the first several raids, after which the areas will quickly get overwhelmed each raid due to not being able to focus fire on the numerous raiders.
While protecting the outside starting area, you may want to rapidly pause the game during raids and give orders to repair damaged turrets.
Remember that raiders will run from exploding turrets, and to get your colonists to run from them as well.
Pros
- Turrets provide additional fire support that doesn't require drafting colonists
- Turrets have a target size of 68%, making them more difficult to hit
- Turrets can be uninstalled just like furniture and re-deployed wherever they are needed, making their placement less of an issue
Cons
- Turrets can be outranged easily by rifle-armed raiders or mechanics
- Turrets require power, and suck up a lot of power when active -- but you can mitigate this with a Power switch
Building turrets out of Plasteel brings their health to 280 (up from 100), making them substantially more durable. This converts 75 of the 175 Steel cost to Plasteel, allowing you to save Steel for other jobs, and has the advantage of being less flammable.
Weaknesses
Turrets are vulnerable to explosives and EMP damage.
- Explosives deal immense damage to turrets. All forms of regular explosives wielded by raiders are capable of 1-hitting a steel improvised turret and leaving a plasteel one at less than half health.
- EMP stuns the turrets. Enemy EMP grenadiers can stun a turret for 20 seconds with each grenade, meaning they can constantly lock down multiple turrets, especially those put close together.
Turrets can be ignited, and are unable to put themselves out. Given enough time flames can debilitate the turret.
Long-ranged gunners can shoot from outside their range without retaliation from the turret. This includes Scythers with their Charge lance, making turrets less than ideal for fighting off Mechanoid incursions.
Turret emplacements
Sandbags can be placed around turrets to give them cover from gunfire. Turrets should have them to reduce damage taken both by the turret and colonists behind the turret repairing/shooting. This has the added advantage of making it harder for melee raiders to run from an exploding turret.
They should be spaced out by at least 3 tiles to prevent a turret explosion from damaging other turrets, potentially causing a chain reaction. Alternatively, use high-durability walls to block explosions from damaging other turrets and your colonists.
Turret chokepoint
Putting a turreted defense in a chokepoint with a narrow entrance and wide turreted area is best because it forces the raiders to take a single-file approach to where all the turrets will be able to fire on them.
There should be more than one line of turrets so that the innermost line or lines can be used to position colonists where they are not immediately under threat from grenades (grenadiers will target the closest turrets first) or if colonists are positioned closer so they can repair, to retreat colonists further back when turrets are about to be or have been destroyed. Every line of turrets should have a line of sandbags directly in front and every supporting wall/rock should also have sandbags to lessen the likelihood of collapse due to collateral damage.
Turrets should not be placed directly (within three tiles) next to other turrets for the same reason, as they have a chance to explode when critically damaged. Placing walls between the turrets can lessen the impact of explosions, allowing you to put them tighter, but remember walls can block line-of-sight and bullets.
Power management
Turrets should be turned off whenever not in use. However, it's hard to anticipate when they will be needed, given the random nature of events in RimWorld, and turning them on by then is usually too late.
To fix this, connect your turrets to a separate power network, reconnecting them if needed. To toggle them all at once, install a power switch in a convenient location. The power switch can be then used to easily toggle a lot of turrets at once, saving power.
Mortars
A mortar attack on siege and raids can be effective while the attackers are still preparing. It's fun and most times raiders would flee before begin their assault due to huge losses of men during preparation.
It also allows you to effectively utilize your colonists who are poor at combat, as mortar accuracy is unaffected by colonist skill, however colonists incapable of violence will outright refuse to man a mortar.
Always to remember to manually unassign colonists from mortars; if you don't, they will continue standing there until they eventually collapse from exhaustion, starvation, or have a mental break.
An important point to remember is that while your colonists are better at dealing with single or spread-out enemies, mortars are designed for heavily grouped enemies. If you diffuse your enemies, the mortars will not be able to hit the enemies easily.
Don't aim mortars anywhere too close to your colonists otherwise you risk friendly fire.
Mortar emplacements

Mortars need to be placed outdoors, so have shelves to hold the mortar shells. Set them to accept mortar shells only otherwise your colonists will haul random objects to the shelves.
Mortars also explode when damaged. Most of the time this isn't an issue, but if you're facing against a siege, an enemy mortar shell that scores a hit on your mortars can cause a chain reaction to rip apart your entire mortar emplacement, killing any crew manning it. To fix this, separate the mortars with high-HP walls that can survive at least 1 hit from an exploding mortar. Building mortars with plasteel also allows the mortar to survive a mortar hit, provided that the mortar shells don't explode.
Mortars can't fire at anyone within 30 tiles of it, so you will need to place the mortars deep inside your base for maximum coverage. It needs to be well-protected against intruders, for enemies that survive to come close to the mortars can wreck havoc on the helpless mortar crew, so you should pay attention and unassign the mortar crew to fight if necessary. It's best that you have your colonists standing guard outside, but if you need to you can always have a few pillboxes to defend the mortar base.
Explosive mortar battery
The most straightforward way of bombarding enemies, this simply involves building regular explosive mortars.
Due to inaccuracy, it takes at least 4 mortars to be effective, and around 8 mortars will be enough for most attacks. If you really want to overpower the enemy, 12-20 is good enough for a dense hail of mortar shells for dealing with endgame-level swarms. Any more is generally overkill unless you're facing up some really slow and tough enemies (such as centipedes).
Note that shield belts can easily mitigate the damage from the mortars, so be careful when facing enemies equipped with these. It's best to use EMP mortars, detailed below.
Incendiary mortars
Incendiary mortars deal low damage, penetrate shields and set areas on fire. The fire can cause disruption among the enemy ranks, as they frantically run trying to put out flames. That is if they can hit, as they suffer from poor accuracy as well.
It can be paired with brawlers, which allows them to close in with less firepower on them, and force the enemy into melee combat, preventing them from extinguishing the flames on them. Be careful not to hit your colonists though.
Be careful with incendiary mortars as the fires can spread across wide areas causing extensive collateral damage.
EMP mortars
EMP mortars are a highly situational weapon, yet are useful enough to warrant their placement in every well-built defense. It doesn't deal any physical damage whatsoever, but are useful against some specific enemies. It's recommended that you have around 4 in each base.
They have a large blast radius, meaning that their inaccuracy is less of a problem compared with the others.
EMP mortars are a must-have in case of a mechanoid raid. They stun them for a whole 90 seconds (much longer than the reload time of the mortars), allowing your colonists to close in on them and concentrate fire, or even engage in melee safely. You can keep on firing when engaging the mechanoids, even if you're using melee; you don't need to worry about the mortars injuring your soldiers.
They also excel at dealing with shields, instantly downing many at once, making them an excellent weapon against full melee charges.
Traps
As you unlock research, and obtain more manpower and resources, you can lay more traps to debilitate incoming raiders.
IED traps
Early on, you may want to focus on armed colonist defense with turrets, but as the raiders grow in number, it becomes more efficient to use a bit of metal to kill several at once than to invest a lot of metal in a turret that costs nothing to fire, but will explode rapidly due to large raider groups.
IED traps are extremely effective when used correctly, however in open areas they are mostly useless as the raiders are highly unlikely to step on any of the traps, and even if they do they're usually not tightly packed enough for the trap to cause serious damage. Thus, it is better if you combine traps with funneling to force the raiders together.
1 IED trap can trigger other IED traps in its explosion radius. This may or may not be desirable depending on the situation; you can easily set off a chain reaction to destroy a whole incoming raider horde, but also use up much more resources. They also damage nearby structures, such as walls or deadfall traps, so don't put too many close to each other.
- Rather than setting more IED traps near existing ones, you can just place the Mortar shells themselves, or even some Chemfuel on the ground for the same effect as a molotov cocktail blast. However, unless you can restrict them to placing just 1 of each it's more expensive to do so.
- Chemfuel has 50 HP, just within the damage threshold of an IED trap, but the shells have 70, so you will need to pre-damage them or leave them on the ground to deteriorate first if you want to use this tactic.
IED traps have a delay before exploding, allowing some raiders to escape. Raiders will attempt to run from an exploding trap, though the fuse is short enough to catch some of them.
Pros
- High area damage
- Raiders usually less protected against explosives
Cons
- High resource cost
- Single-use, non-rearmable
- Requires research
- Does not instantly trigger
IED incendiary traps
A variant of the IED trap that sets enemies on fire. It's a more situational pick compared to the regular trap, due to its incendiary nature.
Pros
- Distracts enemies while they are on fire
- Does not have a fuse (explodes instantly)
- Penetrates shields
- Raiders usually less protected against heat damage
Cons
- Low damage
- Not effective against Mechanoids
Its use requires strong support to be effective. With that, it is a good defensive choice against heavily armored, shielded or fast enemies, with the flames providing good distraction while your colonists shoot them down.
It synergizes great with brawlers, which will prevent the enemy from attempting to extinguish the flames while fighting.
Mountain trap
An extreme version of the roof trap using overhead mountains instead of constructed roofs.
To use it, you mine out a whole mountain except a pillar in the center. Then you damage that pillar until it has just a sliver of health left (40 or less for easy activation with a single sniper rifle shot). Mining out all the rocks at once will result in your colonists getting crushed by the trap.
It is triggered the same way as the regular roof trap, and has the same effect radius except victims are instantly killed and buried. The collapsed rocks spawned after this trap is triggered can be useful or harmful depending on the situation.
Rearming it is a lengthy process as you will have to mine out lots of rocks. This does provide a decent way to train miners though.
Pros
- Instantly kills any enemy
- Leaves no corpses
Cons
- Takes much longer and is more dangerous to re-arm
- You have to mine out everything then support the mountain roof with a low-HP wall; compare with regular roof trap which simply requires building the wall and the roofs
- Colonists risk death if you aren't careful
- No loot or capturable downed raiders
- Overhead mountains may not be easily available
In mountainous areas where overhead mountains are abundant, this trap can absolutely destroy any incoming raids, especially when combined with funneling.
Reactive firefoam poppers
You should have some uninstalled firefoam poppers on hand. When a fire starts and you need to extinguish or control it, you can reinstall them near the fire, and trigger them.
You can also use them as an anti-shield defense as they deal damage against shields, though you should be careful with friendly fire since they down your shields as well.
Firefoam on the ground slows movement speed of pawns by about a quarter. As it covers a wide area, this can be effective as area denial to slow down charging melee attackers, especially those that also had shield belts, though it does prevent the use of fire against them.
"Attention Suppressor"

Once you have lots of bulk materials, but don't have enough industry to build proper defenses, you can build an attention suppressor out front of your basic defensive line. This is usually out of wood, although the flammability of wood is a problem.
Start like you're making a 29-wide room, but instead of doors, just leave one-tile openings at opposite ends. That way it doesn't get a roof. If needed, use a no roof area. Down the middle of the attention suppressor leave an open path, which will actually be traveled by your colonists. Pack the sides with alternating walls, leaving numerous blind alleys branching off the open path. The attention suppressor should look like two giant combs facing each other across the path, or perhaps like a cutaway of an especially-blocky sound suppressor.
A raider entering through an attention suppressor is presented with numerous blind alleys, each one of which could hold something important (in their perspective). Raiders will typically only resist the lure of a dozen or so blind alleys, after which they'll turn off into a blind alley to look for something to attack. In many cases they'll attack the walls, but the general effect is that a raiding force will spend a long time milling around in the attention suppressor, deeply distracted, and slowly trickle out of it toward your base alone, or (for a large raid) in twos and threes. This slow trickle of raiders is easily handled by a few colonists with basic weapons, or later a few turrets and a repairer.
Colonists and visitors with specific business on one side or the other of the attention suppressor will go quickly down the middle without being distracted. However, colonists pursuing joy activities like going for a walk will usually be diverted to do so in the blind alleys of the attention suppressor. As a result, it's not safe to fill with deathtraps.
Pros
- Effectively distracts and delays raiders
Cons
- Does not deal damage
- Takes up large amounts of space
- Expensive and time-consuming to build a lot of walls
- Makes it harder to eliminate all raiders at once
Overall, this can be a decent solution to delaying raids in early-mid game if you have the effort and materials, but as you enter mid-late game it's better that you replace the suppressor with something else (such as a killbox) which can actually bring the hurt.
Killboxes
| This article is a stub. You can help RimWorld Wiki by expanding it. Reason: Please add a reason . |
Killboxes are in general heavily trapped, armed areas where enemies are funneled to so they can be destroyed easily.
They almost consist of a funnel which directs raiders into it, like a wall with a single opening.
Raiders will then trickle in, allowing colonists or turrets to concentrate fire on them, or traps to destroy them while they try to move in to attack.
This is an extremely effective way to defeat most raids, as the enemies will often be overwhelmed by the sheer firepower raining on them. It also allows effective use of traps, as funneling enemies greatly increases the chance one's going to trigger them. A well-built killbox can easily neutralize the threat of raids, to the point where some players refuse to use them since it takes the fun out of the game.
Note that sappers will attempt to mine into the base away from the killboxes, so make sure you have an effective coping strategy.
Building
You should double wall your killboxes as the sheer firepower raining on your enemies will inevitably destroy some of your own walls by accident, allowing raiders to flood into the killbox from another direction, bypassing traps and overwhelming your defenders.
Include sources of cover from around the killbox where your colonists can fire on incoming enemies. For increased firepower you may build turrets as well.
Entryways
Any entryways of the killbox should not be straight, otherwise raiders will simply fire using the entryway as cover. Instead, you should have a turn to break line of sight, prompting the raiders to enter an area where you can get them easily. For better effect, put a grave or other similar object that raiders can't stand on.
The below shows the results of different killbox entryways.
Right design of a killbox entryway. Raiders are prompted to move into the killbox, sometimes so close that they prefer to melee attack instead of shoot.
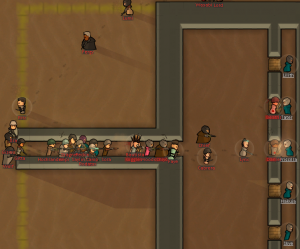
Wrong design of a killbox entryway. Raiders are bunching up in the entryway, using its walls as cover.


Don't make your entryway excessively long, otherwise raiders will think it's not worth it going such a distance and will decide to go for something else instead. Manhunters however will still chase colonists down a long corridor or over extreme distances, so you can have some dedicated anti-manhunter killboxes with extra-long corridors for this purpose.
For better effectiveness fill the entryway with deadfall traps, some IED traps (not too close to each other, otherwise they will set off a chain reaction) to soften the raiders before you fire on them, and alternated chunks or sandbags to greatly slow them down. Make sure that the walls are durable enough to withstand explosions if you will be using them.
If your entryway is long then you will need to build doors to allow your colonists to enter without setting off your own traps or having to go through all the obstacles.
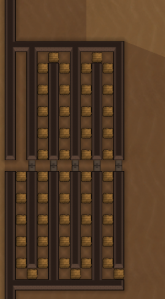
Entryway with alternating sandbags to slow raiders and doors to provide access. Slows raiders but not colonists.
Same entryway but with deadfall traps. Deals heavy damage to incoming raids but costs a lot to build.


Equipment
Colonists defending in a killbox will be shooting at a large number of targets no more than a few tiles away (usually). Thus, defenders should use close ranged high damage weaponry for firing at raiders.
- Charge rifles, heavy SMGs, pump shotguns or LMGs work good in killboxes, being able to dish out hurt at close-mid ranges.
- Chain shotguns inflict extreme pain at killbox range, even surpassing the charge rifle in DPS as long as the targets are closely grouped.
- Miniguns are excellent at attacking the bunched-up raiders inside a killbox. While it won't hit its intended target, it will hit everything right next to it, inflicting heavy damage.
- For maximum effectiveness focus it on a crafting spot at the exit of your killbox where your colonists will face the invaders. Remember to have fortified walls as many bullets will hit them instead of the raiders.
- Bolt-action rifles or assault rifles are useful for larger killboxes for reaching further targets, though they are not recommended for smaller ones due to their lower DPS.
- Don't bother with sniper rifles as they can't deal enough hurt to be effective at close ranges.
- Grenades are good if you can time them right. Throw them at the entrance where each explosion can hit a tight group of raiders, especially if they're slowed down with obstacles. Don't throw too many otherwise you'll demolish the walls of the killbox.
- Have melee colonists with longswords standing nearby as raiders who enter your killbox may decide to melee charge you instead.
Turrets
You can put turrets in place of colonists in a killbox. They deal moderate damage at close ranges, with the restricted space of the killbox offsetting the underwhelming long-range damage of the basegame improvised turret. A few can be deployed to provide additional firepower, ensuring victory.
You may also choose to fully arm your killbox with turrets, with enough to single-handedly take out raids (especially in tandem with traps). Doing this allows you to defeat raids automatically without the need to divert colonists from other jobs, but eats up lots of power and is vulnerable to solar flares, so you will need to have a backup plan.
Situational constructs
Crashed ships
Versus Poison ship and Psychic ship: Mechanoids have long agro range around 40 tiles from their spawn point. The larger the map, the easier it can be to deal with them, as long as the ship crashes away from your base. Though these ships are "time bombs", instead of immediate action, you can spend a few days building preparations before engaging them. Use the "Plan" feature in the Orders menu to draw a 40 tiles straight line so that you can have a visual length field and build one or two "Fire Walls" based on your weaponry. With bows of 30 tiles range, you will need a middle wall and a last wall, the first just to lure them with cover and the second to fire at them. Place some deadfall traps right in front of your sandbags, and rearm them as needed. Always make sure you have a safe pathing between your last wall and your base, so that when you see them coming fast at you, there's safe cover nearby until they retreat back to the ship, at which point you can repeat the same procedure.
You should use EMP mortars to stun the mechanoids, making them helpless hunks of metal. As they tend to spawn very tightly packed, the EMP mortar blasts are extremely effective against them, being able to stun a large number at once. As the ship part also blocks EMP pulses, build multiple mortars to fire a volley, in order to hit all the mechanoids at once.
Building IED traps right next to the ship will instantly trigger the ship's mechanoids to swarm out. However, building them 1 tile away does not trigger it, allowing you to use them to weaken a mechanoid swarm (though you may have to manually trigger them). Don't build too many or you will vaporize the mechanoid corpses which can be deconstructed for resources.

- Progression
- Quickstart Guides • Basics • Intermediate Midgame Guide • Advanced Endgame Guide • Ending the game
- Scenarios
- Lost Tribe Guide • Rich Explorer Guide • Naked Brutality Guide • The Mechanitor Guide

- Survival
- Extreme Heat Guide • Extreme Cold Guide • Extreme Desert Guide • Ice Sheet Guide • Sea Ice Guide • Events Guide
- Combat
- Defense tactics • Offense tactics • Weapon Guide
- Construction
- Colony Building Guide • Defense structures
- Production
- Food production • Money making guide
- Other
- Skill Training • Permadeath save conversion guide •
Ideology Min-Maxing
- Security
- Barricade • Sandbags • Spike trap
- (research)
- Autocannon turret • Foam turret • Mini-turret • Rocketswarm launcher • Uranium slug turret • Mortar
- IEDs
- IED trap • IED incendiary trap • IED EMP trap • IED firefoam trap • IED smoke trap • IED antigrain warhead trap • IED tox trap
- Related
- Antigrain warhead • EMP shell • Firefoam shell • High-explosive shell • Incendiary shell • Smoke shell • Tox shell